
How to Paint Wooden Furniture
I know-this post has been a long time coming! After I wrote about my painted freecycle furniture, lots of you asked for a tutorial about how to paint wooden furniture and I'm finally getting around to it.
While I'm not a professional painter and my paint jobs aren't perfect, I hope that reading about what I've learned will be helpful to you.
Before I start, though, I should probably warn old furniture lovers to leave until this post is over. I don't really have any qualms about painting old, beat-up furniture, and so the pictures here may be slightly horrifying to you.
Ahem.
Sanding
The first order of business is, of course, sanding. Don't be tempted to skip this step...proper sanding will ensure an even, smooth finish that is not prone to chipping.
I use an orbital sander (this Bosch is the one I use), but other small sanders would work just fine too.
I wouldn't really recommend hand-sanding unless you are very strong/patient. It takes a LOT of sanding to remove old paint and stain, and I would get very weary of sanding if I had to do it manually.
I get tired of sanding even with the orbital sander!

I usually start out using 80 or 100 grit sandpaper, especially if there's a durable lacquer finish on the piece. Once most of the stain/paint has been removed, I switch to 150 grit or higher to get rid of any remaining stain/paint, and to smooth out the surface.
Invariably, the pieces of furniture I've gotten have had areas that are impossible to sand with the orbital sander. So, once I've sanded everywhere I possibly can using the orbital sander, I sand the rest by hand.
Depending on the size of the area to be sanded, I sometimes use a sanding block, but most often I just use a piece of plain sandpaper, since it can be bent and folded to reach into awkward areas.
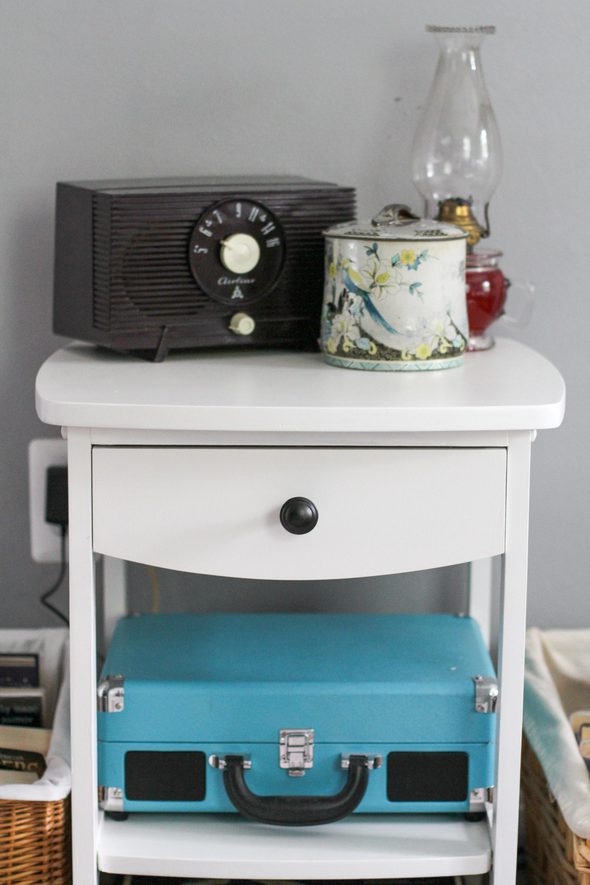
On this nightstand, for instance, I was able to use the orbital sander on the top, sides, inside, and on the lower front piece, but it was useless on the trim pieces below the top and below the drawer. So, I sanded those with a small piece of sandpaper. I did manage to get almost entirely down to the wood grain here, but that's not always necessary.
As long as you sand enough to remove the sheen, the primer and paint should stick.

Some of the older pieces of furniture I've received have had tops made of something similar to formica (maybe it is formica? I don't know.)
When I'm dealing with a piece like this, I just sand the top until it's no longer shiny. It won't be pretty and clean looking, but it will hold the primer.

Once you've finished sanding, it's important to remove all the dust, as residual dust will keep the paint and primer from sticking.
I often use a damp cloth, or sometimes I use a dry cloth and then follow that with thorough vacuuming.
Priming
Now comes the fun part! (I hate the prepping).
Once your piece is all clean, you're going to need to prime it. I prefer to use a spray primer, as it usually gives a neater, thinner coat than a brush-on primer does. The brand I use is Painter's Touch, which comes in gray and white.
Obviously, gray is best to use under dark paint colors, and white is best for light colors.
When you prime, you want to do several very thin coats. In fact, when you do the first coat, it should barely look like you've even primed. Let the primer dry for 10 minutes or so (depending on the weather conditions), and do another coat.
Let that coat dry, and do one or two more coats. The furniture should be almost completely covered in a thin coat of primer at this point.
However, if there's a bit of wood still showing through in places, I don't sweat it.
Depending on the wood type, I sometimes need to sand before the last coat of primer goes on (the primer can raise the grain of the wood). If the top of the furniture doesn't feel smooth when I run my hand across it, I just run the orbital sander lightly across it, using fine grit sandpaper. I wipe it off, apply one more coat of primer, and then I'm ready to paint.
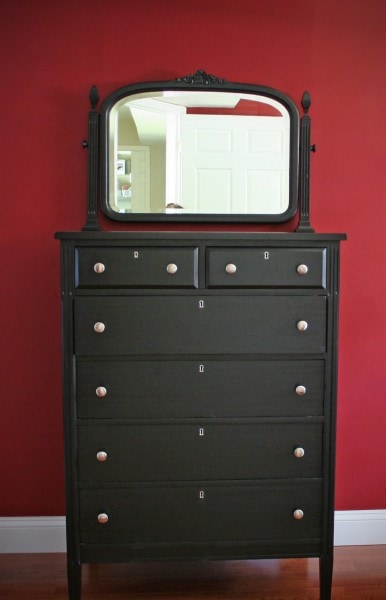
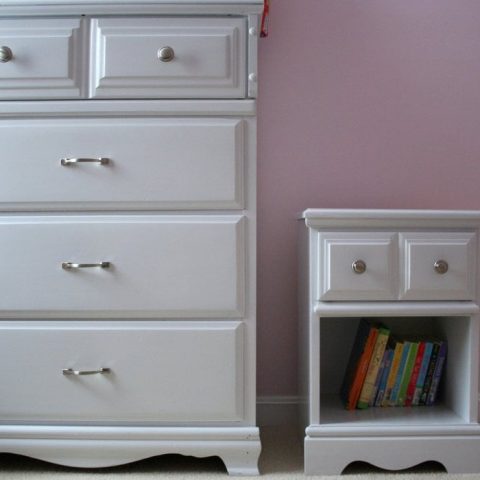
This is how my pieces usually look when I'm done priming.

Painting
Ok, on to the painting! Here's the paint I use:

This is sold at Home Depot, but I would imagine that something similar is sold in other stores. This paint is thinner than ordinary paint, which makes it easier to achieve a smooth finish. It comes in several different sheens, but I like to use the semi-gloss.
(UPDATE-9-2012: My last can of this paint was a bit on the thick side. I'm not sure if that was an anomaly or if Painter's Touch has changed their formula. If yours seems as thick as regular paint, that's too thick. Stir in some paint thinner until the consistency is sort of like a thinnish cream soup. Thin paint will help you to achieve a smooth finish.)
A can this size costs about $8, and it goes incredibly far. Just to give you an idea, the 2 ¼ cans I've used so far have covered two dressers, three nightstands, a chair, a desk, and a file cabinet.
Mix the paint well, using a paint stick (these are free at the paint section of most hardware stores). Using a clean paintbrush (I use a regular bristled brush, not a foam brush), brush on a very thin first coat.
Just as with the primer, it's very important to do a number of thin coats. I don't think I can overstress this...5 thin coats are much, much better than one thick coat. The thin coats look better and they will be more durable.
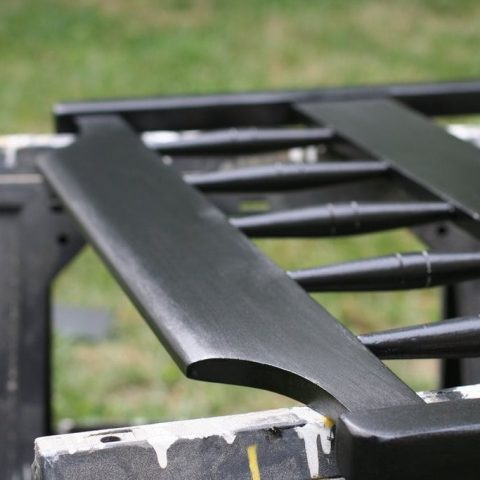
To give you an idea, here's how sparse and thin my first coat of paint was.

I have found that when you're painting a large, flat section(like the top of a dresser), it's best to use long strokes that cover the entire length of the piece. This will help to ensure a smooth finish with an even gloss.
This paint dries very quickly, so as long as you're not painting in very humid conditions, by the time you've put a coat of paint on the entire piece of furniture, the area you first painted should be dry again. If it's not, wait 10 minutes or so, and apply another very thin coat. Repeat this process until the furniture is painted to your satisfaction.
If you sanded down to the wood, you've been careful to do thin coats of paint, and your piece of furniture is made of nice wood, you should still be able to see some nice wood grain through the paint like so.

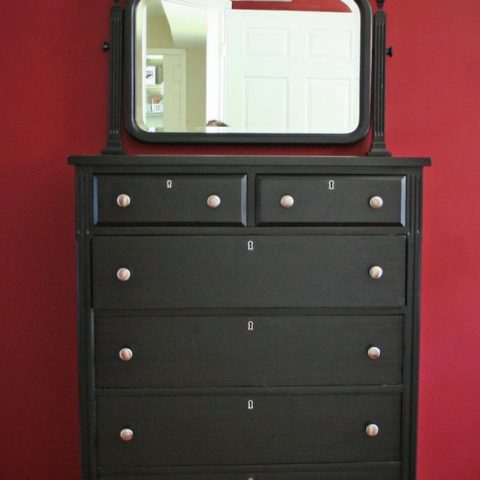
You can also see an example of the grain in this post (just scroll down) about one of my black dressers.
That's the extent of my painting wisdom...in a nutshell, if you sand thoroughly, clean the dust off well, prime with several thin coats, and paint with several thin coats, you should be able to turn out a piece of furniture with a smooth, durable finish.
And if you're anything like me, once you see what an enormous difference paint can make, you'll be hooked and you'll start looking around for more stuff to paint.
Happy painting!
P.S. This post also appears on BobVila.com as a guest post. Long after I published it here, Bob Vila's team asked if they could share the content on Bob's site, so please don't worry that I stole it from him. My content is on his site, not the other way around!
______________________________________
If you'd like to see some more examples of my painted furniture, check these posts out.
Black Paint:
White Paint:
A nightstand and dresser from freecycle
You can also use this method to paint picture frames. Here's how I did that with three frames from Goodwill (plus you can see a little side table that I painted.)
________________________________________
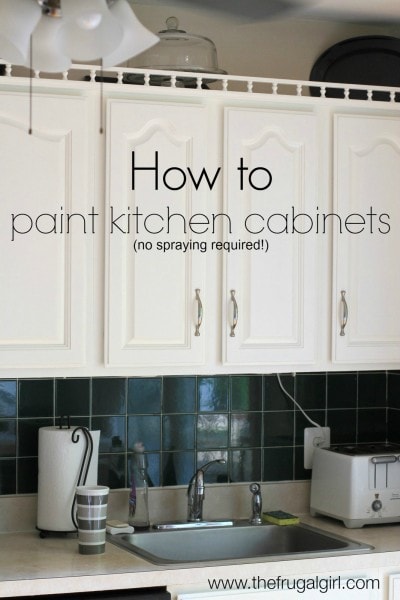
Wondering about cabinet painting? I used a slightly different method, since I didn't want to use spray paint inside my house. Here's how I painted my kitchen cabinets without doing any spraying.
Browse my other furniture painting projects

A white twin bed with drawers
A craigslist pine bed, painted white
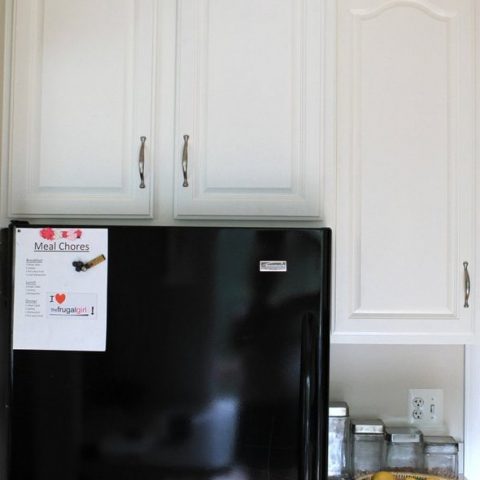
Before and afters of kitchen cabinet painting
I turned my pickled oak cabinets white with Benjamin Moore Advance paint.
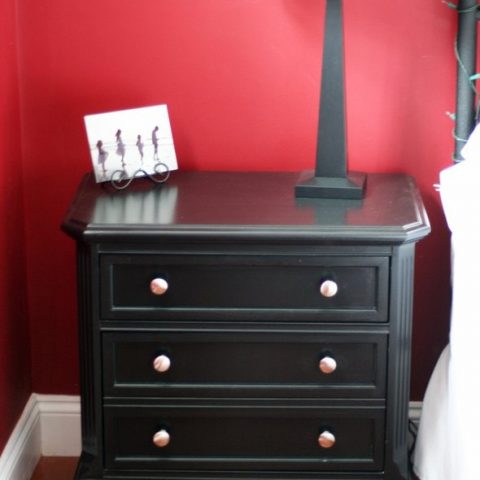
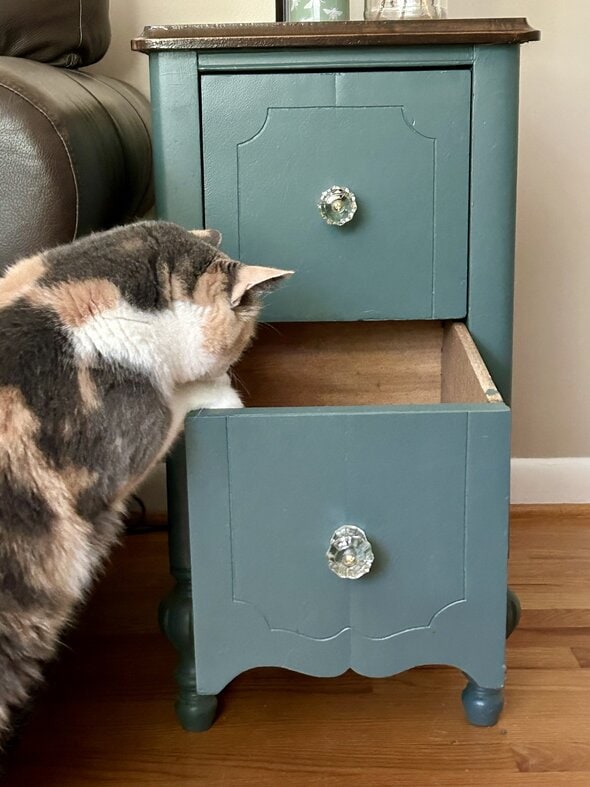
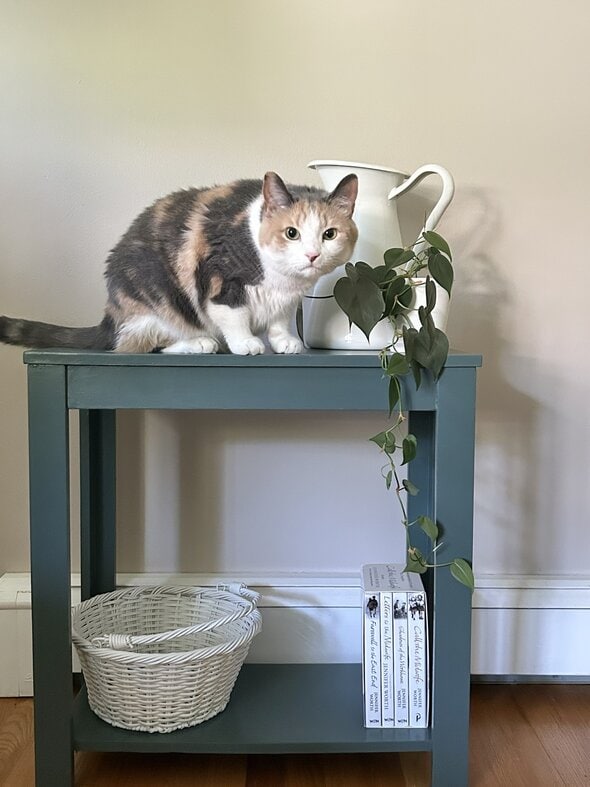
A duo of Goodwill nightstands
I painted a pair of nightstands from Goodwill to replace our old Ikea nightstands.
Before and afters of a tallboy dresser from Freecycle
This dresser was in really bad shape, but a coat of paint fixed it up very nicely.
A freecycle nightstand
It almost perfectly matches the freecycle dresser!
A freecycle dresser and nightstand
Here's my first foray into white furniture painting.
Twin beds turned white
An unstacked bunkbed set, made fresh with Benjamin Moore Advance paint.
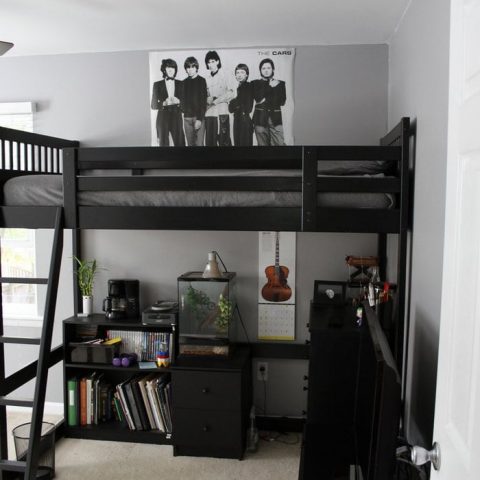
Black Ikea loft bed
I turned a walnut craigslist loft bed black.
Black hand-me-down bed
I fixed a terrible paint job from the past, when I had no idea what I was doing!
THANK YOU, this was awesome advice!! I cant wait to REDO the desk I got from the habitat resale store.
I'm so excited to try and refinish a $5 end table! My can of painter's touch does seem thick. What did you use to think yours? It sounds like latex paints are thinned with water but I have no prior experience!
Yep, you can just use a bit of water to thin it out!
Thank you for identifying the kind of paint you used. I was wondering which type of paint to use on an old kitchen table. I want to paint it white but was worried that it would have that stickiness to it, even after it dries completely. Do you find your furniture feels sticky to the touch? For example, I painted my mantle white and now whenever I move some candle sticks to dust, they sort of stick to the mantle. On one occasion they left a mark on my white paint. Any ideas or did I just use the wrong paint? I believe I used a semi gloss latex paint.
Nope, this paint doesn't end up sticky! I've always had that problem with latex wall paint too, but this stuff dries to a hard finish.
Also, it's important to do multiple thin coats instead of thick coats. For whatever reason, thick coats of paint seem to dry more sticky.
Wonderful post! I wondered whether you spray painted the actual paint or used a brush. Now I know! Thanks for the info about what type of primer ans paint you use. This information will come in handy as I am diligently scouting around for old wood furniture to give new life to and use on our porch. (we live out there spring thru fall!)
Thank you go much! My parents have a set of adirondack chairs that my mother (for some reason) decided to paint bright yellow several years ago. She's made a couple of comments since then indicating that the color didn't turn out quite the way she wanted, and I was thinking about going out there for a week this summer to help her repaint in a less traffic-stopping color. This information is really helpful!
oops... meant "so", not "go!"
You did a wonderful job! I wish I had the confidence to rehab furniture such as this myself! The lines on your piece are beautiful.
Thank you for this post. It was the primer that I have been missing when I have painted--how obvious! And if you got that gorgeous dresser with mirror in the first pic off of Freecycle, then I will be moving to your area! Most of the freecycle furniture in my area is junk.
Thank you for this! I have been eagerly anticipating it since you mentioned you were thinking of it, and this will easily be the most helpful thing I've gotten from your blog. I have an ugly dresser in terrible shape that will work nicely as a learning project. It looks like the "before" pix of Zoe's nightstand, but it's a 5 drawer like her dresser. In fact, it was the "before" pix that inspired me.
Thanks so much for the inspiration. We have been struggling financially for about 10 years now on one income and it is so hard to see beautiful things and not have them. I recently just missed being able to buy a bedroom set that I could actually afford at a low price and was quite depressed looking at my old crappy dresser and nightstand. But your site inspired me! It isn't real wood, but I'm pretty sure if I follow your methods that I will have something that is better looking than the fake wood look it is. I have always sanded down real wood furniture and stained it, but never painted it...I love the look of wood too much! But your method gave me a whole new outlook to my sad old furniture and I am actually excited to try it now! Thanks again and please keep posting your discoveries and results!
Thank you so so much....I've looked everywhere for advice on painting furniture.....and yours is by far, the easiest to understand. Thank you for taking the time to do this for others.
Awesome instructions. I have been looking for such instructions to paint the arm handles of my ikea chair... this is the best I have found!
this furniture looks great. i have an old 70's wooden roll bar. it has locks similar to the dresser above. how did you avoid them?
Atlanta Boy, I was able to pry the face of the lock out with a screwdriver. After they were off, I painted the drawers. I spray painted the locks with brushed nickel spray paint, and then pressed them back into the drawers.
Hope that helps!
Thank you for the tip about removing the old lock face plate! I am painting my old dresser with Annie Sloan paint and was trying to figure out how to 'mask' the locks! Duh, once I read your post about prying them off (they had itty bitty tiny little nails holding them on, which I didn't know), anyway - it took me just seconds to remove them!! ...on to painting!!! Thank you!!!
Perfect! So much easier than trying to paint around them.
Thank you so much. Weather permitting (darn rain) I will attempt this project.
I am curious. What color did you use for the dresser and mirror? I love it and am looking for something similar in one of my pieces. You did such a great job.
You have a great and wonderful talent. Thank you for sharing your ideas and pictures. I am very inspired. Keep up the great work.
Wow! your dresser looks great. I have an old vanity that I have been wanting to rehab and your instructions are so easy to follow...thanks! How did you avoid getting paint on your mirror? My vanity has three mirrors and I don't want to do anything to mess them up.
Erin, I put newspaper down on it and taped the edges. It was sort of painstaking work, but I managed to keep the mirror nice and clean.
I was going to ask a similar question re the mirror on your black dresser, since I have one just like this on top of a half dresser, oval in shape, with the OLD beveled mirror in it.
When you say you put newspaper down and taped, do you mean you had the mirror lying flat, then did a large piece of paper on the mirror, then taped? Were you using painters' blue tape or masking tape? Also, then did you paint the frame of the mirror with a brush?
Thank you SO much!
Paula
Yeah, I had the mirror off the dresser. I laid it flat on the ground, spread newspaper over the mirror as best I could, and then carefully taped all around the edges of the paper, so the tape covered the distance from the newspaper to the edge of the mirror.
Definitely use blue painter's tape or green frog tape...those are a lot better than regular masking tape in my opinion.
Hello, love this tutorial! I actually got an orbital sander for Christmas and can't wait to paint the dresser for our daughter's nursery (due in april). Do you recommend a coat of polyurethane on the top of the dresser? Since I'll be using the top of the dresser as a changing area, I worry that all the ware and tear will chip the paint. Thanks!
KB, I have not done that before, but it's probably a good idea, especially if the color you're using is light.
The only time I've had problems with chipping has been when I've painted something that wasn't real wood, or when I haven't sanded sufficiently. But polyurethane would be a lovely just-in-case measure!
Thanks! I think I'll just brush a few layers of it on the top of the dresser since it'll be the changing area and will get lots of use and abuse :o)
I love all the furniture you've done!! I just started painting some brass lamps that I had received and disliked, lol! I absolutely love them now and have the painting bug, lol! I wanted to know if you use polyurethane as a protector or anything for the furniture?
I haven't yet, but it's a great idea for a piece that will be used and abused.
Yes! I finally re-found this when needed. I bought a trunk to refinish this weekend - woohoo!
Ok, so I have decided to give this a try. I am so excited. I have recently moved and have taken my old (very old) furniture with me. All the pieces look awful, but I cannot part with them for two reasons: 1. I don't want to spend loads of money on new furniture, and 2. For sentimental reasons. I have started with the sanding and as you mentioned on an earlier post, it's almost impossible to sand some of those detailed nooks and crannies. I have hand sanded them down some, but it is almost impossible to sand all the finishing off. Does it show after you paint where you haven't sanded all the way down to the grain?
It really doesn't seem to make an enormous difference in the nooks and crannies. The large, flat surfaces are where really thorough sanding is necessary for a neat appearance. I use the orbital sander on those large surface and I can usually get almost all of the finish off. The tricky small spots I sand with sandpaper, and I just do the best I can. The important thing is to get any shiny finish off so that the primer and paint will stick.
Hope your furniture turns out great!
I wonder if a Dremel tool would work?
Thanks so much for the advice. I really enjoy all of your blogs. I just got done sanding the biggest of the two pieces. Next comes the primer and paint. I will let you know how it turns out. Also, thanks for this post. It has really made this process run smoothly so far. I'm sure it will get me thru the rest just as well.
Thank you soooo much for this! I followed your advice to paint both a play kitchen I refinished for my girls and also to finish a piece of furniture my Dad and I built. Rustoleum Painter's Touch works beautifully!
Great tips, question for you, is it not better to paint with flat and then varnish in a satin or semi gloss paint? It doesn't sounds like you varnish your furniture after applying the semi gloss paint you recommended from Home Depot? Thanks in advance!
I haven't varnished mine before, but it's probably a good idea to make the finish more durable.
Thanks for the advice. I'm going to try painting a large fleamarket shelf find!
I hope it turns out as nice as your projects 🙂
I have a lot of furniture that I really want to re-paint. i don't have a sander, but can i rent one from somewhere? thanks!
Looks great! I have a question though. Do you ever have trouble with items sticking to the paint after you let it thoroughly dry? I have this problem and am not sure why.
I haven't when I use Painter's Touch. With regular latex paint I have indeed had that issue, though.
Great job you've done here. I'll try this one on my center table. 🙂
What an excellent tutorial--thank you for giving this "rookie" the knowledge and courage to take on a project. I just put a second coat of black on my nightstands and will do one more tomorrow. $12 to rent the sander, $11 for paint and primer and $24 for 12 new knobs, and it's like I've got two brand new pieces of furniture. Beats the $200 I was ready to drop at Ikea for 2 new nightstands (and I don't have to put them together!!)
Let me just say that you are amazing!!!!! Ive been searching every website on instructions on how to paint my ugly bedroom furniture. Can I paint over fake wood that is very light to a nice black color?
Yep...just sand it down as much as possible and make sure to use primer. A clear coat of polyurethane might be a good idea too.
Thanks for posting this tutorial--I've had it bookmarked for awhile. I purchased a dresser/hutch from Goodwill today and started sanding. Hopefully I'll have a beautiful "new" piece of furniture for my craft room very soon!
Thanks for this informative post. I bought a great table set a garage sale that was the wrong stain and am refinishing them in a nice black. I've finished the first of the three and it turned out great!
Thanks for this wonderful post. I am following your exact directions. However I wanted a country blue, not available in painter's touch. So I custom made it with wall paint. The person told me to use a semigloss transparent/clear coat on the painted furniture to protect it. Is this necessary?
Thanks, Sandhya
If the piece is going to receive a lot of use and abuse, then yes, a clear polyurethane coat is a good idea. It'll just protect the paint better.
Happy painting!
Thank you!
S.
I was inspired by your post and have painted three items since reading it. Thank you! Although I didn't do a key step of using a powersander, I felt like there was power in just trying for the first time, because now I know I really won't have to buy most basic wooden furniture items (there's so much on the street!).
I am building an aquarium stand for the tank I setup at my wife's office. It will be a very simple box made of 3/4" hardwood ply...I know I know, why would I paint that and not stain...basically because I have the material on hand.
My plan was to just prime it, paint it and call it done but I was wondering if there is some product I could finish with that may have some water resistant qualities...unless you think lots of coats of paint would suffice. I also don't want a really glossy finish.
TIA!!!
If you want to add a layer of protection, a coat of two of low-gloss polyurethane would probably be a good idea.
And I would totally paint it instead of staining it...plywood doesn't look that great stained but looks great painted!
Hi there!
I really love your blog! I actually have two old dressers (as in I got them 20 years ago and they were already second or third hand!) that have probably more than a dozen layers of paint (I only painted them once, but who knows about the previous owners) and I really wanted to bring them back to their woody glory, if possible. Do you think that sanding the paint off would work in this case? Do you have any suggestions for that? Thank you so much!
If you've got tons of layers, maybe a stripper would work better. There might be some green strippers available.
You can always sand them, but sanding through multiple layers can take a very long time, depending on how well-adhered the paint is.
Can I put a polyurethane coat on top of latex paint? I've found that dressers I've had when I was younger that my mom painted with latex paint ended up being gooey And would peel off. I use my vanity daily and have heating tools on it; I need a finish that will hold up.
I have a dresser that had veneer too. It was chipped pretty bad, but I think we did a great job.
http://allycents.blogspot.com/2010/12/dresser-for-baby.html
This is excellent. I was looking for something like this... it's amazing how useless Google can be in those first few results 🙂 I can't wait to try your tips once it warms up a bit in the garage!
Thank you for this wonderful tutorial! Exactly the kind of thing I was looking for---I'm not so intimidated by the repainting process anymore!
what did you learn about curlicues from orbital sander?
I bought an old '69 chest sort of thing very similar in style to yours...I loved it when I saw it, but when I got it home realized the lines is what I loved, not the wood or the "handpainted" floral motif in center of top drawer. My husband thought I was crazy but I still wanted to paint it....he did say "fine", but you have inspired me to go for the gusto. I think your project looks lovely, modern, clean, but with beautiful old style lines about it. I was a bit leary of painting it just for the fact of what someone would say about it, as far as being basically antique, but I didn't go "antique-ing" (sp?lol)....I just bought something I loved! I think painting it would also bring a more calm feeling to it & bring more attention to what I place on top in front of the mirror. Thanks & sorry for long post!
I'm going to be painting my dining room chairs and table, black. I love the pointers you gave on how to do that...how long though should I let it all dry? I have a busy family who eats at this all the time! Will we be going out for the next week? 🙂
I stumbled on your post while hunting around on the proper way to repaint wooden furniture. I want to change some pieces in my daughters room from light walnut to white. I am nervous! But I think I can handle it and it will be much cheaper than trying to buy a new piece of furniture. Thanks a bunch for the post!
Looking for the best way to get a good paint finish on my bedroom furniture. A very helpful post. Thank you.
Just wanted to say thanks for the helpful post. I am a painting virgin but feel inspired to give it a go. Am usually the kind of person to just throw things away and buy new but I am desperately trying to watch the purse strings so I am going to turn my dark wood drawers into black ones and hope for the best. You make it sound so simple!!
I am in Dubai and it is VERY hot now - is there anything I should look out when doing this in the heat? You mentioned humidity - is that a hige problem? Should I wait until it cools down a bit? (in a few months time!!) I can do the actual priming and painting indoors if need be.
Well, if it's really humid, I'd wait until a less humid time of year. Paint has a hard time drying without being tacky if the air is really humid. If it's just hot and not humid, you should be ok, though.
I think the paint can specifies what conditions are good for painting, so read the label and that should help you to figure it out.
Thank you so much for the simple breakdown of instructions! I was Leary before I found your blog because everyone told me not to paint wood. I just painted my son 's nightstand and dresser and....I love it! I might even try white on my daughter's dresser!
I'm going to be painting whight over a light cream colored sleigh bed. The cream paint job is in good condition. Do I still need to do so much sanding and priming?
Thanks!
You'll still want to sand the surface to make it a little rough and to take the existing gloss off of it. Typically painted furniture has a clear gloss finish on it, and paint won't stick to that. So, sand just enough to take off the gloss and then proceed with the primer and paint.
I was happy to come across your page. Thanks! I am doing the exact same thing with the same products, but the espresso stain finish. (Mine is one of those ubiquitous oak dressers from the 80's oak furniture stores.) The primer went great, but with that first coat of the espresso, I was sure something was wrong. Talk about streaky! And primer is supposed to make paint go on nicely, not all streaky! I guess it's just the way the paint works and you have to do tons of coats. I am on coat 4 now and it's getting pretty good. Honestly though, next time I will seriously consider using house paint. It covers soooo much better. Does it really chip more easily?
Can't say the same about coverage as you did. This 6 drawer horizontal dresser is going to take just about the whole quart.
I don't like a solid color because you see every mark, so tomorrow when it's all dry, I'm doing a colorwash over the top with a metallic bronze or copper.
Ok, I have a whole load of furniture that's stained rele dark brown, it is rele hard to get all the stain off. So I was just wondering if I have to get it all off? Thank you!
Nope, you don't have to. If you want the wood grain to show through, it has to come off, but if you don't mine a more plain finish, all you've got to do is get the gloss off so that the paint can stick.
Thank you! <3 *Will it look funny if some of the color is off and some is left on? Because it is stained. So I can't get it all to come off.
Nope! The paint is opaque, so it should look just fine.
I'm super excited to try this. I just got a used piece of furniture to try this weekend. What kind of brush would you recommend using? Some people have told me to use a sponge brush? What do you use?
I just use a fairly inexpensive regular paint brush and it works fine.
I just went to buy my supplies and they said at Home Depot not to use the Painters Touch Primer spray paint with the Painters Touch paint because the spray is oil based and the paint is latex.....was I looking at the right stuff?
Gosh, that's odd. I've used them together zillions of times and my furniture is holding up great.
You state that you apply thin layers of both primer and topcoat. This suggests that you thin the paint before applying. What ratio of water to paint do you use to thin the paint (and primer)?
Nope, I don't thin it. I just mean that I don't put gobs and gobs of paint on the brush. I get the brush only a little wet and do quick, long strokes to spread the paint out in a thin layer.
This is awesome!!! I only have one question...does the primer/paint cover the old mildew smell or should I get something specific for that?
Thank you so much for the tip on the Painter's touch paint. I am painting a nightstand and dresser I got from my mom. I used the Kona Brown, it is so beautiful. I sanded down to the wood because the surface was damage. But I didn't get a nice wood grain to show through. I really don't care, I love them. LOL, my mom wants them back after she saw them. No way.
Your information was very helpful but may I ask what the exact name of the paint that you used? Only because the pic that you took wouldn't show on my screen. Thanks 🙂
It's Painter's Touch and it comes in small cans at Home Depot.
Wow, how cool that project is. I've never done using a paint like you use here. This is a great way to refurbish old furniture. I love the finished work.
I love the look of your painted furniture, it really makes me want to paint my current project but I'm having qualms about painting over some gorgeous old (read oak?) wood grain... do you have any suggestions? 🙁 I was thinking of just staining it but I'm so tempted by the nice color finishes.
I say do what you want! If you love stained wood, then don't feel like you have to paint it. But if you love the painted look, don't let guilt keep you from painting it. It's YOUR furniture, make it look gorgeous to you!
Thanks, I will 🙂
Hi Kristen,
I have a question. I paint outside. After my furniture dried. I ran my hand across the top surface and felt a few lumps here and there. Well I thought they were drips of paint. But when I took a closer look, they are insects!!! I can see the little legs and antennas sticking up from the paint. I didn't even notice them, while I was painting.
Have you ever had this problem, I usually just resand and paint again but I'm tired of doing that.
Any suggestions??
I paint outside because my mom has respiratory problems.
Oh, how frustrating! I do often paint outside, but I try to do it on a day that's not windy, because I get bugs/dust in the paint. Is there a time of year that's less buggy where you live?
Do you do really thin coats, using the paint I recommended? If you do that, it should dry really fast which should give the bugs less time to adhere.
I do thin coats, but maybe not thin enough, I will try and improve on that. Because my paint dries fast. My mom has a lot of trees in her backyard, so in the fall should be less buggy. I got a bug zapper too. I didn't have as many on the night stand I finished this morning. Thanks for responding.
oh yes I use the painter's touch in Kona Brown. Its beautiful.
You article is really helpful. Your tutorial is easy to be understood and can be done by everybody. You use the paint to antiquing and enhance your wood pores and grain.
Nice job.
God Bless You
This is incredibly helpful, thank you so much. I have a question, what happens with the bottom of the furniture? Do you leave it untouched and in the original finish or is there a separate process for the bottom after you finish the rest?
If the bottom won't be visible, I don't worry about it! I just leave it as is.
Thanks 🙂
Hi, my husband recently stained a bedframe and it turned out WAY TO SHINY. It looks like the bed is made of brown glass! Is there any wood colored paint or stain that you recommend to stain/paint bed frame? Also, do you recommend staining or painting? We want the bed to look like pottery barn style wooden bed frame. Anything will help! Thanks!
Did he use polyurethane? There are degrees of shine with polyurethane...you could sand it down a bit to take the gloss off and then use a satin poly. If you're wanting the wood grain to show through, then stain and poly are the way to go. If you want an opaque look, then brown paint would be the thing.
Thanks Kristen for the detailed explanation. I've been researching for days, but your step by step instructions are the most helpful! I am going to try the painter's touch primer, but I have lots of acrylic latex indoor/outdoor paint left over from our home renovations. Will this work okay? Any negative points about using it and does indoor/outdoor matter? thanks!
Hi! I plan on following this guide to paint my first side tables! We live in Wyoming but are moving to Florida in march and that is when I planned on repainting lots of old furniture. I learned a lot from reading your post. Thanks so much and wish me luck
Greetings, I ran across your website while trying to fix a problem. Years ago I purchased a cute black chest bought at thrift store. Several months ago I decided to touch it up with a new coat of paint as it was looking a little sad! I touched it up using a latex enamel. I believe it was a Rust Oleum latex enamel but not the product you use....anyway I'm thinking there must have been an oil based on the chest initially because after painting it everything I put on it stuck to it. I regret to say I didn't sand or prime. Just slapped a coat of paint on it. The surface is tacky and its as if it hasn't dried completely. This week I was determined to rectify this situation. This time, I sanded it down...not completely to the wood but got rid of the old yuk. Then I went to Lowes and they assured me if I use a product called Zinsser Cover Stain Oil Base Primer that I then can use a latex enamel over that and it would be fine (I purchased Valspar). Well I followed there instuctions and the chest is as it was before, sticky tacky and not looking too good. What should I do? Should I sand per your instructions and follow your procedure? Do you have an special recommendations? I tried the internet for hours looking for a solution but just became more confused! I'm heading to Lowes to give them back their product and a piece of my mind! Just for the record I live in south Louisiana but it was a dry, cool day for a change!. Low humidity for our area (about 50%)! Any little bit of advice would help this sorely vexed southern gal. Bless ya'll!
I'd recommend that you let it dry, sand it until it's smooth, and then use the spray primer and brush-on paint that I recommended. I've never had a problem with that combo turning out tacky.
Thanks!!! I have several pieces of old furniture I want to repaint, and I had no idea how to get started.
I love your blog!
I have a pine chest that had old paint on it. I wanted to stain it after the paint was removed. A lot of the old paint came off but some has seeped into the wood and I can't get it off. Should I continue, if so how, or should I just paint. My daughter wanted to stain it a mahogony color to match 0ther baby furniture in the nursery.
If you can't get ALL the paint off, you're probably not going to be happy with how the stain looks...it won't soak in evenly. I'd be inclined to just paint.
Im so excited to do this now, but will the paint chip? How long will the paint last if i do a dresser?
As long as you prime and you're painting real wood, it shouldn't chip. If you're painting over fake wood, you need to be really sure you scuff it up well so the paint will stick.
Thank you for the advice! When I was younger, my parents painted my dresser with white enamel and then I painted stuff on it. Now, I want to repaint it because it looks childish and I have an idea for another design.
I appreciate you sharing your findings. It should be a big help!
This is exactly the information I need TO INSTRUCT SOMEBODY ELSE TO DO THE ACTUAL WORK! I'm not lazy, I just got old! LOL Thanks for the good lesson! Richard Lee Van Der Voort American Ex-pat living in the Philippines
Great Blog and thank you for sharing. I love old pieces with a great new finish....sadly I don't know that I have the patience. Here's to you!
How long should a stained dresser air dry outside before coming in the house. It smells bad and it's been 48 hrs??????
I actually don't know! I've never stained a dresser. It does take a while for polyurethane odor to go away, though.
It should be dry by 48 hours. Did you finish it off with any clear lacquer? If not you need to, to protect the wood and finish. You can go with satin, semi-gloss or gloss. Personally I like satin lacquer when it comes to stained furniture. It brings out the woodgrain better than semi-gloss or gloss. Also from my experience(I have stained and painted alot of furniture over the years) it will take a bit for the smell to go away from the stain. Thats just part of staining furniture 🙂
Hello...I have a wooden kitchen table that has been painted over a number of times. The paint is chipping, so it must have been done incorrectly. What do I do in order to paint the table again? Do I have to remove that old paint somehow? Thanks for your advice!
Kate
You'll definitely want to sand until the finish is even...plus, you want to get any gloss off.
I came across your post while I was researching ways to refurbish old trunks. I hadn't known that you could get spray on primer (which is silly because I worked at a paint store briefly) So after using a roll on primer for my current project (and the many problems I had with getting a nice even coat) I will definitely be following your advice next time and the spray primer. Thank you for enlightening me 🙂 Cheers.
This is awesome! Just what I was looking for. I have a vintage vanity I want to refinish for my girlfriend. I was wondering when doing something such as a vanity or dresser, do you ever paint the insides of the drawers? The vanity has been pretty beat up. The insides are a mess. Any more help would be appreciated!
I haven't before, since the insides have been in good shape. But you certainly could!
This was very, very helpful. Thanks!
THANK YOU!!!! do you have any guidance as to how to apply the paint.... as far as rollers/brushes?
thanks
I typically spray the primer on and then use a medium-grade medium-sized brush to apply the paint. Just do thin coats and use long strokes.
Found your post just in time!
I'm going to do my first ever DIY project (painting an old white desk black) and this has helped enormously!
If I could just ask you a few questions?
1. Do you sand in between coats?
2. How many litres was that can of paint you used?
3. Do you have any advice about painting drawers ?
4. The desk has an inbuilt holder for pens and a small overhanging shelf above the main body of the desk. Should I turn the desk in any particular way to paint it ? Should I paint with long or short strokes under that overhang right at the back of the desk?
Sorry if I've overwhelmed you with questions and thanks for any advice!
Ok! Let's see.
I do such light coats, there's no need for sanding.
The can I buy is a quart.
Drawers-take them out and stand them on end to paint them.
When I paint the top of the desk, I do long strokes that go from one end to the other.
Hope that helps!
I am trying your method to paint a bedroom suite I got from my grandmother. My first question is do I need to sand down to the wood or can some of the old paint remain? My next question is how do you recommend painting the fine detail, there is alot of scrolling on the drawers? I am afraid the paint is going to run or puddle in the details. Thanks
I use a small brush for detail parts.
Some paint can remain, but you want your surface to be smooth and you don't want it to have any gloss.
Thank you for the step by step with pictures! I have been wanting to re-paint a headboard, and then if it turns out well, I just might do all the bedroom furniture! I could not find the Painters Touch paint, but did find a Valspar latex enamel paint that said it is for wood, metal and more. Do you think that would work?....and if so would you recommend a satin finish or a gloss finish? (there was no semi-gloss available)
Hmm, if I had to choose between those two, I'd go with satin, and then maybe do a coat of polyurethane over top for durability. I hate painting with high gloss paint because it shows all the imperfections so badly.
I used your tutorial to do my living room table and then my entire bedroom set!
I posted pictures for anyone who wants to see how a newbie manages! I've never painted anything before but it turned out great. Thank you, thank you, thank you!
googlemyhouse.blogspot.com
I wondered what I could use to finish it don't want it too shiny..I like the way your black furniture came out
I use semi-gloss paint, but you could buy flat sheen paint if you want the finish to be even flatter.
I am definitely going to try this!!!
Thanks so much for the tutorial. I am in the process of painting all the chairs in my dining room candy apple red and this was super helpful.
What I was wondering is what you have/have not done about the potential for lead dust. I did not think about this until I was half way through sanding the chairs and my back porch, everything on it and me were all covered in dust (I do not have a power sander only sheets of sand paper but was able to get everything down to the wood!).
All of the furniture was old but only one (a relatively new metal chair) was previously painted all the others were old wood with stain/varnish so maybe no big deal but it made me think and was wondering what you have done for clean up/protection!
Thanks so much!
None of the pieces I've painted have been old enough to have lead paint, so I'm no help...I'm sorry!
Great site- Thanks.I am inspired and just want to transform the furniture around me to give it a new lease of life now! I started with a coffee table, sanded and primed it is ready for the antique pine paint- only thing is I like the table as it is fresh and white - maybe I went to thorough on the primer?Please advise me if I could coat it in varnish- clear and what type to protect it? Just cannot wait to get busy with the rest of the furniture now lol x
Thanks for this! I'm just about to start my very first project!! It's a dresser for my little girl. I was afraid I was sanding too much but now I don't think I've sanded enough.
Great post! I found you on google. I wanted to ask: When you started hand sanding the more detailed curves at the bottom, what grit sandpaper did you use?
I've been having problems with my sander not fitting onto some sides of the coffee table I am working on. I have also been hand sanding with 40 grit paper (very course) but I feel like everything is moving slowly. It's pretty daunting and I'm afraid to go near it.
Any advice?
Thanks in advance!
For hand-sanding, I often use a higher-grit sandpaper, like 150-200. I find higher grit sandpaper to be touch to use by hand.
But of course, when I'm doing just the little detail areas, I'm not trying to get every last bit of finish off..I'm just trying to get the shine off so the paint will stick. So, I'm not being terribly thorough at that point.
I came across your page last week, timely - because I am in the process of splitting my childrens' room. Son is moving into the playroom before he starts K this year, exciting times! I wanted to start from scratch and spend under $500 for the entire 2 room project, and invited my MIL to help me make some acessory/paint choices. After reading through your inspirational pages and stellar directions, I felt I could do anything! Well... I've got about 4 pieces of furniture and half a dozen wall accessories to remake and I am so excited! I bought an orbital sander today, and stocked up on accessories and Painter's Touch per your recommendation. I loved the sanding portion - but I am having trouble with the corners and tricky parts. Looking into a detail sander or attachment for a power drill/driver, soif anyone has advice on that - I'd love it. These old hands are not built for the detail sanding! 🙂 Anyhow, thank you for inspiration! Love it 🙂
I really liked this blog! The perfect instructions for all my "little" projects...sometimes i feel like i bit off more then I can chew! I have a question though: I have a beautiful vintage vanity that needs to be repainted. The top had water damage and started lifting off. I was able to lift off a peice and see fine wood underneath so that what I started doing! But by the middle it became pretty difficult. also I could tell that some of the grain was going into a different area, so I might have lifted a tad bit more then i needed. I kinda figured I could just putty over the lifted parts. What do you suggest i do? My neice is expecting this as a birthday present, but im worried the top is beyond repair.
Thanks for all your help! I'm going to paint my vanity today and this will really help me!
These are great tips! I have two DIY projects I need to start. One is repairing my mom's old chairs. She wants a nice wood finish on them so it looks like I'll be stripping and sanding away on them. As soon as they get done I am planning on redoing my dresser. I never considered doing thin coats like you mentioned. From the pictures, it looks like it will be worth it in the end. I'll have to stop back soon for more great tips.
I love that you have taken old pieces of furniture and given them new life. Having beat up furniture around my home is never wanted, its usually just waiting to be touched up. Isn't it wonderful that a whole room can come together with just a few coats of paint.
Is it necessary to remove all of the previous stain and varnish down to bare wood? I get bleed through when i sand sometimes and sometime i dont, or just a few spots of it. I use oil based primer when i get bleed through. Other wise i just use latex.
No, as long as you're painting, it's not strictly necessary. If you're wanting to stain the wood, then it does need to be thoroughly stripped.
Refinishing an old pine Farm table, staining the top and painting the legs black. I've followed your instructions "to a T" and I'm now (finally!!) ready to paint. When I went to Home Depot for the primer and paint the salesperson encouraged me to use Painters Plus OIL paint instead of the type you recommended, saying oil is more durable and long lasting. So, I bought the oil. Now I'm second-guessing that decision and want to head back and buy the latex type you recommended. Is the latex really durable enough? I'll shoot myself if I have to ever do this again (joke).
Kristen, I ended up following your instructions "to a T" (I returned the oil-based paint to Home Depot and got the water-based per your instructions) and my farm table looks absolutely beautiful! FYI, I painted the legs black and then stained the top in a rich walnut color. The project took many hours but in the end, it was all worth it. My table has made my kitchen look very ELEGANT. Thanks again.
Kristen, I ended up following your instructions "to a T" (I returned the oil-based paint to Home Depot and got the water-based per your instructions) and my farm table looks absolutely beautiful! FYI, I painted the legs black and then stained the top in a rich walnut color. The project took many hours but in the end, it was all worth it. My table has made my kitchen look very ELEGANT. Thanks again.
Thank you so much for this indispensable guidance! Just refinished a Craiglist dresser for our new babe's nursery (2 weeks to go...so just in time). Thrilled to have spent under $80 for the entire project. There was a crazy heavy coat of shellac over the entire dresser that I used Citristrip to remove (bought at Home Depot). It would have taken days of sanding without a chemical. Citristrip (I don't work for them, I promise!) left on overnight pulled off nearly everything - even on the detail work - and it's not too stinky or noxious so even a pregnant gal can use it and feel okay. Then I started sanding, wood filling, sanding, priming and painting according to your post. Thanks for the confidence boost! We can't wait to change the baby on this "new" dresser (well, maybe a couple more weeks!). Thanks again!
Thank you! We just purchased some new furniture with a darker wood (espresso) finish than what we currently have. Was thinking I needed to replace everything but then thought I could see about painting a couple pieces to match. Excited to do this to finish our new living room 🙂 Thanks so much!
Kristen, on my first try with black paint, I am a little disappointed. On a small table which was already spray painted black, I used the gray primer you recommended and the black satin paint from Rustoleum. On the top of the table, I see brush strokes which I dislike, but on the legs it is perfect- no
brush marks, just a smooth even satiny finish. What happened to make the top come out looking totally amateurish? I used the same brush, same product at the same time. The brush strokes are really noticeable. How do I fix it? Do I have to re-sand and reprime? I tried two even coats and still brush strokes appeared the second time. Help. I really want to learn to do this extremely well.
Gosh, that's so weird...I usually have an easier time getting the top smooth and even and a harder time with the legs.
Did you use really thin coats on the top, with long strokes that go from one end to the other?
Was the top of the table as smooth as the legs before you started painting?
Can't say if they were smoother- I think perhaps maybe because legs don't get "used" like a table top gets used. But the whole thing was primed very well following your instructions. I used long continuous strokes with the grain. I used a satin finish,not a semi-gloss. Is this the problem? How about a foam brush? Would that eliminate brush stroke marks? Will I have to re-sand and re-paint?
Hi Kristen! I stumbled across your blog while googling "how to paint wood furniture." Thanks so much for the tips! Your furniture looks fantastic. I have recently joined on the freecycling and upcycling movement. I'm redoing my first piece, a nightstand, and after sanding and priming I'm already proud. 🙂 Keep up the great work!
this was a big help, thanks!
One also might want to take note, that when finishing furniture. Regardless if a paint or other type of finish is applied. The steps that I have always used are as follows : Rub down ALL surfaces with "OOOO" Steel Wool, wipe down with clean Tack Cloth, Vac, then apply a good grade of "Sanding Sealer". Repeat all steps once more, then apply your "Primer" repeat all steps except "Sealer" . Apply your primer and repeat "Steel Wool, Tack Cloth and Vac." The apply your first coat of finish coat, repeat all and sub. your second coat of finsh for the primer. If done correctly, your project will render professional result and you can proudly say "I did that myself" Most importantly do NOT rush, take your time !!!
What is sanding sealer? Who makes it? How is it applied ? Why do
you add this step to your routine- how does it make it a better finished product than doing without?
Quick question for you ... I bought this lovely piece of furniture at a yard sale this weekend and went to work sanding it ... I quickly found out it has about 6 layers of paint and gloss on it, and it quickly ate up my sandpaper before I even finished 1/10th of it! I should have known since I basically had to chisel paint off of the hardware to remove it. Any recs for really thick paint?
i liked the fact you said it was easy..i have an old, old buffet server, dark wood i'd like to paint white. whats nice is it has side arms that flap up. i want to put it in laundry room so i can fold clothes on it. have you ever sponge painted to add a spit of color? the laundry room is stark white...
Thank you very much for this informational post! Although my kids had great quality PB craft table and chairs, they were worn with paint stains, scratches and other types of inexplicable markings that only toddlers can create! I couldn't bear to look at it any longer and yet could not afford to buy a whole new set so I considered painting the furniture. I've never done any type of DIY project and so I simply googled "how to paint wood furniture" and there was your site. You made it seem do-able...even for me. I went to home depot, got every item you showed, rolled up my sleeves and got to work. The kids even helped out! By the end of the night we had beautiful pieces of furniture at a fraction of the cost! Thank you, Thank you, Thank you, you have truly been a blessing in our home. P.s. my husband is extremely impressed and "didn't know I had it in me."
I have just picked up an old dresser on the side of the road, turns out it is a Basset!! It is a beautiful piece of furniture, huge. I don't know if I should pain it or stain it. I want to pain it to look old and warn and use it as a buffet table in my kitchen. It looks like one of your pictures of a bedroom end table before is a match to my dresser, looking at the handle and it turned out beautifully. Thank you for all your insight into this process, your tips have helped me tremendously!! Off to start my first of many refinishing jobs, I hope to do a lot more!!!
Wow, am so impressed. Thank you for such thorough instructions. I want to paint my dining table. I had no idea it was going to be such a daunting task.
I don't think I want to invest in a machinery for sanding, and would likely try sanding by hand. Thank you again, posts like these make me appreciate usefulness of internet all the more.
Thanks for the great info! Like most people's comments, your instructions are very clear and simple.
I am new to painting wood furniture and I started on a dresser this past weekend. I sanded all the finish off and primed it, as you suggested. I would like to paint the dresser 2 different colors. I am using the Painters Touch semi-gloss latex paint you show above. My question is, what type of tape do you suggest I use when I start to paint my second color? I will need to put this tape on the dried paint. I've read a few other sites and I've seen Frog Tape and 3M-2080 Delicate Blue Painters tape suggested. Have you used either of these or is there another type/method you suggest?
Thank You so much for this post. I recently started selling items in a 7x7 spot in a antique/mercantile store and buying from local online auction sales. I am painting furniture and your directions are wonderful! Nothing is staying in my space!
Can you use a small roller to paint large flat services? or, does it go on too thick?
I followed this step by step and I'm pleased with how my piece is turning out. One question though - did you not finish with some kind of top coat? I feel like my piece needs one but I don't want to choose something that will make it look glossy. I like the dull black look. Any suggestions? Thanks!
I'd add a coat of satin polyurethane on the top, then. That will make the finish more durable, and won't make it look shiny.
I didn't add poly to mine, but most of my stuff isn't in a high-traffic area. For something like a table, I'd definitely do a coat of poly, though.
This is such a great tutorial, Kristen! Your instructions are very clear, simple, and easy to follow. I'm so glad to have found this post. Thanks so much!
Do you refinish paint furniture as a business or just for yourself? I have a wood kitchen table and four chairs I would like to have painted black. The table is wood - light colored almost like pine and the chairs are painted - two red chairs and two blue chairs. If you do not paint for others, can you recommend a person or company that does? I live in the Gilbert, AZ area.
thanks so much for your assistance.
Stephanie
I do it just for myself-I'm sorry! And I live on the East Coast, so I'm not too sure about who's available in the AZ area.
Thank you, this article is awesome. I can't wait to start my project!
Thanks for this! Really helpful.
Thanks so much for this tutorial. I am refinishing a dresser that is almost identical, keyholes and all. When I went to Depot they told me that the Painters Touch only comes in the Ultra-cover now, and is the replacement for the blue cans. They recommended using water if I wanted to thin it out. So I was wondering if you use water or actual paint thinner? Also, when you got your dresser did it have all of the keyhole inserts? Mine was missing a few and I'm at a loss for where to find them.
Yep, mine had all of the keyhole pieces.
I got one of the new cans and found the paint to be thicker than I like, so I used paint thinner to thin it out.
Your furniture is beautiful! I just attempted my first pieces this weekend and it does NOT look like yours! I wonder if it has anything to do with the fact that the dresser and bookcase are not real wood - they are made of partly particle board and whatever else is used in cheap furniture. And I used the liquid deglosser. Next time I will try a real wood piece and sand it with sandpaper and see if that makes a difference because I really enjoy doing this!
Yes, real wood is key!
Hi web site great!
I am painting a kichen table and chairs the sanding is hard going.
My question is what is the best way of painting the six chairs an off white
hope you can help
Many Thanks
Andrew
Thanks for this post. I start sanding tomorrow.
I'm so inspired! Thank you!!
Thank you so much for these tips! I've had several semi-successful furniture painting projects but the paint tends to ding and peel up when it sticks to something (in the wine cabinet, for example). Turns out I've been globbing on the paint and need to go easy with it. I'm trying this out tomorrow on our craigslist buffet!
While looking at you 2 nightstand I noticed I have the same ones. I would love to paint them. The hardware you used is very pretty. The existing hardware has 2 hole and I noticed that your hardware is just one hole in the middle of the drawer. My question is what did you use to fill in the 2 holes, and I assume you just drilled a new hole in the center. By the way, your work is very beautiful and you are very blessed with a great talent!
I stuffed paper shreds into the holes, filled both sides with spackle, let it dry, sanded both sides, repeated the spackling/sanding process until I was satisfied with how it looked, and then painted right over the old holes. And then yep, I just drilled a new hole in the center for the new hardware.
Yeah. I've tried using a regular paint on a chair and it didn't gave the look I had in mind... wooden furnitures are definitely different than walls or any other furniture, and we've got to deal with them differently...
And semi-gloss would give just the perfect shine for wooden furnitures.
do you use a finish or gloss or sealnt after your last coat of paint has dried?
I typically don't, but would recommend applying a thin coat of varnish if your piece is going be highly-trafficked (for instance, if you're painting a kitchen table.)
Great diy article. a tip for getting ultra smooth finishes: pure mineral spirits is good for wiping down sanded primer, and for thinning the rustoleum enamels.
I had already primed my piece of furniture, when I read your painting tips. I am sorry to say that my coat of primer was not as thin as you said. So, would it be alright if I painted the other coats thinner? I am planning to crackle the vanity that I am painting. It is going to be used as a desk. I have almost decided not to crackle the entire vanity though, because it seems like such a big job. Do you have any tips on crackling methods for furniture?
I've never done any crackling (just not my favorite look), so I'm afraid I'm no help!
If your coat of primer is at least sort of thin and you'll be crackling anyway, it's probably not going to be a big deal.
Do you sand outside or inside? Your post encourage me to try this. Do you use a mask or have a vacuum attach to your sander to get all the dust from sanding? I read that the risk of breathing in sand dust can make you get asthma.
Thanks you so very much.Although,English is my 4th language ,I understand very well.I,m going to paint something.
I just bought a can of Rustoleum Painter's Touch in Semi-Gloss Black and it too was thick, almost jelly-like. I tried to use it as-is and while I can still put a pretty light coat on, it's fairly streaky (and the streaks stay visible even after 3 coats). Fortunately I tested it on an inside piece first. Unfortunately, it seems Rustoleum has indeed changed their formula.
I had a similar experience with my last can. Fortunately, you can thin it with water or with paint thinner, and then it works so much better.
This post is the first I read of your blog. I have read slowly and I have liked. I have found new things for me on it. I didn't know that there is spray primer. Reading this post I have remembered when I was younger and I built shelves for my friends and I applied primer with brush
Hi! Thanks for this. i just sanded and begun painting my first painting project - thanks to your post, i believe it's going well. I finally reached the priming step, and after spraying the first two narrow sides, just one coat - the spray can was empty. Is that normal? (ie, in order to do at least 3 coats over the entire closet I'd need to buy 10 spray cans? )or should I ask home depot for a refund on it?
thanks!
N
Goodness, it sounds like you got a bad can! One can should easily do an average-sized piece of furniture. Go get a refund and a new can!
Hello, I was wondering what size the can of paint is. I will be painting a dresser, 2 night ands, a mirror and a chair... How much should I buy?
Ooh, that's a LOT of painting! I'd say you'd need at least two cans, and maybe more depending on the size of your dressers and nightstands.
The cans are small, though, and it's not like they're $25 apiece or anything.
Don't forget to thin the paint out a bit with some water, since their new formula is a lot thicker than the old one.
Great article. What about the paint that has primer and paint in one
I haven't ever tried that, so I can't offer an informed opinion-my apologies!
Is it easy to leave brush marks when using brush on paint on wood?
If the paint is thin enough, then you shouldn't have brush mark problems.
What color did you use for the dark-colored dresser at the top of this page (with the red wall in the background)?
Is is Rustoleum paint?
Yep, it's black semi-gloss Rustoleum paint.
Once you have finished painting the piece, do you use a lacquer or anything on top of the paint?
If it's not a high-traffic piece, it's not necessary. But if it's a table or something like that, then yep, use a brush-on varnish.
It's beautiful. Do you ever spray paint furniture or always use a brush?
I always use a brush. I just have such trouble getting spray paint to give me an even sheen, so I stick with the brush.
Hey, I have read your instructions(they were very helpful!) But I am just wondering a time frame. How long did it take you to complete this project?
Gosh, that's hard to say. It all depends on how hard it is to sand off a particular finish, and how intricate a piece is. If it's pretty plain, it takes way less time than a piece that has a bunch of swirls or detail.
I have Mom's old bedroom set in my master and it's about 50 years old. It's great hard wood but it's begging for an update. I'm feeling much more confident about this project after reading your blog. Thank you for the details. I've made my list and am heading to Home Depot! 🙂
I've been painting furniture for a few years and also use Rust-Oleum Painter's Touch, mostly colonial red and black. I had the same trouble you did. I couldn't find Colonial Red, so I used another red and it was very difficult to paint with and clean up. I found the Colonial Red and re-started the piece I was working on. The paint was as excellent and not the same as the other red. Black seems fine as well. I hope they not changing their product. It's the best around for painting furniture. Also, thank you for some great tips - I'm about to refinish a dresser and will use your tips.
I notice that Rustoleum Painter's Touch also comes in a gloss Kona Brown. Would using a gloss present any special challenges when painting or the end result, versus using a SEMI-gloss (as in the Black color)?
Glossy paint tends to show more imperfections, so yeah, semi-gloss is a bit easier to use. It's more forgiving!
Thank you so much for providing this information. I didn't know which primer and paint products to use. Looking forward to my first furniture painting project!
Have you used Floetrol before? Is is mixed in with paint to help reduce brush marks. It costs about $7 at Home Depot. Have you had or heard of any results from using it? Thanks!
Um, where have you been all my life?! 🙂 I am getting ready to paint my old bedroom nightstand from when I was 14! It's the only piece I have left and I'm painting it white with some sort of fun baby blue knob for my little boy's nursery! This post made me confident enough to go for it! As soon as the weather stays above 30 degrees! Thanks so much!
thx-that was a great tutorial! i am going to paint some untreated wood w/a moroccan theme. i built some table like shelves to hold clothes and decided to re-purpose them in a new apartment for the living room. i am going to get primer, make sure the paint in thin enuff, and use thin coats.
cheers
*c
What kind of brush do you use?
A medium grade, medium sized brush from Home Depot or Lowes. Nothing terribly fancy. 🙂
You're blog is such an inspiration! Thank you for posting this! It's very helpful!
How long did it take you to do the dresser and mirror in this post?
Gosh, it's hard to say! I mixed sessions of sanding, priming and painting in with my regular life (spray a coat of primer, go throw a load of laundry in, spray another coat of primer, start on dinner, etc.) A very, very rough guess is 8 hours?
Do you have any knowledge of how to repair a water damaged, swollen wood dresser top? It is an old extremely heavy dresser. I would like to just stain it again, but could paint if no "fix it" possible. Any ideas you can give would be much appreciated!!
Could you possibly sand it down with a power sander? If it's solid wood, I would imagine that a really thorough sanding would fix it.
Do you have any pictures of twin/youth beds? I want to paint my daughters beds, they will be having their own rooms for the first time, as we are purchasing our own home. We would like to use the existing furniture (hand me down, basic wood frame bed) and make each bed cute and personalize them by finishing with stenciling?
Thank you.
Carrie
Here's a twin bed that I painted for one of my daughters, although I just did plain white: https://www.thefrugalgirl.com/2012/06/zoes-bed-in-white-at-long-last/
and here's a black one I painted for my son, although again, it's just a solid color: https://www.thefrugalgirl.com/2010/07/joshuas-newly-black-bed-for-real/
Thanks for all of the wonderful info! I have a question about the primer. Is it supposed to have a gritty, sandpaper-like feel to it once it is applied and dry? Mine does. Do you suggest a light sanding to eliminate this? I am using all of your recommended products.
I am painting my mother-in-law's four poster canopy bed for my daughter. I will let you know how it turns out. Again, thanks for sharing your process.
It shouldn't feel super bumpy, but it shouldn't feel glossy either. I do often do a really quick sanding after my primer coat, so if yours is feeling pretty gritty, I'd do that. Just go lightly so that you don't remove all of your primer!
Hi, I notice on the photo of the dresser that it's an older dresser with the keyholes on each drawer. The dresser I am re-purposing also has this. I am replacing the hardware (which is brass, as are the keyholes). Can you tell me how you replaced the keyholes with brushed nickel to match the drawer pulls? This has been causing me a little stress and I would greatly appreciate it if you could share what you did!
I just spray painted them with brushed nickel spray paint. You should be able to find that at any home improvement store. Mine just popped out of the fronts of the drawers, so that made them easy to paint.
I have just given a first coat of melamine paint on a bottom of a hutch. To my dismay and disappointment I noticed a paint run from the primer phase and I painted over it by mistake. really don't know what to do. Thanks for reading me. Joyce
I'd let it dry thoroughly and then sand that spot down. Then you can do a coat of primer over the spot and a new coat of paint and then you can proceed.
Hi Kristen!
Thank you so much for this post 🙂
I just started sanding down some freecycled furniture and was getting a bit defeated to be honest. Love the before and after pictures! I shall carry on with the sanding of quite disgusting 80's, ugly furniture... and I will make it beautiful 🙂
xxx
Your blog has given me inspiration and confidence! What do you use over the paint to seal and protect? Could you give me the brand name? Finish (satin? semi-gloss?) And, if you spray or brush it on?
Your pieces look so great!!! And, they appear to have a hard finish which I am trying to find out how to get.
Thanks!!!!!!
I haven't actually used anything over top of the paint-it's been hard enough as is.
I spray the primer on and then brush on the paint in really, really thin layers.
Help! I prepped as required, used a satin black on table and chairs, but do not like the matte finish and want to go semi gloss (didn't see your website until after I did this or would have used semi gloss initially). Does this mean that I have to prime all over again before I can apply the semi gloss paint?
No, no, you shouldn't have to prime (phew!). Just lightly sand down your current paint and then apply the semi gloss paint.
You don't spray with a sealer at the end?
I haven't needed to thus far, but if I were doing something like a dining room table, I probably would.
You do a fabulous job and your instructions are perfect. I have one question. Have you ever painted furniture that has a veneer? Some of the sections on my pieces are missing. So 90% is veneer and 10% is bare wood. Would you strip off all of the veneer?
Thanks,
Sheryl
If it's a small section, you might be able to glue a new piece of veneer on and then fill in any spaces with wood filler or spackle (the new veneer piece can be made of whatever wood you want. It doesn't have to match because you're going to paint it all anyway.)
One drawer on my black dresser had terrible veneer, so bad that I couldn't salavage it, so I took it all off and then proceeded with the painting steps.
Great information. I'll be painting some bookcases, so your advice will be helpful!
Quick question: I was at the final few coats of paint and a gust of wind picked up and some fuzz got on top 🙁 do you think I can lightly sand the top and add a few more coats?
Yep, that works just fine. Been there, done that!
I have a very old table and chairs that I thought I ruined till I found your very understandable instructions. Ugh!! I didn't prime and put way too much paint on at a time. Would it be best for me to strip off the paint and start over? Also, any suggestions on what to use for the seats that had that pressed cardboard that looked like tooled leather. Thanks so much for sharing.
I'd recommend letting the paint dry thoroughly and then sanding it down until you have a flat, even finish to work with (you don't necessarily need to get down to bare wood) Then you can prime and paint over that and you should be good to go.
I'm not sure what to suggest for the seats...are they upholstered? I've never done upholstery before.
This tutorial is word for word from Bob Vilas tutorial. Congrats on that.
Actually, Bob Vila's site asked if they could republish my tutorial. So, it's my original piece that is published on their site, with my permission. 🙂
Way to go Kristen. You are such a class act! BTW, I followed your instructions, back in July, to paint my mother-in-laws four poster bed for my daughter. I have to admit that it was lots of fun and I was all fired up in the beginning. By the time I finished I was "over it" but it turned out GREAT thanks to your wonderful instructions. I hope to send you some pictures. Fall is coming with good painting weather so I hope to take on more projects then. Keep up the good workðŸ’
Great information! Can't wait to get started! I'm curious if you've ever used a paint sprayer vs. a brush?
I have not...I've only ever sprayed with a can of spray paint.
I used your advice and went to town on a free dresser!
http://thesinglechristianparent.com/2013/08/16/finally-the-free-dresser-is-complete/
Kristen,
Great insights!
Did you mention in this string, how long the whole dresser process took you?
Kirk
Thank you!!! Been looking for in-depth furniture painting instructions, and you win!!! I wish there was a greater prize than my praise and gratitude, but if I could afford that I'd be buying new stuff at fancy stores and having it delivered by (hopefully!) cheesecake on wheels. I've been sanding down to bare wood until I'm ready to drop, and the other sites discuss painting right over old finishes, with paint that costs $50/gal, no sanding or priming. But after paying that for the paint, who can afford anything else?? My other thought on their method is the big "yuck" attached to picking up furniture in alleys and thrift shops and bringing unknown "culprits" into your home. I consider the sanding, not only a good prep, but ma great scouring. My question is, have you tried the new paint n primer paints, like Behr Premium Plus in a satin finish? It's advertised as great on furniture. That's what I've had mixed. Also how about the new rustoleum paint and primer spray paint?? Have you tried that on furniture? Thank you so much for sharing your experiences. I hope you don't publish email addresses. I love the nightstand!! M
I haven't tried Behr on furniture but I do use it on walls a lot.
I use it on walls also. I'll let u know how it turns out on furniture. I'll use your tips re priming. I think the extra steps will help provide a great base. My past attempts have been "ok". The pieces have survived. I even added a "bonnet" top to my old hutch n some decorative molding to change the look. (Liquid Nails worked like magic!). I changed the look completely. Even managed to match it to my drapes w the computer matches at HD. But my brush strokes were too obvious to satisfy me. Thank you again for taking the time to share your hard work and talent. M
Thank you so much for taking the time to do this post! I followed it to a t and my table looks fantastic! I ended up finding that awful veneer on the top of my project (a vintage sewing table) but it seems to be holding the primer and paint well. I sanded the wood portions until they were no longer shiny, and sanded the veneer until it was totally clear of the old white paint. The only question I have is if it needs a final clear coat, or if it stands up to normal wear and tear okay without it?
That depends how much traffic your piece will get. If you're going to use the top of it a lot, a coat of poly might not be a bad idea.
I just wanted to tell you I really enjoyed reading this post. I love to find old treasures and bring them new life, it is truly amazing to me what people discard ! Thanks Again, and Happy Painting !
Shelley, from Shuniah,Ontario Canada.
Hello!
I have a question. Is there anything that I could use to protect the paint? I've done some furniture following your intructions and I feel they are a little bit gummy and too easy to scratch. I'm planning paint a dinner table, then I need some thing more resisteble as it is used daily. Any suggestion?
Thanks a lot and good job!
I love your work...
Marjorie Souza
Hmm, I wonder why they're gummy. The finish on my pieces is usually really hard. Did you do super thin coats and let each coat dry before you put another coat on?
You can certainly put a coat of polyurethane over the paint to protect the surface...I'd definitely recommend that for a dining room table.
After reading your wonderful instructions and the comments, it seems that I won't be able to customize my paint color with Painter's Touch. Can you recommend an alternative paint brand that can be customized?
Love the nightstand in black - exactly what I want my dresser to look like. What kind of black paint did you use? Flat? Glossy? Eggshell?
Hope mine turns out as nice as yours:)
Can you paint water base paint over oil paint or oil base paint over water paint ?
You can do water based over oil, but as far as I know, oil-based paint will not work over water-based. You'd want to sand, prime with an oil-based primer, and then apply oil-based paint.
That dresser turned out beautifully! Where do you do your sanding and painting? Is the garage or outside the best place to do it?
Thank you!
I don't have a garage, so I do this in my backyard, and I have to do it when the weather is right (too cold or too hot and humid is bad for the paint...instructions for that are on the cans).
I am disappointed. I read this post on Bob Vila's site less than two minutes ago. Nearly word for word. Photos included.
http://www.bobvila.com/articles/30124-dream-it-do-it-how-to-paint-wood-furniture/
That's because Bob Vila asked if his site could publish my tutorial. Mine's the original, and the one on Bob's is a copy of mine. If you read the whole post on Bob Vila's site, you can see that the article is credited to me. 😉
My question is, I have 3 pieces that do not have anything wrong with them. I really do not think they need sanding. Should I still do the sanding? I am looking to paint them black.
Thanks
If the finish is at all glossy, then yes, it's a good idea to do a light sanding. If the finish has any gloss on it, the primer and paint will have a tough time sticking to the old finish.
I like your ideas I have been doing alot of research and you know what your doing I am a beginner and feel your way of painting makes the most sense good job keep up the good work
Awesome work. Thanks for the tips.
How do I get old paint off of my dresser and not take the finish off with it?
I have a dark pine dresser that had neigh paint on it.
Thank you,
Donna
I don't know of a way to do that...sanding, the method that I use, would take off the paint and the finish.
I think your dresser is beautiful. I am really working on refinishing an old truck that my mom gave me before she died. It was her uncle. I really want to know how to begin. Since I'm retired I need to get my mind working again. LOL I was told that first you sand , metal primer, than paint it and seal it. Is this correct? I also have a hand saw that is very old and I do not paint so give me some ideals. Thanks so much. JoAnne
I have nooo idea about truck painting, I'm sorry!
I have a secretary desk that was my moms. I tried painting with milk paint, disaster!!!!!!!!!!!! I now have a big mess, am sanding down now and want to know if I can paint as per your instructions above. I also need to know how to paint the cubbies on the inside. I cannot take the piece apart, would never be able to put back together. Any suggestions?
I would just use a small brush to paint the cubbies (although I haven't seen your piece, so I'm not entirely sure how small your cubbies are.)
This is so perfect, and exactly why I am scrolling the comments of you post from years ago! My parents have graciously offered me an antique secretary from my great aunt and while I want to respect the history it’s in desperate need of refinishing after sitting unused for so long. I’m going to buy your Bosch sander but won’t stress about sanding all the little cubbies too much. I may have missed it but do you recommend any stains if I want to keep the wood showing? Also, kudos for (as usual) always responding so graciously to the people who feel the need to accuse you of copying Bob Villa. Your kindness is inspiring!
I'm not super informed about stains; do you have a local hardware store where you could go show them a photo of your piece and ask for recommendations?
I do know that when you want to restain a piece, you have to be more thorough at removing the old finish. When you paint, it's not quite as critical. Is it an ornate type of piece? If so, a liquid stripping agent would probably be more effective than sanding. Sanding works best when you have large, flat surfaces.
Good luck with your piece!
Hi,
Your tutorial is great! thank you so much. I am in the middle of painting a triple dresser and I just finished the first coat or primer last night- I used Kilz Complete. The dresser is dark, primer is white and the final color is going to be a dark sky blue. The dresser is completely covered in primer, but you can still see black through the white brush stroke marks. Is this ok or should I do a second coat of primer. I plan on using sherwin williams pro classics alkyd for the color. Thanks for your help!
Primer doesn't usually provide an opaque coat, so you're probably fine! Once you put the paint on, you shouldn't still see the black.
Also, which spray paint do you recommend for a brushed nickel look?
I usually use Rustoleum...they have a bunch of different metallic options.
HELP! I'm in the middle of painting a triple wood dresser. Here's what I did so far (Allowing a full 24 hours to dry between each coat): 2 coats Kilz Complete Primer, light sand after the last coat of primer, 1 coat of SW Proclassic alkyd paint. After letting the SW paint dry, there are terrible brush strokes!! I have a feeling that I did not sand enough between the primer coats and after the last coat of primer. Here is my plan: Sand now more completely, and paint one more coat of SW with floetrol added. Do you think this will help or its too late? Also, I used a purdy 2'' angled brush for everything. Thanks in advance!
Hmm, I wonder too if it's the primer that's a problem. That can leave brush strokes, especially if you did two coats. I'd sand it down smoothly and then try a smooth final coat.
I agree with Kristen! I wouldn't waste money on the floetrol! Sanding is the key! The brush is a great brush as well!
the black chest at the top of your site is really pretty. What black is that and do you have a protective coat on it .thanks, Jimmy
Hi my fellow frugal friend! I love the piece you painted! I actually refinish furniture as a part time gig! Helpful hint to all...I never use waterbased primer! I always use Kiltz Original oil based primer. It can be used under latex aka water based paint! Reason being, as you mentioned, water based products can raise the grain of the wood. Also tannins have a tendency to seep through. The oil based blocks tannins, doesn't raise the grain, and blocks those terrible old furniture smells! Although it has more toxic fumes than water based, it is a staple for me! It dries fast and is just as easy to sand!
Also I noticed the orbital sander. I have a sander shaped with a point on the end which helps get in those nooks and crannies! If you ever have any questions please feel free to contact me! I am a fan!
Beautiful job! I am curious though on your comment about the paint being thicker than previously and if that happens to add paint thinner. I did notice that the paint you showed was latex. Wouldn't you add water to this?
Yes! I don't know what I was thinking, but yes, you can totally use water instead. That's what I've been doing of late.
Just a question regarding protecting the piece after you paint it. Do you use a glaze or wax or something on top of the paint to protect it?
I haven't personally, but if I were painting something like a kitchen table, I'd definitely do a coat of polyurethane to prevent scratches.
Hey, this is the same post as Bob Villa. I was looking at how to sand down furniture and I clicked on yours and then Bob's and its exactly the same.
Yes. I wrote the post originally, and Bob Vila's site asked if they could publish my tutorial as a guest post. So his site has published my tutorial and not the other way around. 😉
Hi Kristen!
I realize you did this a few years ago but I came across your blog when searching for painting furniture. I noticed that on the black dresser, you too have those "key" like holes between the dresser handles- how did you paint around or remove them? The handles on my dresser are screwed in, however, the "key" hole is not...Any advice would be much appreciated!!
Thanks!
Fortunately for me, the little metal pieces around the key holes just popped out, so I removed them, painted the drawers, spray painted the key hole pieces and put them back in.
So painter's touch in the brushable non spray paint variety only comes in basic colors what paint do you like to use when you want other colors. I'm painting a bed frame and my little girl wants purple .... Thought about mixing a can of red a blue thoughts?
I might actually look into Benjamin Moore Advance. It's what I used for my kitchen cabinets, and it can be tinted to lots of shades. Here's what I wrote about painting my kitchen cabinets: https://www.thefrugalgirl.com/2014/05/how-to-paint-kitchen-cabinets/
Wow thanks for the quick response! I really like the concept of the very thin multiple coats as that always seems to be my painting downfall glopping on too much paint I don't think I saw in the cabinet painting did you or would you thin the paint to achieve the results like you talk about in the furniture painting instructions.
With the Benjamin Moore Advance, I didn't find that it needed to be thinned, actually. It's a pretty lovely self-leveling paint, and it's not super thick. But still do use a light hand and err on the side of thin coats for the best results.
I have recently picked up quite a nice set of draws for my hall from a charity shop local to where i live for £20, it needs a good c;leaning up and painting but i want to give it a go, the draws were manufactured on 11th June 1931 (this not a guess, it is stamped onto the back), my query is regarding the presence lead or asbestos in old varnish, should i be concerned? Any help or advice greatly appreciated
Mark
I'm not sure when lead was banned in the UK, so you'd have to do some research on that. Here in the U.S., lead wasn't banned until 1978, which makes me think it's possible your set of drawers could have lead paint.
If you don't want to get it tested, then when you remove the old finish, you'd want to assume that there's dangerous stuff in the finish and act accordingly (using appropriate protective gear).
Hi Kristen, thanks for the quick response i will bear your comments in mind when i start the project. I assume my other query about asbestos in varnish was nothing to be concerned about.
Oh, I'm sorry I forgot to address that! As I understand it, asbestos paint was generally used on walls, not furniture, but to be safe, you'd want to check with someone who has more knowledge in that area than I do.
Awesome post! I am buying my first house and am working on some upcycling projects to keep myself from stressing about the closing but wasn't sure about the proper way to paint used furniture white. Thanks for the tips!
Thank you so much for your help and advice.
I have bought a dining table that extends the table is cream apart from the top is rubber wood and I dislike the colour is it is quite orange. If I sand it down to the bear wood,would the orange disappear? also would it paint a cream colur succesfully. thanking you for your help.
Yes, I think if you sand it, prime it, and paint it, you could get rid of the orange tint. The orange tint on the top is probably more from the stain than the actual wood itself.
Your article was helpful to me, because you're not a representative of a paint company, but a consumer who has experience and has given good personal feedback.
Just wanted to say your instructions are crazy simple and helpful! I've been wanting to repaint my grandpas old record player forever but just never knew what to do. When I saw this though I went out and bought an orbital sander and just started doing it! so far it's looking great! thank you very much!
Hello! I am looking to paint a vintage retro 1960's dining room set black. After sanding the set, how many times do I need to prime it, and do you use a spray primer and what kind, and lastly should I be sanding in between each time I prime it before I paint it? And one more important thing, how many coats of actual paint do you recommend? Thank you so much; you are so very helpful and all this knowledge is such a blessing! Thank you and happy creating to you!
I use spray primer and just do enough to give it a light coat.
Sanding between coats of paint gives you a nicer finish, so if you have time, go that route!
Restoring the beauty of old furniture is somehow a hard thing to do by ourselves. You deserve a big round of applause for doing an extraordinary job! Not to mention those beneficial guidelines you listed on how to paint wooden furniture. Thanks for sharing your thoughts. I would surely share this one!
Thank you so much! Attempting my first refinishing job and looking forward to it!
Have you ever worked with chalk paint? They say you don't need to sand or prime before using but I'm skeptical about the paint sticking.
I haven't, so I don't have an opinion on it. I know it's pretty expensive, so I think that's why I've never given it a shot.
I didn't catch if it's latex paint or oil based? I usually use spray or latex based brush-on paint but it always seems to come out sticky. What am I doing wrong?
This is a latex paint, which I generally prefer over oil just for ease of use.
Sometimes doing thick coats can give you a sticky finish. Also, painting in humid conditions can cause sticky paint that's slow to dry. And you'll want to make sure each coat is nice and not-tacky before you put another coat on.
Thanks for great sharing post. Every time I paints my stuff, I get trouble in how to make the one I paint look smooth and beautiful.
You copied most of this post, including the pictures, from bobvila.com. At least be honest with your subscribers so they don't feel adequate when their pieces don't come out like "yours.
Actually, that's not correct. I wrote this post originally on my own blog, and Bob Vila's team asked if they could guest post it on their blog. If you read the post on Bob Vila, you'll see that it's attributed to me. The project, the dresser, the photos, and the text are all mine.
I really did sand, prime, and paint those pieces, and they really do look like that!
I've been struggling to paint this eye-sore of a dresser for months now. It's been sitting in my poolroom looking so forlorn. It is pretty intricately carved, so I am having trouble sanding it well enough that the paint will stick. Even with a piece of sandpaper folded up (my fingers are not happy when I'm done) I can't seem to get it worn down enough that the primer will stick. Do you have any other tips? I'm determined to finish this silly thing.
I'm so glad I stumbled across your blog. It's always refreshing to feel like the blogger has a very peaceful and graceful attitude, and low and behold, it's because they too found their salvation in Christ. Thank you for humbly giving the glory to God and proudly calling Him your Father on your blog. Happy to be following the blog!
Hmm. Were you able to at least get most of the gloss of of the carved parts? You don't have to get it down to bare wood.
And the inner parts of the carved sections probably won't get a lot of abuse, so it's not as crucial to get the paint/primer to stick really well there as it is for, say, the top of the dresser, you know?
I hope you can get this finished up! And I'm glad you found my blog too...don't be a stranger! 🙂
Does the furniture get the smooth surface without sanding?
Oh, you definitely want to sand!
Oh no! Home Depot no longer carries the Painter's Touch Spray Primer (it is listed as discontinued on their website).
They still carry the cans of Painter's Touch Primer. Should I try brushing on primer or take a chance with a different brand of spray primer?
Hmm. It might be discontinued on the web, but it should still be in stores. I bought some just a week or two ago.
Thanks for being so detailed. This is exactly what I want, and you've given me hope that I'll be able to get it done when the stars align and I find both a house and a desk to go in it. 🙂
I think about whether a Dremel apparatus would work?
What about using a Wagner Power Painter to spray the dresser, is this a good idea or not?
I've never used a power spray painter, so I'm no help with this question!
Grateful for this post 🙂 question on the primer.. You said you sprayed it on. Did you use a paint gun, or just buy cans of spray paint? I see the primer that you recommend comes in both spray paint cans and gallon paint.
I just used cans. You only need a thin coat of primer, so it doesn't take that many cans. Unless you have a HUGE piece of furniture, the cans should probably work fine.
Thankful for this post :- ) question on the groundwork.. You said you splashed it on. Did you utilize a paint weapon, or simply purchase jars of splash paint? I see the groundwork that you suggest comes in both splash paint jars and gallon paint.
Hmm..I'm not sure what you mean about splashing. Could you clarify?
Kristen, I think this comment is weird spam. Compare it to the (legitimate) comment immediately above.
Thanks for sharing your experiences. I'm doing some research on paiting. I have a old coffee table and I want to paint it. But I don't know what type of paint is the best?
The paint I recommended in this post should work great for that!
Thank you for the advice! We are in the process of building a new home, and I have been looking for ways not only to spruce up our furniture, but also ways to find cheaper furniture and make it new again. Thanks again!
You mentioned using semi-gloss, but your beautiful chest doesn't seem to have any shine to it. I'm painting some furniture navy blue and want the same "sheen" as the black chest. Not sure whether to buy satin or semi-gloss? Would love your suggestion. Thank you!
I used semi-gloss, and my dresser does have a bit of a sheen to it. I wouldn't say it's super shiny, though.
I love I found your site.I've been an impatient painter, painting to thickly to get the job done. And hence easy chipping.I didn't have time to read the long thread of comments, so just curious what are your thoughts on liquid sandpaper? I used that form of prep way back in mid 1990s. I painted it on all woodwork in my house and the paint never chipped.
Liquid sandpaper is like stripper, right? I'm not a fan of using stripper because it's so goopy to clean up. I do think it works well, but I'd just rather sand than use it.
Have you ever worked with Walnut? My grandfather was a woodworker and made a huge farmhouse table back in the 70's. It has since been passed down to me and the varnish is pealing off. I want to re-purpose the table to more fit in with my home. Just curious as to how well the paint will hold onto that type of wood.
I think walnut would be great! Pretty much any solid wood works great for paint.
Thanks!! That was really helpful. And super cool BobVila.com wanted to use your info!
I am painting a wood dresser white. How do I seal it? I have heard that the poly sealers turn the furniture yellow.
I've heard that too, so I've opted not to seal my white furniture. The tops of my dressers and such do need to be touched up every few years, but that's a quick and easy job.
HI, I'm going to try my first project today! Thanks for the advice. I saw a spray paint that included both paint and primer in it. Can I go with that or is it better to do the primer separately from the paint?
I think I'd go with spray primer and brush-on paint. I have a terrible time getting an even sheen when I use spray paint instead of brush-on paint. It just comes out with a blotchy sheen.
Thanks for this great post! I have a few pieces that I'm looking forward to painting. Question - I notice that you don't use protectant after you paint. Is it because of the type of paint you use? Or do you find that protectant is unnecessary? I'm hoping the pieces I paint will last a lifetime - trying to decide if I have to finish with a protectant. Would love to skip that step, since I have so much to paint!
Whether or not you use a protectant will depend on how heavily used and abused the piece is. The paint I use does dry to a nice hard, non-sticky finish, but if the piece is going to get a lot of abuse, a brush-on polyurethane coat would be a great idea.
For instance, if you're painting a kitchen tabletop, you should do a coat or two of poly. But if you're painting a decorative shelf, you probably don't need to bother!
Firm believer in if its good piece of furniture/wood to stain it and than poly. The wood is the star of the show not the paint! If the furniture is so so by all means.
Good tips thou
Looks like you just copied and pasted this from the This Old House website. Nice job!
Actually, if you read the post, you'd notice what I said regarding that. I wrote this post originally, and This Old House asked if they could reprint it.
And that's clearly stated on the This Old House article too. So don't worry! No plagiarism is happening here.
If you are still writing your blog, I would like to subscribe because your info is readable for a novice such as myself.
Great Post. I was thinking about spray paint after reading this i will go for it. Thanks for sharing
Another stunning piece of furniture. It looks as if it was solid wood before you started. You really are good at this. Can you do it as aside hustle to take you through nursing school?