
How to sew on a button

"How to sew a button on" sounds better to me, but then I'd be ending my title with a preposition.
Does that even matter in a title? This title is a fragment, after all.
Anyhoo!
Today's topic has been requested by several readers. Because my mom taught me how to sew when I was a kid, doing a post on button-sewing would not have occurred to me (I live in a "Hasn't everyone been taught how to sew?" bubble, apparently).
So, it's lovely that you guys send in requests, because I do love to write posts that meet your needs.
Reattaching errant buttons is a skill every frugal person should have in their repertoire...it's one of the simplest but most often needed mending tasks, and if you can sew a button on properly, you can greatly extend the useful life of your clothes.
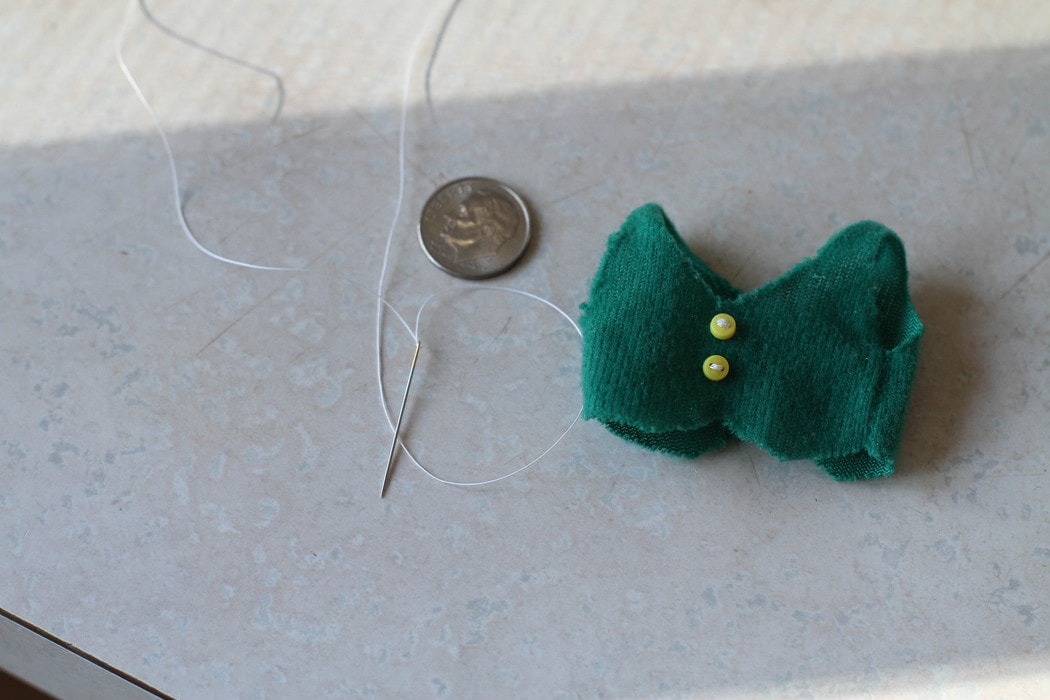
You'll need some thread, a sharp needle (not the blunt sort used for cross-stitching), and some scissors.
And the button.
But you knew that, right?

Cut a length of thread, thread it through the eye of the needle, and tie the loose ends together with a knot or two. This gives you a double thickness of thread and prevents the thread from coming out of the needle.

Find the appropriate spot for the button. There should be some markings left by the previous stitches.

Starting from the underside of the clothing, push the needle up through one of the button holes and down through another, repeating until the button looks securely attached. If your button has two sets of holes, stick with doing just one set of stitches for now (more on that later).
If your button only has two holes, your stitching pattern will be obvious, but if it's got four holes, you can either do two parallel vertical sets of stitches, or you can use a cross-stitch pattern. If there are multiple buttons on the garment, just do what matches the other buttons.

To keep my stitches secure, when I'm done sewing, I run the needle through the back of the fabric, making a loop, and then run the needle through the loop, making a knot. I usually do two of these knots, just to be on the safe side.

Now, to make very certain you don't lose your button, finish one set of stitches, tie the thread off, clip it with a scissors and then do the other set of stitches with a new thread.
This way, even if one set of stitches comes loose, the other side won't unravel too, and the button will still be attached to your clothing item.
So, that's all there is to it! Don't let another perfectly good item of clothing sit unused for lack of a button...you can totally do this.

By the way, if you're new to sewing, you may not have a huge stash of thread sitting around your house, and so it may be a little bit tricky to find a color that matches. Thread is surprisingly pricey (several dollars for a spool at Michael's), so you probably won't want to run out and buy every color under the sun.
I'd suggest keeping white, black, and tan thread around as those will meet most of your button-sewing needs. Also, sometimes you can find affordable little mending kits at craft stores and those often have a nice assortment of colors on small spools.
Keep in mind that if the button won't actually be showing much, the thread doesn't have to be a perfect match. I didn't have the appropriate green thread for this button, but since it's on the waistband of a skort and I never tuck my shirt in while wearing it, a slight color difference wasn't a big deal.

Do any of you experienced menders have button-sewing tips to add to mine?
___________________________
Today's 365 post: A fish, of course.
Joshua's 365 post: Fortune-Teller
I don't sew, (as evidenced by the dust covered sewing machine that my mother gave me but I don't know how to use!), but I used to cross stitch so I have lots of cross stitch thread. I use the cross stitch thread for all my mending. It's inexpensive and I have lots of colors so I can usually match anything I need.
Ooh, what a great idea!!
I use cross stitch thread a lot of the time, too! It's nice and thick.
I love using embroidery floss, too. I used to have a huge collection of floss, fabric, patterns, hoops, etc., and I could always find the right color for sewing on a button.
Great tutorial! I actually just dealt with my mending pile yesterday and was thinking about how useful it is to know how to sew on buttons. We would be spending a lot more money replacing clothing if I didn't have basic mending skills. And really, my skills are nothing fancy...I'm not super practiced, but I can do simple repairs and it saves us a lot of money.
Kristen, I sew on buttons with an extra step. By adding a thread shank to the underside of the button there is a little extra space allowed for the button-hole side to "fit". To accomplish this, I use a straight pin. When I bring my thread through the waistband the first time I start from the front of the garment, which hides my knot under the button and doesn't leave a lump on the skin-side of the waistband. After the button is loosely attached by the first loop of thread, I lay a straight pin across the top of the button and continue to stitch back and forth through the holes OVER the pin until the button is secure. With the needle on the back side of the garment I remove the straight pin and give the button a gentle tug to make space between the button and the garment. Then I push the needle up between the garment and the bottom side of the button and begin winding the thread around the stitches, "wrapping" the threads I have just sewn, making a nice little shank. Put the needle through to the back side and tie off as you have shown. With this extra step there is less stress on the button and it might stay on longer...maybe forever. This method might take an extra 30 seconds and an additional 12" of thread. My mother sewed buttons your way...I learned my method in high school home ec. class and have been doing it this way for 40+ years. With a husband and four kids that's been a lot of buttons! I love your blog!!!
I'm going to have to try that! I had some thoughts along those lines as I was sewing my buttons on yesterday, but hadn't quite figured out how to do it.
I was about to ask about shanks, thank you. This is far simpler than anything I had brainstormed.
WilliamB,
self-taught mender ... and it shows
For thicker materials such as winter coats, if the button doesn't have a shank, use a match stick instead of the straight pin. Learned this in high school - about 50 years ago.
I was impressed with your tutorial, especially the 'tie the ends of the thread in a knot'. I have always left out the obvious, to me, steps in trying to teach someone how to sew. This has made me think really hard about all the steps involved in teaching any skill. It will come in handy when I teach my granddaughter how to sew. Thank you.
The thread shank is what I was going to add too. My mom is a meticulous seamstress and she always said this step was necessary so the buttonhole would fit correctly over the button. Otherwise, a lovely pictoral tutorial!
I also make shanks, but I use a toothpick. The square ones don't roll around as much. I also use button and carpet thread on pants and heavier. A large spool of a neutral color lasts a long time and it doesn't take as many stitches.
Nice to see that someone's carrying on teaching all the things we learned from our grandmas or home ec.
I sew buttons on with a shank, too.
Love this post! I teach my students how to sew and knit each year. It is amazing how few have any exposure to these almost lost arts.
My method is slightly different. Regardless if I am sewing a shank or a 2/4 hole flat button, after I sew the button onto the garment, I bring the thread back up through the underside of the button but do not sew an additional loop through the button. Instead I wrap the thread around the already sewn threads underneath the button, going 3 times. I then draw the needle back to the underside of the garment and run it through the material just underneath the button and tie off with a double knot. This gives a rise to the button so it doesn't sit so flat against the fabric that it's attached to. Hope that makes sense! My sewn buttons tend to stay on forever, BTW. : )
You know my mom made us go to a sewing camp one summer when were about 11 or 12. I wouldn't say I have a lot of crazy skills in the sewing department but I can fix a seam, a button, sew on a patch. If there was a zombie attack & I had to run a sewing machine I could probably make it happen. We lived in a pretty small town I think that class may have been run through the extension office. But this might be a good option for some folks to think about for next year's summer plans. Instead of sending the kiddos to science day camp send them to sewing day camp! I bet they are also offered through local fabric stores.
This would be a great option for some high schools to raise some money in the summer to offer some home-ec type summer camps. They already have the facilities & maybe some of the stellar students form the previous semester could help run them. Anyone w/ any influence in those areas feel free to steal that idea!
Zombie attack preparation! I, too, went to sewing camp as a child - and have several American Girl outfits to show for it. 🙂
Technically, the proper way the stitching lines on a button go is to match the direction of the buttonhole. . .except, of course, when sewing on a button with a cross-stitch pattern. Perhaps a bit OCD, but I was curious one year and looked the info up. 🙂
And not all garments follow the rule. . .lol.
I've found that the buttons on a LOT of clothing purchased new are not as secure as one would hope for a brand new pair of pants, so this is a valuable skill not just for extending the life of your clothes, but for being able to wear some clothes more than once or twice!
Also - should you lose the button entirely, or purchase a garment without a button - the size of the button matters. It needs to fit through the buttonhole, but not slide out too easily again.
My husband has a giant purple button on a pair of green pants because of this. Teehee.
When the button fell off a pair of my husbands shorts, I found a button in my button box that looked like a pair of big red lips (I have know idea where it came from, maybe a stuffed doll?). Sewed it on and put the shorts in his dresser. I still remember the laugh we shared over that button. Moral of the story is...save every button!
HAHAHHAHAHA. I love it.
I learned with shanks as well - what you use to make the shank depends on the thickness of the fabric. For my husband's shirts for example, a straight pin is fine, but for coats (or other thick items) I use a toothpick or wooden match.
Where I grew up you had to take years of home-econ in high school. We called it husband-catching skills since it included cooking.
Sewing buttons is so simple, I love doing it because I feel so accomplished, haha. I always find that my buttons are sewn a lot tighter and hold better than the store sewn buttons anyway.
Do you darn socks? Because I'd like a tutorial on that, if you do!
Practice on tshirts! I darn those. I don't bother with socks.
cross stitch thread is best for darning socks. Much thicker. Also good for performing minor operations on beloved stuffed animals that have seen better times.
When I darn sock I turn it inside out and put a ball smaller than a tennis ball inside opening. In the past I've used small plastic balls that come with some of my kid's games. Push the ball to the darning point and gentle stretch the problem area over the rounded edge of the ball. I start at one side of the hole and pick up the edge of the fabric with my needle and bring it to the same point across the ball just getting the edge of the hole with my needle. I go back and forth until the hole is closed I finish my repair the same as FG and good to go!
I have recently learned how to darn socks using duplicate stitch. I knit them, and with all the work I put into them making them, when they get holes it is worth the time to fix them. http://www.youtube.com/watch?v=TYuIl3hIAS4 here's a youtube demonstrating the technique.
I've been sewing since I was a kid and I loved this post! I never thought to sew a button on with two different lengths of thread. What a clever idea! Thank you Katie for the directions for creating a thread shank. I've always done this by just holding the button away from the garment while sewing. Your way seems much easier.
I wasn't going to read this post (because I thought I already knew the right way to sew a button on), but I'm so glad I did! Finishing one set of stitches, knotting and cutting the thread and then sewing the other set with a completely new thread is pure genius. (Picture hand to the forehead and me saying, "why didn't I think of that?!")
I always learn something new from your blog. Keep up the great work!
Kim, I thought the exact same thing--how could you not know how to sew on a button? But Kristen's tip about sewing the stitches separately was such an obvious improvement over my slapdash method, and then the instructions for shanking?? Perfect! Just goes to show even basic skills always have room for an upgrade 🙂
Thanks, Ladies!
Thanks! I figured I wouldn't learn anything from this, since I've sewn buttons on before, but I did learn somethings! Like doubling up the tread, and sewing the button on with 2 different strands, in case one breaks. I'm gonna do that next time I have a button to fix!
I'm one of those people who really needed this post! I rarely lose buttons, but when I do I have to give it to my dad to fix.
Yes, my dad. My mom was not a survivor of high school home ec class, but my dad is the son of a seamstress. He sews amazingly perfect seams by hand in less time than it would take me to figure out how to turn on a sewing machine. 🙂
I never learned how to do anything but do quick hem repairs and they are always super sloppy (no sewing machine at my house!) so keep these basic sewing posts coming!
Thanks!
Another thing you can do with this skill is to change out all the buttons on your garment! Sometimes I'll see a blouse in a store that's really nice, but the buttons aren't. It's such a simple thing to change, and it can give your garment a totally different look.
I never throw away a garment with the buttons still attached. I don't have as large a collection as my mother or my grandmother had, but I haven't needed to buy any buttons in a long time.
Another good color of thread for your arsenal is a "nickel gray"...sort of light silvery gray. You'd be surprised how many fabric colors it adapts to!
Estate and yard sales are great places to buy leftover thread assortments at very low prices; you might also find old sewing kits with thread at Goodwill or other thrift stores. I purchased a box a couple of years ago with spools (many of them wooden!) in every color of the rainbow for $3.
I have been sewing for a very long time, worked as a sewer and designed clothing and bags for rock climbing. The one thing I do differently is to double up my thread. Instead of just two threads, I have four going through the button at one time. This just makes it so I only have to make one "X" in my sewing to ensure the button stays on - really much faster.
Great post! Sometimes the simplest tasks are the ones we could use a little help on. I, too, have sewn many buttons, and I learned two things today - the separate threads for the four holes, and a commenter explained how to create a shank. Thanks everyone!
Another idea for a future post might be how to sew a button onto a thick wool coat. Seems like it would be the same, but it actually was a challenge for me. Especially since I had to sew on several, and keep them in a straight line, etc. Wish I had known the shank trick before I did that one! lol!
Use the matchstick outlined above, it can go between the button and the coat, if it's easier to hold. When I'm doing a series of buttons, I do them up as I go, and a mark through the middle of the buttonhole, and a measurement from the edge helps get them straight. Make sure the done up buttons are centered in the buttonhole before marking. Sometimes a second button is used on the inside of coats to help keep them stable. It is usually just a flat clear button, smaller than the "functioning" one. Sew it while sewing the main button. This also helps if the fabric is wearing where the previous stitching was.
I use embroidery floss for mending. It's amazing all the colours that are available. I take the item to the store and compare it to all the floss till I find the perfect colour. (Not as important with buttons, but with holes it works amazingly).
when you thread your needle, put your thread in half and then put both ends through the eye of the needle (it's a bit more difficult, but not too bad). you now have a loop opposite your needle. take a little bite of fabric with your needle where the button needs to go, pull your thread almost through, leaving a bit of the loop. put your needle through the loop, then pull tight. your thread is attached to your garment, without a knot. threading this way also means you are not stressing your thread in the same spot each time you pull it (which can lead to breakage), which is what happens when you thread the needle and then tie the ends in a knot.
Brilliant! If I don't want a knot I start like FG finishes the sewing, but it's easy to pull the thread right through before it's secured. This is much better; thanks!
Some people cannot do that. If that is one of your readers they can buy a cheap Buttoneer with plastic fasteners from Kmart.com. They are awesome and so is an Easy hand held sewing machine.
Although i haven't done this, my sister-in-law told me that the best thing to use for putting on a button is dental flosss since it is so strong and the wax helps it to slide through thick wads of cloth.
I have many fond memories of my grandma's "button box". She would frugally cut the buttons off of garments if they were so worn that they had to be discarded and saved the buttons in a round tin.
When I was little she'd thread a dull needle and anchor the bottom of the thread with a button so I could string the buttons in all sorts of patterns. I loved playing with the buttons and it's the one thing of hers I wanted when she passed. I still love sorting through the button tin and telling my kids the names I made up for some of the buttons (the "sparkly diamond ones," for example).
Through the years I've added buttons of my own, and occasionally I have used some of the old buttons in the box to mend my own clothes. You can buy big packages of mixed buttons at the craft stores nowadays, but the buttons in my grandma's button tin each tell a story. I'm looking forward to amusing my own grandchildren some day with grandma's buttons.
I 'cheated' a couple years ago and bought a small rivet-button kit. It's come in quite handy and has fit all the buttons I've needed to fix - mostly at the waist-band of pants. It presses together quite easily and the repair is done in a few seconds. Wouldn't work as well on a nice blouse though... 🙂
One other thing I might add is two ways to hide the beginning knot. You can either start sewing on the button on the right side of the garment, take a tiny stitch where the button is to be sewn and then string the button on the needle and sew the button on as you describe. You can also loop the thread through the buttonholes and secure the button on the thread before putting the button on the garment, and you begin sewing the button on the right side of the garment with this method also. When I took garment sewing in college (Home Economics major) we were graded down for having the knots showing, so it has become a habit. Also I do the thread shank when sewing on all buttons, if done this way the button will not come loose.
if i sew the button on my pants closer to the edge does that make my pants a little bigger?
Yes, at least the waistband will be a bit bigger.
I am one of those poor bachelors who has to learn it all himself. Gotta say, this really helped me out. Combined with the comments (shank wrapping method, hidden knot, and no-knot starting stitch) and a paper on Buttons and Buttonholes from the UKY university I stumbled upon, I will now conquer the world! Thanks for this post.
Kristen,
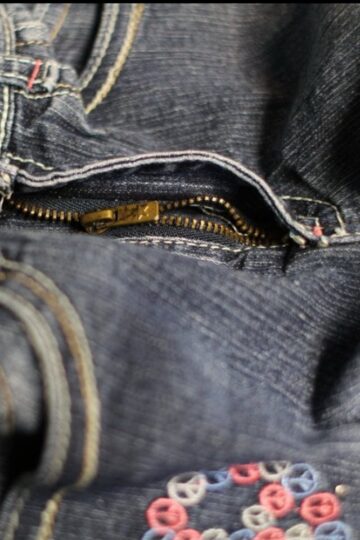
Can you suggest a store where I can find Zippers for winter jackets??
We have been looking around in craft stores without success.
My daughter's winter jacket is quite new except for the broken zipper which is beyond repair.
Thanks,
Anusha
I have gone to fabric stores to find the unusual replacement zippers. Some stores can actually special order length, color and type of zipper. I have ordered several of these and they haven't been over priced. They even ship directly to your home. Some places sell zipper repair kits, but they only repair the zipper pull.
Hope this helps!