
A little more painting | Before and Afters of a tallboy dresser from Freecycle
Antique lovers, you will probably want to leave the room for this post. Consider yourselves warned. 😉
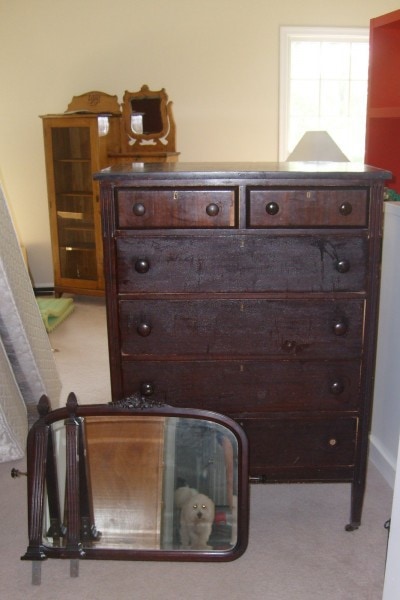
I'm about to post pictures of an antique dresser that I (gasp!) painted.
In my defense, I got it from freecycle, and it would have been against the freecycle code of ethics for me to sell it (so I'd never have gotten any money from it anyway.)
Also, the veneer was not in good shape...the top was missing several chunks of veneer, and the veneer was also peeling off the top two drawers. So, to restore it to a level where one could stain it would have taken a lot more money than I wanted to put into it.
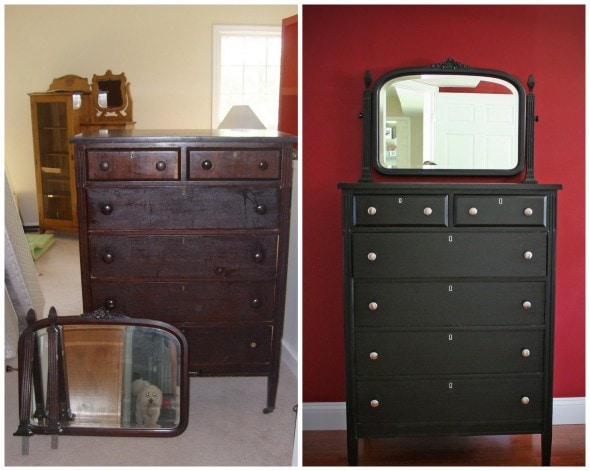
I fixed the veneer on the top, removed the veneer from the top two drawers (some was missing from the one, and I had to take it off the second one in order to remove the lock), sanded it, painted it, bought new hardware, took out the locks and spray painted them silver (they were gold before), and took the wheels off the bottom.
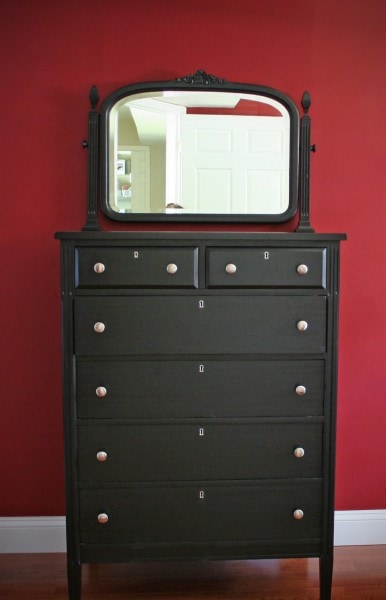
Here's an after shot of it.

And here's a picture of the top, so you can see the neat grain pattern in the veneer.
I'm pretty pleased with how my veneer patching came out...I glued some broken pieces of the veneer onto the top before I sanded it all down, and it's not very noticeable at all.

This replaced a particle board Ikea dresser and another freecycled and painted dresser has replaced the other Ikea dresser, but that's another post for another day.
I spent about $16 on hardware (LOVE the multipacks of knobs at Home Depot!), less than $4 on paint, and $3 on a can of spray primer.
I already had the can of silver spray paint for the little lock pieces, so there was no new cost involved there.
So, for $23 and about 8 hours of labor, I now have a dresser that looks pretty stinking good compared to what it looked like before.
I love paint.
_________________
Here's the step-by-step process I use to paint wooden furniture, including a list of supplies.


Your recent paint posts are inspiring! I'm living in temporary housing for work, but now i CAN'T WAIT to get back home to Freecycle and do some serious painting!
Thank you, Millie!! Seeing other people paint wood furniture is what inspired me, actually. lol I'd love to see what you do when you get back home. And hey, maybe you can inspire someone else. 🙂
Very nice! You made it look beautiful. I should pay more attention to freecycle. But there's just not much I need these days.
Well, if you don't need something, then even free isn't is a very good deal! With the exception of a piece or two, all of my freecycle furniture has merely replaced an existing piece of furniture(which has all been freecycled, with the exception of desk, as it was quite literally falling apart!) So, my acquisitions haven't been cluttering up our house.
Thanks for stopping by! I bookmarked your blog. By the way, I'm an avid bread baker like you, although I haven't gotten to the point of selling mine!
Wow, you did a great job on this tallboy. Can I just tell you that I have been looking for the perfect tallboy and dresser combo and found them (finally but have not purchased) on Crate and Barrel for 3K! And the style is similar to what you found for free. REDICULOUS! I am going to Freecyle IMMEDIATELY!
Holy cow! $3000? I'm feel extra specially blessed now. lol Which ones were you looking at on Crate and Barrel? I love their furniture(and Pottery Barn's too).
If you can't manage to snag something on freecycle(these things show up randomly), you might consider going to a you-finish furniture place. You can get some really nice stuff there for WAY less than you'd pay at Crate and Barrel or Pottery Barn.
wow this is amazing! It looks super. Man, our freecycles suck compare to what you guys get on there.
That's weird, Jenny! The area I live in isn't particularly wealthy(I bet the freecycles in rich neighborhoods are freakin' awesome!)...however, this dresser and another one I got came from someone who lives nearby in a nicer neighborhood. So maybe that's how I lucked out. :p
The furniture you've freecycled and painted is beautiful! I recently purchased a solid maple dining room table and 6 chairs through Craig's List ($100 for everything!) and would love to bring everything back to life with a little paint. Do you have any recommedations for the type of paint to use for this kind of project?
Hi Jen!
The paint I used is the Painter's Touch brand, which is sold at Home Depot. It comes in small cans and is stocked by the spray paint. It's latex, I believe, and I use the semi-gloss sheen.
First, though, I spray on the gray Painter's Touch primer...it works better than the primer that you brush on. After I do the primer, then I brush on the paint that comes in cans.
I'm thinking about doing my own dining room table in black...just haven't had the time yet. I hope yours turns out well!
You just gave me an idea!!! (*picture lighbulb going on*) I am not really too fond of my kitchen table - it's great quality wood, though, so I wouldn't dare go out and purchase another. I would probably like it loads more if I painted it. Food for thought... thanks 🙂
Oh yeah...it's amazing what a coat of paint can do. I think that black paint makes a lot of bad furniture look really great.
My favorite is the dog in the mirror.
I am so thankful that I found your web-site! I have been wanting to stain an old dresser I got from my Grandma. It's in good condition but I don't like the color of it. I love the dark espresso color which is what I wanted to stain this piece. I researched all day on how to stain and went to Home Depot to get samples of stain. Then after researching more on how to stain, I came across your web-site and now I have changed my mind on staining...I'm going to paint! I'm like you, I don't care if I paint an old piece? It's not like I'm gonna sell it or anything? I just want it to look amazing in my home 🙂 My hubby and I are off the Home Depot for supplies (including the sander!)
Nice furniture you got in here. Anyway, I just want to thank you, I just finished a project of mine (a table), I was inspired by your post ( https://www.thefrugalgirl.com/2009/03/how-to-paint-wooden-furniture/ ), and I'm pretty happy with the result by following you. Thanks 🙂
Thank you, your web-site help me alot. Can you please tell me what tipe of paint
to use for my wooden chairs to look white antique? Thank you
I emailed you quite awhile ago re: painting my desk and you were kind enough to reply. Its a french provincial reproduction and it was a clay color with quite a bit of raised detail. I did paint it and its now a solid color however I'm thinking it might look a bit better if it was a little lighter on some of the raised detail. Could you tell me how to do this? I don't know if you do this kind of thing in your painting but I'd appreciate any advice.
Thanks
What type of brush did you use?
I use a medium grade paintbrush from Home Depot or Lowe's...nothing fancy or unusual.
Beautiful and inspiring. My 14 year old wants new furniture and this might convince her the Goodwill's the way to go. (She wants Ikea!)
Hi there:
I redid all my mismatching bedroom furniture last summer (2 tall boy dressers, one antique, one from the 90's) an armoire and a night stand. I sanded and stained them all black and put on silver hardware and love them. I was told that staining allows the wood grain to show through, while painting does not. In your post you said you painted the tall boy black? and on the picture of the top of it I can clearly see the wood grain. I think painting takes alot less time as staining requires several coats then a clear finish. So, can you confirm that you painted the tallboy and can still see the wood grain? that would make my next project easier (one more nightstand to finish the room off - finally found one very similar to the one we have). Thanks.
Yep, I painted all of my furniture-no stain. I find that as long as I've thoroughly sanded down to the wood grain and I use spray primer instead of brush-on primer, the wood grain still shows through.
Hi Kristen. I love what you have done here! I have inherited a dark oak sideboard that just doesnt go anymore with our newly sanded floor and cream woodwork Could I possibly send you a photo and ask your advice on what we could do with it? Im thinking of cutting off the legs and turning it into a blanket box with cushions on top for seating. Thank you so much. Penny x
You certainly can, but do know that I'm no decorating expert!
Did you really just pull the veneer off? I have a dresser and end table from the 60's that the veneer is chipping and pulling off most of the 8 drawers. Do you think I could just pull the veneer off, sand and paint to save the dresser?
I only paid $35 dollars for it six years ago so if I ruin it, it's not a terrible loss but I love the shape and would love to salvage it.
Yep, you can do that. Since you're painting, it's not a huge deal to remove the veneer, whereas if you were staining, the lack of veneer would be very obvious.
Thank you so much. I'm a new home-owner and don't want to spend tons on new furniture, I have several second-hand-pieces that need work, so this is extremely helpful.
I followed your instructions on painting a wood table, chair, and bookshelf using all of the same products you did including the black rust oleum semi gloss black paint and it looks good but do I need polyurethane cover over my project? P. S. I researched on many websites before starting and you had the most clear and precise instruction!! Thank
Jeanene
It all depends on how much use the piece will get. A dining room table could definitely benefit from a poly coat, but something that's not treated as roughly wouldn't need as much protection.
I'm curious. The paint you show on your web site says soap & water cleanup, but you say to thin with paint thinner if necessary. I thought that would only be used with oil base paints?
Yes! That was silly on my part...I could have just used water.
I just found your site and it is very helpful. I am in the process of preparing to paint a walnut sideboard and wondering if you still recommend Painters Touch primer and paint as you wrote this post and another post on painting old furniture awhile ago. Thanks for your input
Yup, I do still like their paint! I like to thin it a little bit, though, as the newer formula is a bit thicker than the old one.
Another good choice is Benjamin Moore Advance paint, but that's more expensive than Painter's Touch. I painted my kitchen cabinets with Advance, and they've held up for years now.