
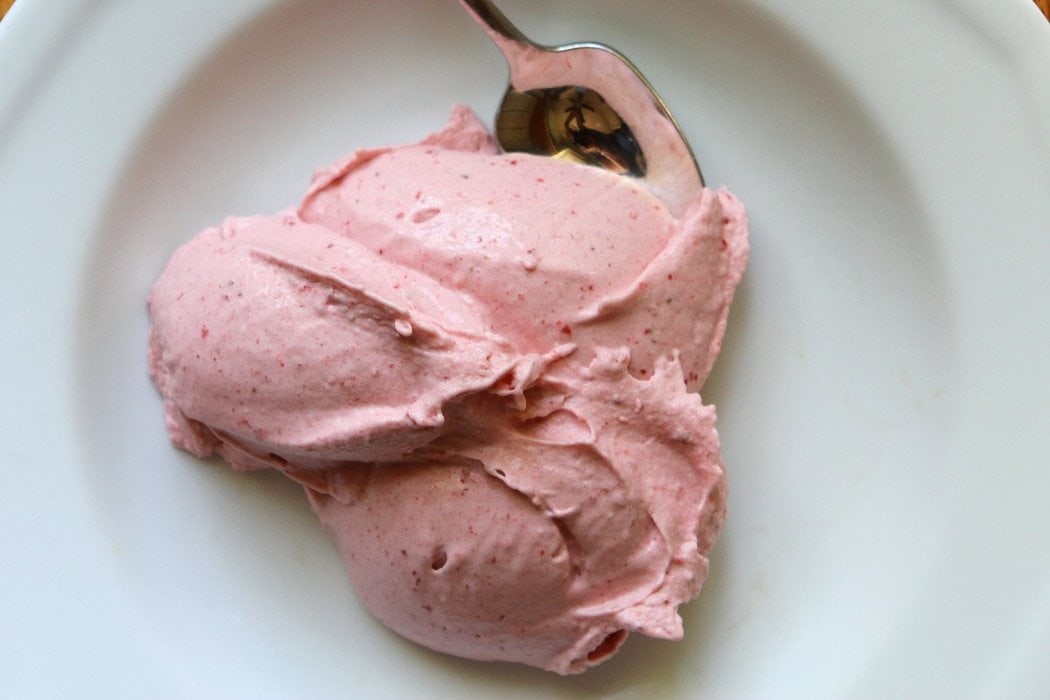
3 Ingredient Homemade Whipped Cream
Those of you who are experienced in the kitchen will read this post title and be like, "What? Why is this even a post?? Doesn't everyone know how to whip cream??"
But if I have learned anything in my years of blogging, it is that any knowledge or skills I take for granted will be new to someone out there, and I can help someone by sharing a how-to.
For instance, I've come across a fair number of people who have no idea how to sew a button on.
Or people who are surprised that making your own frosting is actually super simple (butter, powdered sugar, vanilla, a little milk or cream! Here's a recipe.)
And I know there are also people who have no idea how easy it is to make whipped cream.
If that's you, well, read on, because this post is for you.
Why bother making whipped cream?
Well, first of all, homemade whipped cream tastes better than Cool Whip or canned whipped cream.
Second, I think it's less expensive, as long as you can get vanilla at a reasonable price.
Thirdly, three ingredients seem way healthier to me than the ten or so ingredients you see listed on a can of whipped cream.
Fourth, I do think homemade whipped cream is less trash-producing. You can make a powerful amount of whipped cream with a bag of sugar (which comes in a recyclable or compostable paper bag), a container of vanilla (technically a recyclable plastic bottle), and a pint or quart of whipped cream.
(Bonus reason: if you make homemade whipped cream, you get to lick the beater when you are done. Can't do that with a spray can of whipped cream.)
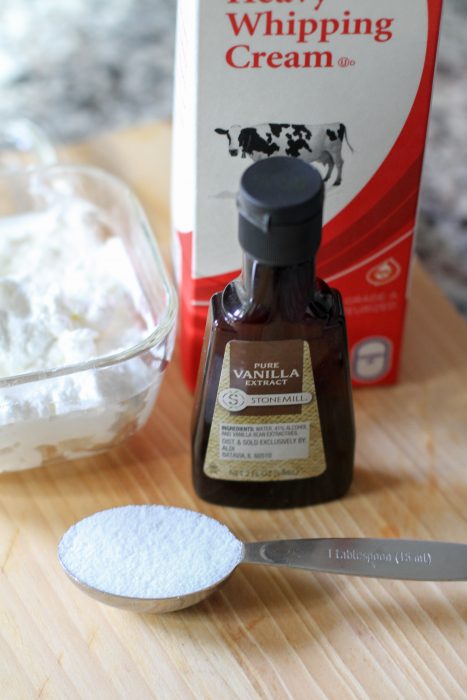
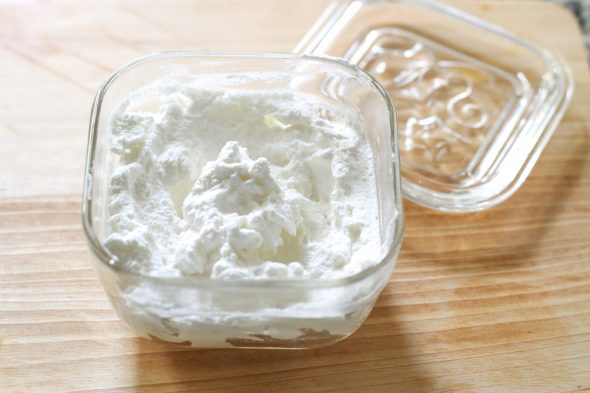
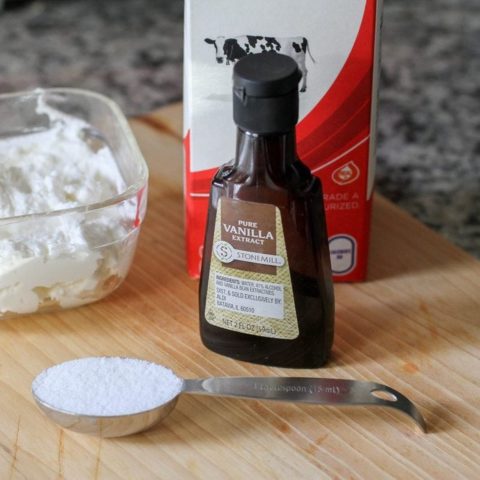
Three ingredients
You can make one-ingredient whipped cream (put heavy cream into a mixer and whip it up), but that's not going to be at all reminiscent of what comes in the spray can.
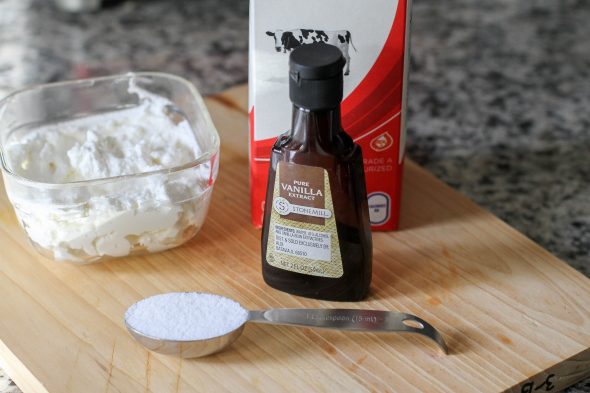
To make sweet whipped cream, you just need:
- heavy cream (table cream or half-and-half will not whip)
- sugar
- vanilla
You need an electric mixer
"Need" is maybe not the right word. If you want a workout, you can whip cream by hand with a whisk.
But cream-whipping is going to be significantly easier if you've got an electric mixer.
I personally use my Kitchen-Aid stand mixer every time.
(This is the Kitchen-Aid model I have.)
It helps to keep things really cold
You don't need to do this, but if you put your mixer bowl and beater into the freezer for a few minutes before whipping the cream, it can help your cream whip up better, especially in the summer when your kitchen is warm.
Whip it just until it's fluffy
If you beat it in the mixer for too long, the texture will get a little too stiff (vs. creamy), and if you leave it even longer, the milk solids will start to turn into butter.
You have to seriously overdo the beating to get to the butter stage, though. I've tried making butter on purpose and it takes FOREVER in a stand mixer.
So. Don't worry too much about accidentally making butter; just whip the cream until soft peaks form and it looks nice and fluffy.
Whipped cream is best right away, but you can store it
We usually eat whatever I make right away (I can be counted upon to lick the bowl every time), but I've stored whipped cream in a container in the fridge for a day or two.
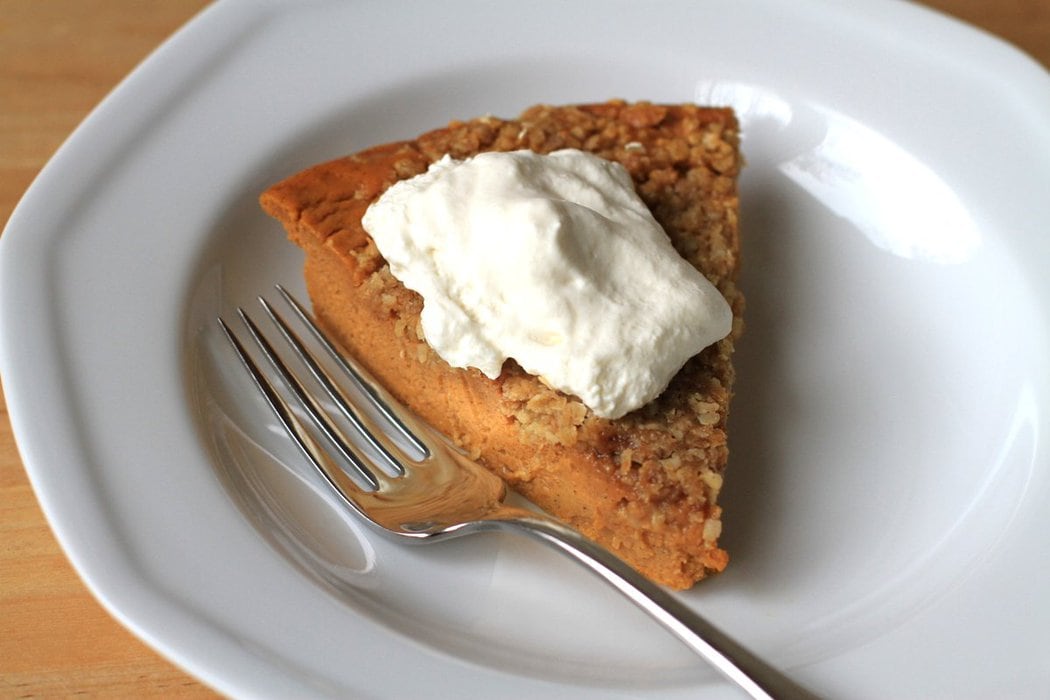
What can you use whipped cream for?
Well, I mean, you can just eat it with a spoon if you are a blogger named Kristen.
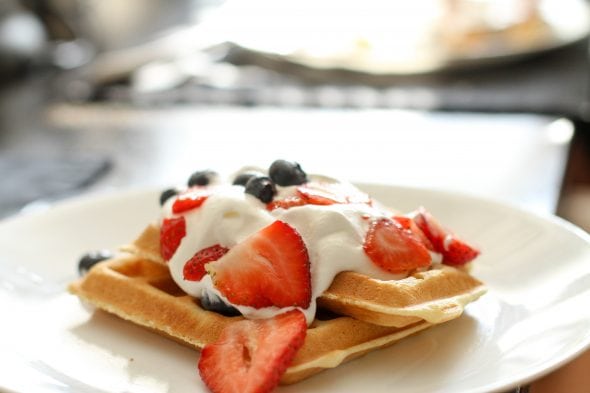
If you are a non-Kristen person, though, you can:
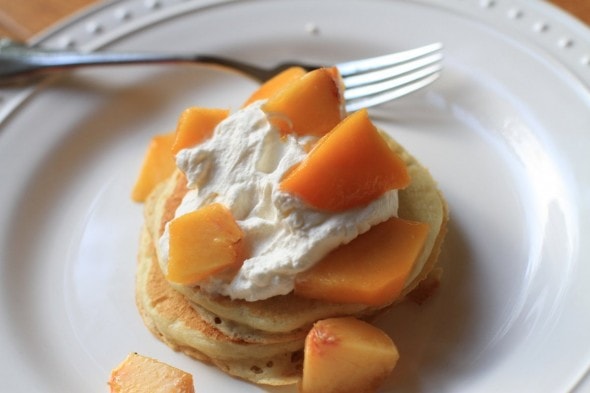
- eat it on waffles/pancakes along with chopped fruit (less sugar than syrup, 73% fancier)
- use on top of pudding
- add to hot drinks like hot chocolate or coffee
- dip fruit in it
Anything you've been using Cool Whip or Reddi-Wip for can usually be done with homemade whipped cream.
How do you like to use whipped cream?
And if you make yours differently than I do (or add flavor variations), I'd love to hear about it!
Scroll down for the recipe.
3 Ingredient Homemade Whipped Cream
Homemade whipped cream is easy (and cheap!)
Ingredients
- 1 cup heavy cream
- 2 tablespoons sugar
- ½ teaspoon vanilla
Instructions
Notes
If your house is warm, it's helpful to chill the bowl and the beater before whipping the cream.
Nutrition Information
Yield 16 Serving Size 1Amount Per Serving Calories 57Total Fat 5gSaturated Fat 3gTrans Fat 0gUnsaturated Fat 2gCholesterol 17mgSodium 4mgCarbohydrates 2gFiber 0gSugar 2gProtein 0g
Thanks Kristen! It is good to know that it is a good substitute for cool whip as I often see recipes online that use it, but they dont sell it here in the uk.
Now I Know that I can just whip some up myself!
Do you use regular sugar or powdered? I've always used powdered, but if regular sugar works too, I bet it's cheaper.
@Becca, I always use regular sugar.
@Becca, Powdered will make a smoother texture. You can make your own by buzzing granulated sugar in a blender.
I've always used regular sugar, but after reading today's comments, I kinda want to try it with powdered sugar!
@Becca, You can make your own powdered sugar. Two cups sugar and two tablespoons of cornstarch in a food processor for about 3 minutes will do it. In a pinch, I hae made it without the cornstarch and it worked fine.
Hah - awesome!! I 100% did not know how to make whipped cream until this post 🙂 Gonna share it with my 10 y/o who loves baking and such and who would greatly enjoy making this too! Thanks!
It is also really simple (and cheaper) to make your own vanilla!
This is the recipe that I use: https://sallysbakingaddiction.com/homemade-vanilla-extract/
@BettafrmdaVille, Interesting.
My mother placed a split vanilla bean pod into a container of granulated sugar, and used that sugar for baking recipes that called for sugar and vanilla extract. It lasts for many months.
I make homemade whip cream whenever I bring dessert. I’m often asked, “How do you make it?”.
I use confectionary sugar instead of granulated sugar though. I also make chocolate whip cream using cocoa powder.
@Bee,
Do you add any additional sugar if you make it chocolate? Or is it sweet enough with the "standard" amount? I think I might just have to try the chocolate version. 🙂
You can also make a small amount of whipped cream in the blender. This is what I usually do unless I want a big batch for a party or a recipe.
If you (like me) are working around the veganism and/or dairy allergies of loved ones, it’s easy to make dairy free whipped topping at home. It’s not as delicious as Kristen’s recipe above, but it tastes about like Cool Whip and is a lot cheaper than buying vegan Cool Whip. https://thehiddenveggies.com/aquafaba-whipped-cream-vegan-cool-whip/
You can also make one with coconut cream substituted for the heavy cream in Kristen’s recipe. But it does taste coconutty.
If you have loved ones who also do not eat refined sugar, you can make either of these with a little maple syrup.
It can also be made with an immersion blender, which is way less daunting than hauling out an actual mixer, and therefore is way more likely to result in whipped cream. 🙂
Another bonus is that you can adjust the sweetness depending on what you're serving it with. More sweet for, say, strawberries, but less sweet for an already-sweet pie. Although my husband usually says I cut the sugar too much, so this can lead to disagreements. Ha.
I sometimes make it with maple syrup as the sweetener. Particularly good for topping apple things.
@kristin @ going country, I'm a big fan of the immersion blender method, but last time I made it, I just shook it up in a quart mason jar (with the lid on TIGHT!). We were running late, so I was shaking it up in the car on the way to an event. LOL.
LOVE whipped cream!
My mom used to always make whipped cream. It was great on pie! I admit, I’ve never made whipped cream myself, but with a dairy allergic child I just didn’t want to make something so tempting and not have a safe version for him. I have made frosting, though! I used to always make my son allergy safe frosting with Earth Balance and powdered sugar.
I have made whipped cream many times, but only with cream and sugar - never with vanilla! I'm definitely going to try that next time!
I made this the other night to put on apple crisp. I froze the mixer bowl and beater for a few hours ahead of time, and popped the cream in the freezer for about 20 minutes (maybe)? Beat it on high for one minute, and voila, whipped cream. The colder everything is, the faster it whips. You can also flavor whipped cream with cinnamon, or cocoa (for chocolate whipped cream!). Since we are sugar-free here, I use granulated xylitol and it works just fine.
We do not use whipped cream a lot, since we hardly ever eat dessert. But when we do we whip it ourselves with a little very fine sugar and (my preference) ground cardamom.
Best results with fresh full fat heavy cream (pasteurized, not sterilized). We usually buy a 1/4 litre bottle, use half, close the bottle and save the rest to whip later or alternatively use in a savoury dish, even a curry.
@J NL, Huh, cardamom? I might have to try that some time.
Also, Kristen, you'd go nuts in the UK, with their double cream available everywhere. It is SO SO good. The British use a lot more cream than we do.
Perhaps I am secretly British. 😉
@Rose, Scones and clotted cream = a dream 🙂
@Rose,
Cardamom is so fragrant, you just need a pinch. I also keep 2 pods in a jar of fine table sugar. O and I think Becca?? Makes her own vanilla extract with vodka? I do that too, with coffee beans. A little coffee extract in whipped cream is not a bad idea either, however only for adults if made with vodka of course.
@Christine81, To die for. WHY don't we have clotted cream in the States? sob
@Rose, do you have a Turkish or middle Eastern grocery store where you live? They might sell kaymak / kajmak which is basically the same as clotted cream.
@Lina, I wish. I live in the middle of nowhere.
@Rose, You can find clotted cream for sale in the international aisle of any supermarket. A dear friend makes it at home and swears it’s not hard.
@Erika JS, Not here in the middle of nowhere. I indeed has a sad.
@J NL,
I just listened to a Milk Street podcast where they were talking about Swedish cardamom buns...I've never made them, but they sound delicious.
I had cardamom rolls (pulla) in Finland and they were, indeed, delicious!
Also just came back from the Balkans where they eat kaymak on cevapčiči and it is delicious.
@Liz B., My mother made a lot of Scandi breads and cakes with cardamom. Yum.
@Rose, It is easy to make your own clotted cream. https://www.internationaldessertsblog.com/easy-clotted-cream-recipe-with-clotted-cream-scones is the recipe I use. I like it because it also goes over all the things you can do wrong.
@Rose, I purchase English double cream from the Devon Cream Comany from my local grocery store to eat with scones and jam. It's delicious. Expensive for a wee jar but we don't often bake scones so is a treat for us.
@J NL,
Yup. I do make it from vodka and vanilla beans. I also buy it premade from Aldi though because I am of the belief that there is no such thing as having too much vanilla on hand. Also, butter. If the imaginary butter meter on my deep freezer drops below ten pounds, I start to get sweaty...
@Becca, my butter meter is set at four. If there are fewer than four pounds in my freezer I know it is time to buy more and I feel a bit panicky.
But the price of butter these days is … ahhhhh!
@Rose, and @BettafrmdaVille,
I have a coworker whose husband is Swedish, and who also is a fabulous baker (she is, not her husband)- she's mentioned the prevalent use of cardamom in Swedish baking, and she makes a cookie at Christmas time that has cardamom in it. I'll have to ask her about cardamom buns. Envious of both of you for having tried these treats! 🙂
Total cream lover here, but I never put sugar or vanilla in.
Also, for anyone who finds buttercream frosting too sweet, you can always add some softened cream cheese to cut the sweetness a bit.
One more thing: buttercream frosted cakes don't have to be refrigerated, but cakes with cream or cream-cheese frostings do.
That said, my favorite is the pecan-coconut frosting from German chocolate cake, which is named after someone called German and has nothing to do with Germany. This is what I think of as "Outerbridge Crossings," after things named after people which sound like something else. https://en.wikipedia.org/wiki/Outerbridge_Crossing
You can freeze leftover whipped cream!
@Joan from Dublin, Ireland, this is what I was going to say, too! In fact, my mother-in-law, whose normal is cooking for two, freezes it in dollops on a cookie sheet, then bags them to pull out one at a time as needed.
This is not a need my family of seven has. lol.
@Karen.,
I've frozen them in dollops before and put them on my coffee in the morning. So yummy!
@Joan from Dublin, Ireland,
Really?? I had no idea!! Thanks!
If I am making a small amount of whipped cream, I often whip it by hand with a whisk and a large, cold stainless steel bowl. It is a great workout!
@Fiction Reader, For an even tougher workout, shake it in a jar till it's thick.
@WilliamB, my kids love to shake it until it is butter. We do that about once a month. They have the best time.
That's how I make it, but I use powdered sugar (confectioner's sugar). I love whipped cream. I lick the bowl and the beaters when done.
May I add something for those not used to whipping things? Soft peaks is when you lift the beaters out of the beaten cream and they leave little peaks in the cream, with the peak tips curled over. Stiff peaks, such as for egg whites, is when the peaks stand up straight and tall, not curling over.
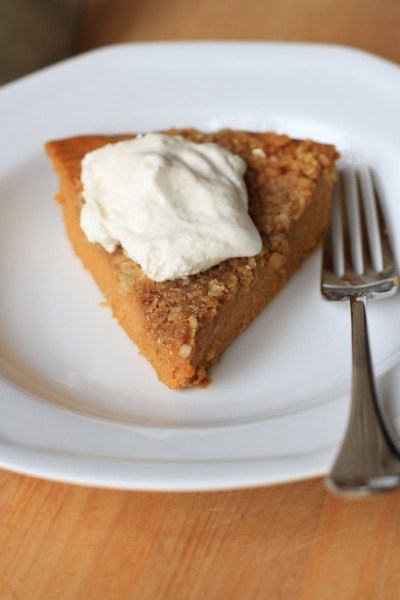
We eat whipped cream on PIE [I know Kristen isn't a big pie fan :)] on cobblers, on fresh fruit or thawed frozen fruit like strawberries, blackberries or peaches, and on some puddings. So, so good. My youngest daughter has developed the knack of getting the cream Just Exactly Right, so we often have her whip it.
@JD, You can also puree the fruit a bit and mix it into the cream for a fruit fool. Another English dessert* we don't typically eat in the US.
*often called "sweet" or "pudding" in the UK. Classically speaking, "dessert" wasn't the sweet course, it was thing like nuts, fruit, and candy. Back in the day, a fromal dinner was an hors d'oeurve, soup, fish, joint [roast], sometimes a second entree, sweet, savory, dessert. Yes, they often served something called a savory which was something like marrow toast or cheese straws or even a deviled egg.
Sorry, feeling chatty today.
@Rose,
I find this sort of thing fascinating! I've always wondered about the use of the word "pudding" in the UK referring to what we in the US would typically call "dessert". I'm fascinated by words and language in general. (And of course, the Pink Floyd song from The Wall always comes to mind...."how can you have any pudding if you don't eat your meat?" Ha.)
@Liz B., Keep in mind "pudding" doesn't necessarily mean a sweet milky dessert, either. You can easily make a steak pudding with steamed suet crust. (And sometimes I do!)
I love all kinds of cuisines, but British is one of my faves.
Also this reminds me of one of my favorite characters in all literature, the elder Mr. Ryder in Brideshead Revisited having four-course dinners alone.
"Dinner that evening consisted of a white, tasteless soup, over-fried fillets of sole with a pink sauce, lamb cutlets propped against a cone of mashed potato, stewed pears in jelly standing on a kind of sponge cake.
[Mr Ryder says to Charles]
"It is purely out of respect for your Aunt Philippa that I dine at this length. She laid it down that a three-course dinner was middle-class. 'If you once let the servants get their way,' she said, 'you will find yourself dining nightly off a single chop.' There is nothing I should like more. In fact, that is exactly what I do when I go to my club on Mrs. Abel's evening out. But your aunt ordained that at home I must have soup and three courses; some nights it is fish, meat and savoury, on others it is meat, sweet, savoury--there are a number of possible permutations."
@Rose, thinking of black pudding - not my favorite part of an English breakfast ;-).
@Rose,
Good point about a "pudding" not always being a sweet or dessert!
As for Mr. Ryder - let the man have a lone chop, if that's all he wants! Ha ha. (I know, things were not that way back then...must keep up appearances....lol)
Looooove fresh whipped cream! Glad some folx are learning about it today so they can also join in the tasty fun! Another vote here for using confectioner's sugar rather than granulated.
Sounds delicious! I have had homemade whipped cream (my mom made it when I still lived at home) and it's AMAZING. Way, way better than the stuff in a can. Though I admit I wasn't sure exactly how to make it, so thanks for posting the recipe!
Another nice thing about homemade whipped cream is that you can make as much or as little as you want.
To stabilize whipped cream, so it lasts in the fridge or on your pie without “weeping”, add 1 tablespoon instant vanilla pudding dry mix with the sugar, to two cups of heavy cream. Taste to see if you still need to add vanilla extract ( the pudding mix adds a very light hint of vanilla.)
@SandyH,
You just reminded me, I saw a Martha Stewart recipe where a bit of plain gelatin was added as a stabilizer. Now I need to find that recipe again.
@JD,
https://www.thespruceeats.com/stabilized-whipped-cream-3057618
This isn't Martha's, but this is one just like it.
confectioners' sugar typically contains a bit of cornstarch & adds stability to the whipped cream
@Tiana,
Check your package labels, though. I avoid corn, so I buy confectioner's sugar without cornstarch. But I think most of brands will have cornstarch, as you said.
I make my own vanilla. Make one every six months. Always have one that is usable and one that is “brewing”. I get vanilla beans from a local bulk food store.
Homemade whipped cream is soooo gooooood!
I like to flavour mine: use chocolate sauce to get chocolate taste, rum for a slightly boozy whipped cream, fruit syrup (you won't need sugar then) or elderflower syrup (elderflower cordial) which is supertasty on strawberries, and so on...
Add the flavors after whipping.
I grew up with homemade whipped cream so knew how simple it is to make, especially with the mixer doing all the work. I have since tasted commercial “whipped cream” and it tastes like the chemicals in the ingredients list.
Thanks, Kristen, for sharing this info.
Kinda neat that the way to make whipped cream is in the two word name of it.
Over the last four or five months, this has become a "thing" at our house. No more honey or maple syrup with waffles or french toast-the kidlets want the whipped cream. I quickly whip some up while the toast or waffles are cooking. Like Kristen, I put the bowl and the beaters in the ice bin in the freezer (even a couple minutes seems to help) while I pull out the rest of the ingredients. I use confectioner's sugar too. Has definitely elevated our morning routine. And I like that it's less sugar and more real ingredients. Check the label on the heavy whipping cream, though...sometimes they add stabilizers. Makes for an easier whip but also a more processed product. Speaking of which, can anyone explain the difference between heavy cream and heavy whipping cream? When would you choose one over the other? I feel lame for asking but other than assuming that heavy whipping cream is pretty much exclusively for whipped cream, I don't know the nuances. Maybe there are none and I'm just overthinking it...
@CrunchyCake,
I've wondered the same thing about heavy cream vs heavy whipping cream.
I made a great friend when husband and I went over to another couple's house for dessert. Host husband and I were in charge of making whipped cream with a mixer while my husband and host wife chatted in the other room.
We couldn't get it to whip the way we thought it would and it was turning lumpy. My husband came in and said, "You know you're making butter, right?" We laughed so hard! Thank you for bringing up this lovely memory for me.
A 16 ounce bottle of vanilla extract was $12 at Costco today. That's the cheapest I've seen it in several years.
I have had coconut milk whip cream on hot beverages and it is delicious.
@K D, Wow! I think the last time I checked, it was something crazy like $23. I think that was on the heels of some weather issues near madagascar, though. If I recall correctly, the price of everything vanilla related (including ice cream) skyrocketed for a while. Hopefully this means supply has stabilized.
I love whipped cream but I have never added anything to it. In the UK we have double cream and the even better whipping cream and we just whip it!
I find cream sweet enough without sugar or vanilla especially as it’s usually going on a sweet dish.
I’m diabetic and I’ve no longer got any kind of a sweet tooth, cream is one thing that’s not a problem for me!
I remember when my husband and I were first married, and I made a pie that had a whipped cream topping. My husband had grown up in a home where his mom typically used canned whipped cream or Cool Whip when whipped cream was called for - ice cream sundaes, maybe to top hot chocolate, or with pumpkin pie. She was a working mom with three kids, so I definitely understand the convenience factor. I had grown up in a home where we didn't often have desserts, but my mom would make a homemade strawberry shortcake for my dad's birthday every year....homemade sweet biscuit/cake, fresh strawberries, and freshly whipped, lightly sweetened cream. (I'm salivating as I write this.....haven't had it in years). We also sometimes had the canned whipped cream handy for spontaneous ice cream sundaes. Anyway, my hubby was most impressed that I was making *homemade* whipped cream for the pie I was making, and so was the rest of his family, even though it was quick and easy to make.
If you need to keep your whipped cream longer or need it for doing something like decorating a cake or pie, add a tablespoon or so of dry instant vanilla pudding powder AFTER you have whipped the cream to the consistency you prefer. This will stabilize the whipped cream and prevent it from separating. You can't taste much difference, other than a little stronger vanilla flavour.
Your blog post or posts about this years ago taught me this! I actually just attempted it for the first time last week & it was so good! Thanks for sharing skill tips:)
I'm in the plain category. I don't add sweetener or vanilla, although I separate mine and do add sugar at the end for my family because they like it sweeter.
If you don't have an electric mixer, you can use an immersion blender in a tall container (I've seen these for sale for as little as $15, or there's thrift and Buy Nothing options) OR simply shake and shake and shake the cream in a clean Mason jar with a lid. If you choose the jar method, be sure to check it after a few minutes and frequently thereafter because this is also how you make butter. You have to stop when the thick cream is no longer sloshing around the jar but before you hear the thinner liquid (buttermilk) has separated from the cream--because at that point you made butter and you can't turn it back.
The butter is very tasty, so not a waste. Press out all of the buttermilk--you can drink it or bake with it--add salt to taste, and enjoy freshly-made butter. You can get the kids involved in the jar shaking. But keep a close eye on it to avoid turning it into butter.
We usually make whipped cream for holidays and such, but for me it's more economical to buy the one in the can. (There are brands that don't use high fructose corn syrup if you are avoiding it, check the label.) While I agree the canned version does not taste as rich, my acid reflux is often triggered by the extra fat in the homemade version. Also, we would never use up the homemade stuff fast enough and it would go to waste.
A tip for the buttercream frosting, don't forget to add a bit of salt if you are using unsalted butter. It will enhance the flavors and keep it from tasting too sweet. I usually use salted butter, or I add 1/4 teaspoon if the butter is unsalted. Unlike the whipped cream, extra frosting can be frozen for another time.
Now I want a piece of pumpkin pie! With whipped topping of course!
Today is a perfect example of why this is the best place on the internet. A simple post, with fascinating and educational commentary by a diverse group of people I think of as friends. I have whipped cream many times but had never considered using an immersion blender even though I use it for other things frequently. Also, love Outerbridge crossing/German chocolate cake trivia. Finally, someone mentioned yesterday having mind pictures of commenters which I also do. Some of them I "know" in real life such as the basketball dad who I think of as Battra. I don't know his actual name, so this works well for me. I am always extra nice to him.
My Mama always uses powdered sugar. I didn’t even know non homemade whip cream was a thing when I was little. All the things need whipped cream in German baking ;). Kristen’s apricot coffee cake, for example. I like to put it in my coffee.
Coincidentally, I just made whipped cream with an old fashioned hand mixer on Monday. It felt a little like “exercise” but was easy and delicious served on apple cake.
Holy, moly! 71 comments on a simple whipped cream post and every one of them was fascinating to read! This is one of the many reasons why I love this blog!
I know, right? The people here are so great.
I worked in a small cafe where we used this recipe. One made, we used a cookie scoop to place a serving on a parchment paper covered cookie sheet and put it into the freezer. When frozen we placed them in a Rubbermaid-type container back in the freezer and pulled them out as needed.
I have recently learned you can also freeze unwhipped whipping cream, & whip it after it thaws. It looks lumpy when you thaw it, but it whips up fine and smooth if it’s cold. This allows me to buy the larger, cheaper carton of whipping cream at Costco & freeze 2-4 person portions for use later.
Oh, I have frozen cream before but I have never tried whipping it after I thaw it. This is good to know!
One of my friends told me a story that happened to her.
One of her neighbors gave her a call, I sent my husband to the store for whipped cream, and he came home with whipping cream that is liquid and in a milk type carton. There's no time to send him back to the store for the kind in a can. Do you know how to use what I have? My friend was able to come to the rescue. I don't know if her neighbor became a convert to home whipped cream or reverted to the canned stuff.
I always feel like I must be a major sugar addict because I have to use way more sugar than that. I just need sweeter whipped cream or else it's just...cream. I can't be alone! I also amp up the vanilla. The most heavenly thing to put whipped cream on for me: hot chocolate pudding. It melts into a sweet pile. 🙂
I like to use maple syrup instead of sugar. I don't use a lot, so it is only lightly sweetened. In place of vanilla, lemon extract is awesome, especially paired with a blueberry dessert.
We love to add a smidge of almond extract at our house - just add cautiously. A little goes a long way! (In addition to sugar and vanilla extract). I also just had a pumpkin tart from a bakery that had an orange flavored whipped cream on top that was to die for. Will have to see if I can recreate it - maybe with zest folded into already whipped cream?
@Krysten, There is also orange extract, though zest might have a pretty texture. It can be homemade with peels in vodka.
@Heidi Louise, thank you! That sounds like a delicious and fun fall project. 🙂
In between an electric mixer and a wisk is an egg beater! This will whip cream in a minute or two and is easier than getting out the electric mixer! See the link for an example - if you don't have one of these, try one - very handy item to have in your kitchen. I have my mothers-the one she used when I was a kid, I am 63 now so this thing has gotten A LOT of use and has lasted for more than 63 years! Very Frugal!
https://www.acehardware.com/departments/home-and-decor/kitchen-utensils-and-gadgets/miscellaneous-kitchen-utensils-and-gadgets/62852?store=08546&gclid=Cj0KCQjw48OaBhDWARIsAMd966Cq6G4UruzdelzCJdLUt1gtlbSVBx7rhOvuLf4WBGWWo09-QiLb4BcaAngcEALw_wcB&gclsrc=aw.ds
I went to a friend's once for dinner and brought dessert, along with the ingredients for making whipped cream. She had no clue whatsoever that it could be homemade and was just tickled to death with the whole thing. No stand mixer? No problem. An electric hand mixer will work as will an immersion blender. I would venture to say that if anyone has an old hand-cranked rotary beater, that it would work too. So much better than anything you can buy in a can!
Haven't read all the comments but I make my own whipped cream often and have found that 1TB of cornstarch helps it to "hold" much better. This makes it easier to make ahead! Happy Weekend!
You can also make whipped cream with an egg beater in just a minute or two. Much faster than a wisk, but don't need to get out the electric mixer!
Love homemade whipped cream! I also use vanilla and a touch of sugar, however I will often choose my blendtec blender over my stand mixer to whip. It is so fast, usually a 30 second blitz!
I usually forget to add the vanilla and it is always just fine.