
A bread dough rescue with WilliamB
Some weeks ago, reader WilliamB messaged me with a bread problem (from a Bernard Clayton brioche recipe).
I did my best to help, and we had a pretty extensive conversation with many photo updates about how the bread rescue was going.
WilliamB suggested that this might make a fun blog post, so today I'm collating my collection of words and photos from the conversation!
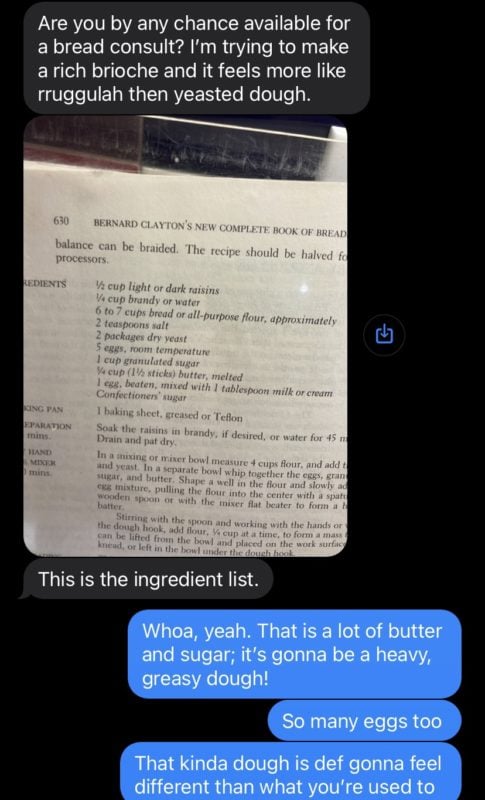
The initial problem is that the dough did not rise at all. I am unsurprised by this, because in Clayton's recipe, the eggs and butter are mixed straight into the dry yeast/flour mixture.
I presume that this results in the yeast granules getting coated in a layer of grease, which makes them unable to dissolve and grow.
WilliamB looked up some other brioche recipes and most of those involved making a soft dough or sponge first, and THEN mixing in all the heavy eggs and yeast. That probably works way better. What the heck, Mr. Clayton??
Given that the dough involved a lot of butter and eggs, it was worth some rescue effort. Butter and eggs ain't cheap these days!
I remembered a time, years ago, when I made a batch of roll dough and it didn't rise at all. In that instance, the problem was that I'd completely forgotten to add the yeast.
WHOOPS.
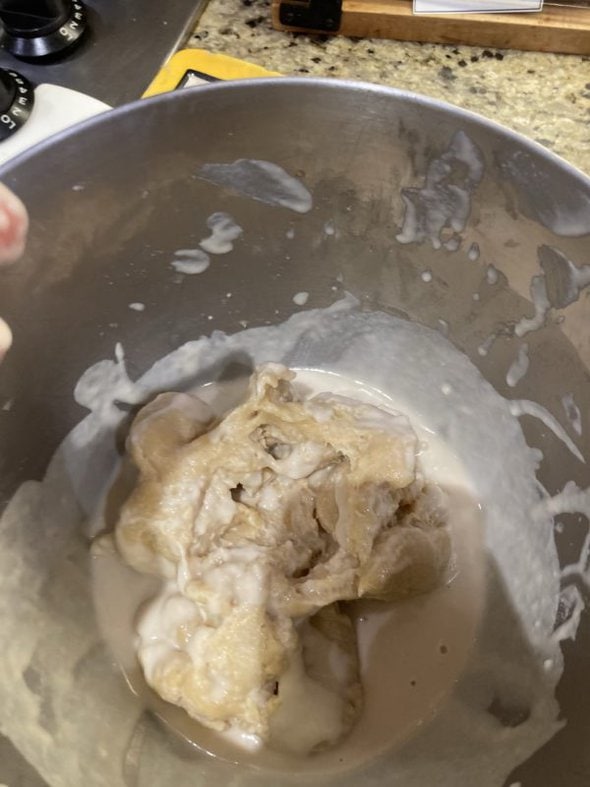
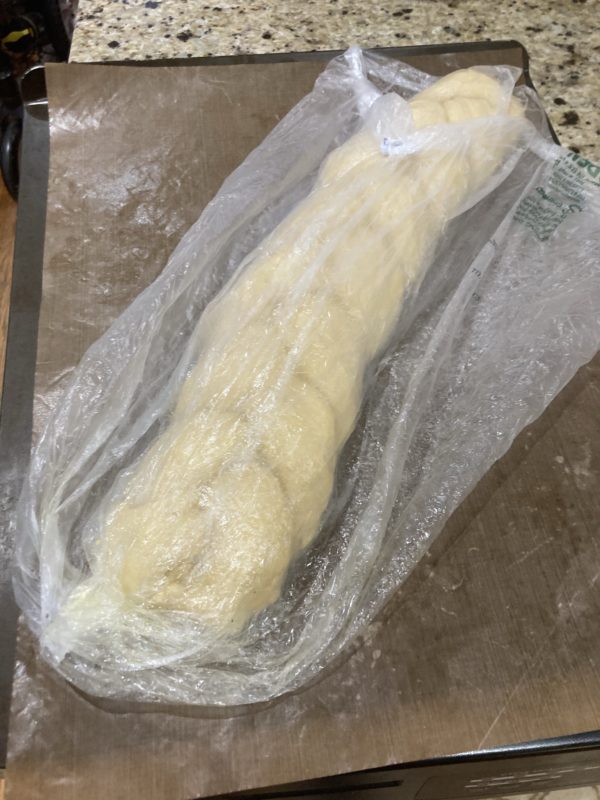
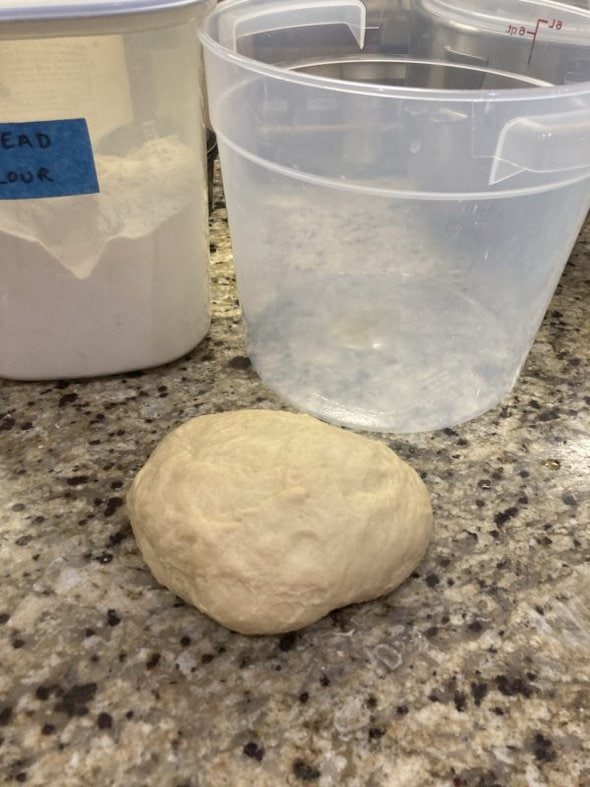
In our text convo, I shared that in order to remedy the problem, I'd made a tiny batch of soft dough with the full amount of yeast added, and then I'd kneaded it into my unyeasted dough.
I let the newly yeasted dough rise again, proceeded with the recipe, and all was well.
So, I suggested that WilliamB try something similar.
It was tough going at first.
A little better now:
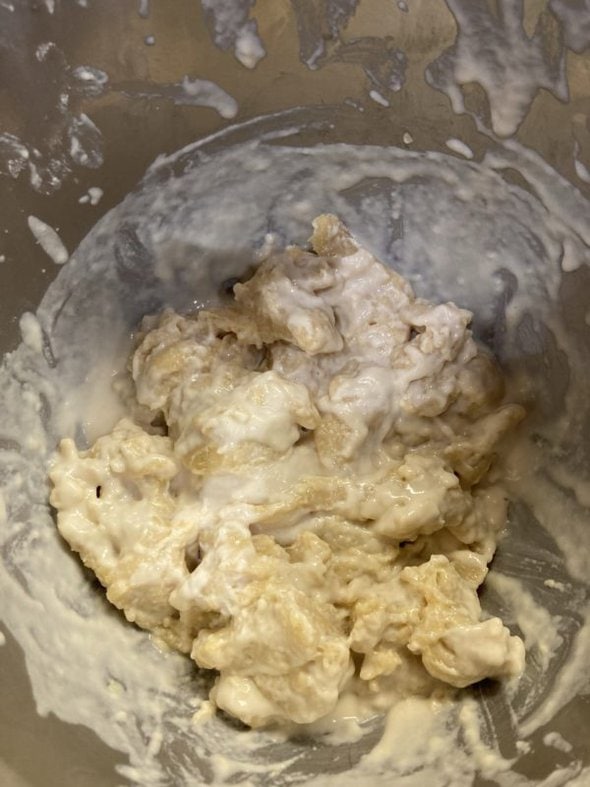
WilliamB let the dough sit for a little while, and then did more working-in by hand.
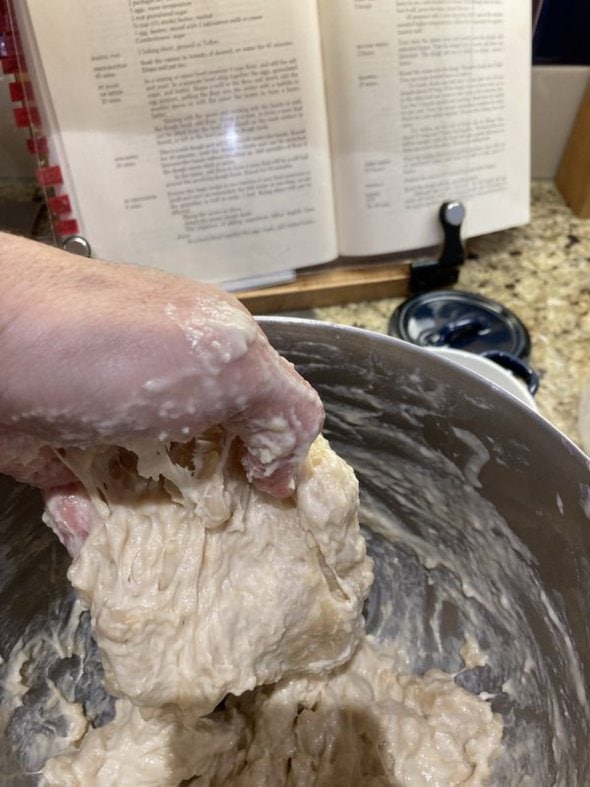
You can see the lumps of the old unrisen dough in there.
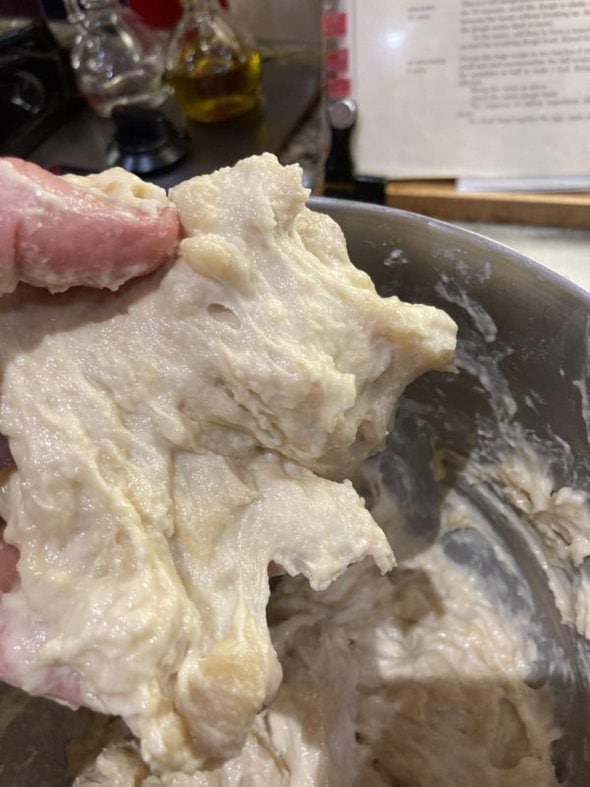
After another 15-minute rest, the dough lumps were a little softer.
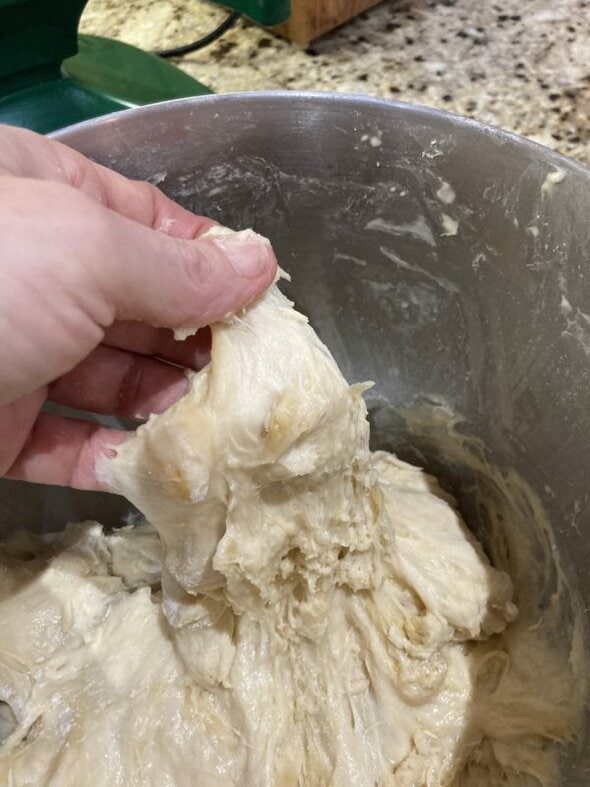
And then the Kitchen-Aid came in handy.

WilliamB said, "This looks auspicious." and I agreed.
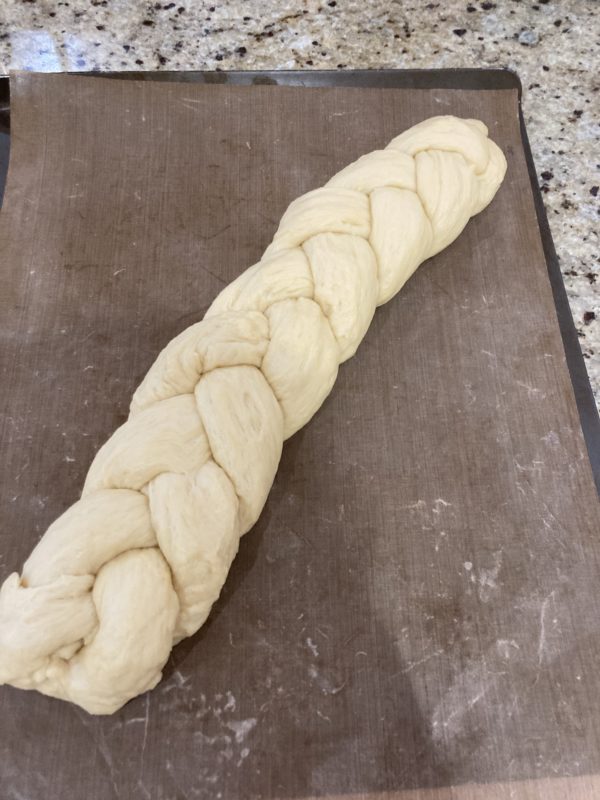
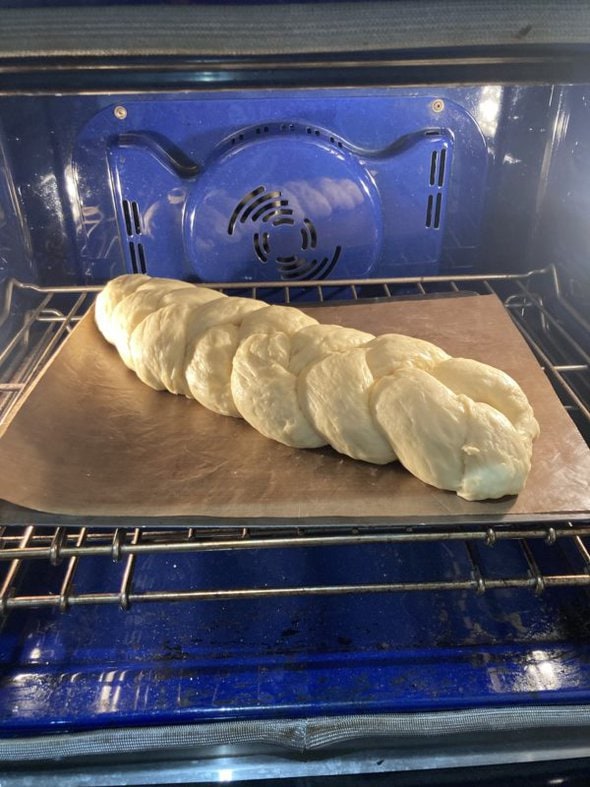
Time for an official rise.

WilliamB opted for a braid with this dough:
And in a move understood by many of us here, the covering of choice was a torn produce bag, even though many bread recipes suggest using a fresh piece of plastic wrap!
Time to bake!
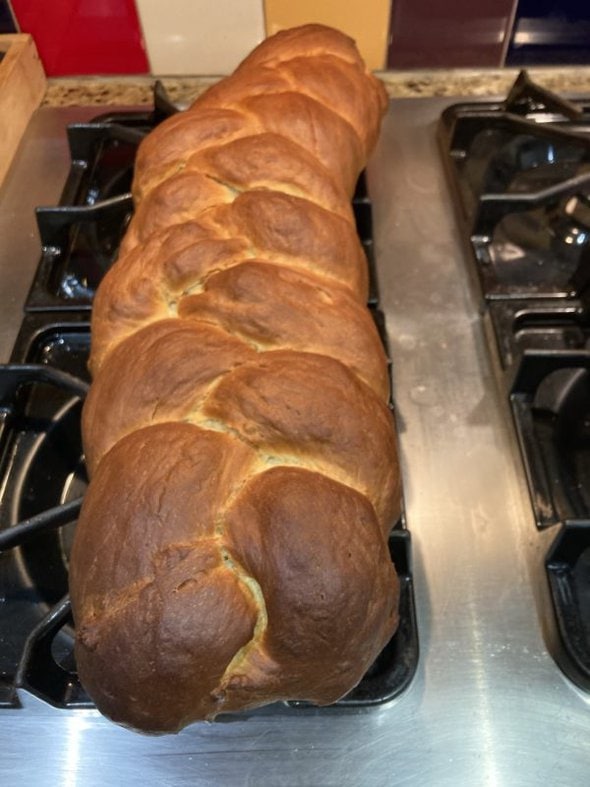
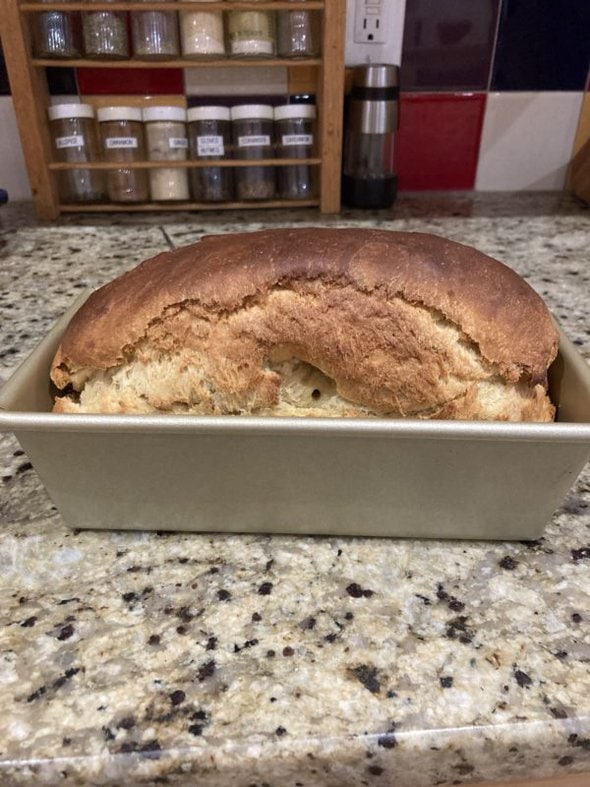
And here's the finished product.
Here's what the inside turned out like. This picture makes me hungry!
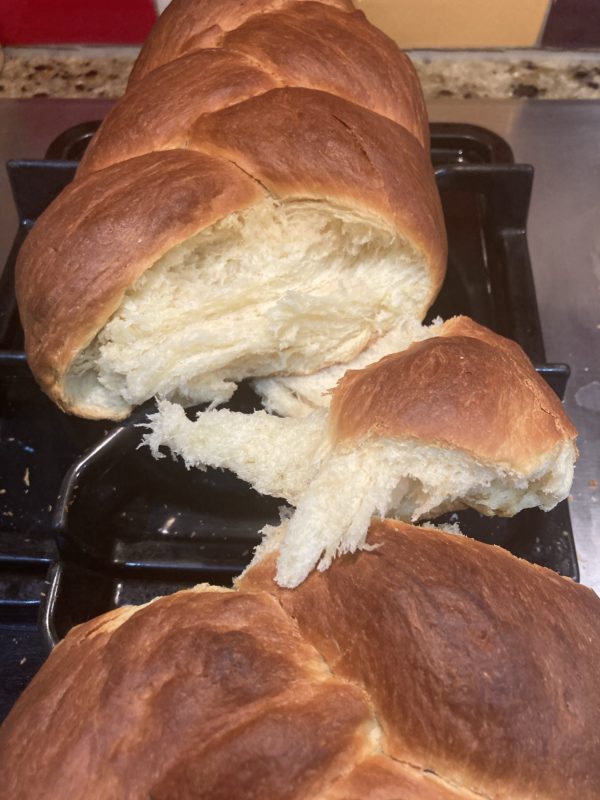
The verdict from WilliamB: a bit bland, but mostly a success.
Now, this batch of rescued dough was actually the second failed brioche dough (!!!)
But, cheered by the first rescue, WilliamB attempted a rescue of the other batch.
This one was stiff enough that it needed to be chopped.
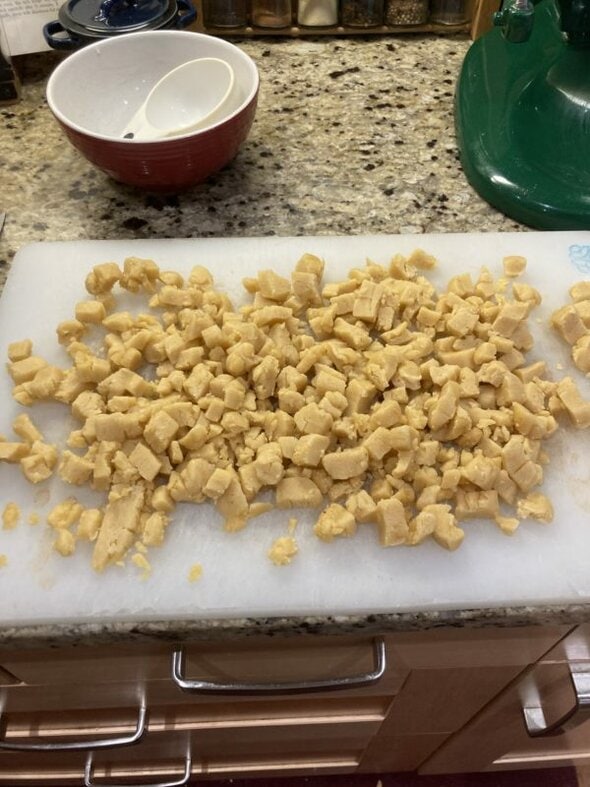
In the midst of the remixing attempt:
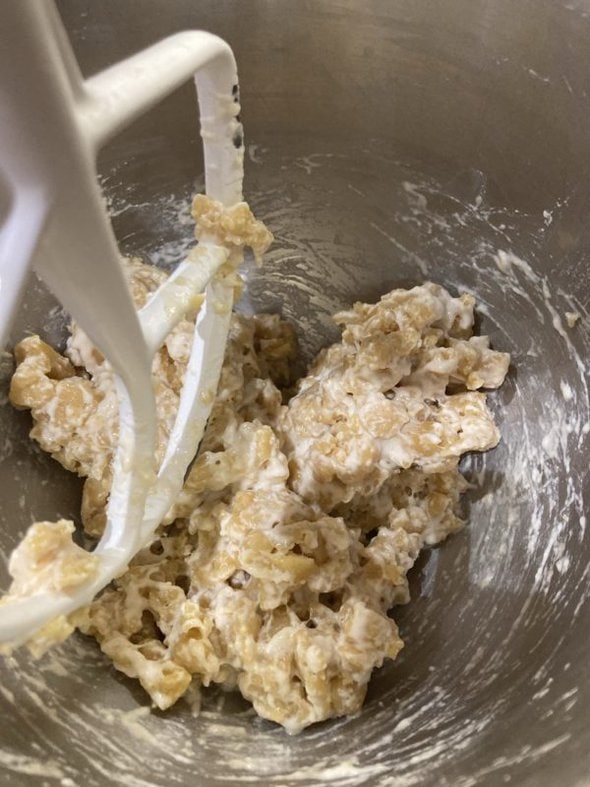
Amazingly, the dough ended up like this:
And after a successful rise, it got shaped into a loaf.
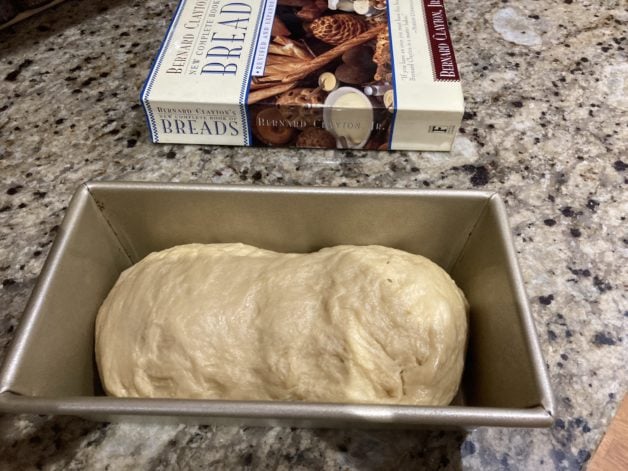
Here's how it looked once it was baked.
A picture of the inside:

WilliamB's review: a good texture and a better flavor than the braided loaf.
So overall, I (Kristen) think this was quite a successful bread rescue! The ingredients used for the rescue were very cheap, and they resulted in a save that kept a buttery, eggy dough out of the trash.
In a case like this, I think an experimental rescue is really worth a try, as long as you have the time. The worst that could have happened is that WilliamB would have wasted a bit of flour and yeast.
And what DID happen is the best-case scenario: the dough was turned into something very edible.
This is exactly the thinking behind my post "Will it work? Try it and see!"
When you have a low-stakes situation (WilliamB couldn't have really made this dough worse than it was!), experimentation is usually a really good choice.
So. There you have it: a pictorial tour through a real-life bread rescue. 🙂
Thank you, WilliamB!
P.S. WilliamB was in a previous Meet a Reader feature; click here to read it.


Wow, if nursing doesn’t work out you’ve got a future as a bread whisperer!
@Laura,
you made me laugh! Thank you for this.
And yes, Kristen would make a wonderful bread whisper
Haha, well, WilliamB deserves most of the credit here!
@Kristen, Nah - my right choice was to ask you for help. After that I was following up on your suggestions. The sponge was the key.
@Laura, Honestly, I didn't really think there was much anyone could do over the phone but far be it from me to limit Kristen's capabilities to only what I could imagine. I was glad to be proven wrong.
great job!
The next worst case scenario is one I recently had.
I made a batch of bread off the top of my head without checking a recipe- trying to go by feel.. and while it worked.. it was bland and did not have a great flavor. So one loaf was a great butter and gravy vehicle... but that second loaf was not going to do much for me.
I chopped it up into little pieces and left it on the table to dry out a little and made a custard. eggs, cream, milk, sugar, vanilla, cinnamon and salt. added the last of a bag of frozen blueberries and made a french toast bake!
@jes, Yes! There are so many, many ways to rescue bread. I tell my children, "The only thing you can really do to completely ruin bread is not to add any salt." And really, it can be rescued after that by bread pudding or croutons.
@Jody S., in a story I think I've told before, I did completely ruin one loaf of bread machine bread when I forgot the yeast. One advantage of hand-making bread over using a bread machine is that it's easier to rescue hand-made bread. There wasn't much I could do with my little brick except use it as a temporary doorstop. 🙁
But I admire WilliamB's and Kristen's combined efforts, and both loaves look yummy!
What were measurements of small dough? (Im trying to rescue small batch brioche dough that didn't rise because of old yeast)
I'm not sure what you mean by "measurement of small dough". Can you say it differently please.
Oh, do you mean, what were the measurements for the sponge (separate but of dough I made after talking w Kristen)?
It was approximate.
- I used the full amount of yeast called for in the recipe;
- then proofed it in a couple of tablespoons of warm water mixed with about a teaspoon of sugar (sugar to feed the yeastie-beasties, proofing it to make sure the yeast was alive);
- then added maybe a half cup of flour and let it rise some.
As you can see from the pictures, the sponge was very liquid.
@A. Marie, What you made was hardtack, right? That is educational! You could have shared it with a grateful homeschooler 😉
@Jody S., in this case, I don't think that even a homeschooler studying hardtack would have been that grateful. On the other hand, I never thought of paging Fred Flintstone...another building block for the town of Bedrock! 🙂
@A. Marie, I've got a beagle and a coonhound who would happy to take it off your hands.
Man, I miss bread baking.
I love this home cooking rescue, good work! “In a move understood by many of us here…” was my favorite part 😉
@Robin, That was my favorite part, too.
Great save! I've had problems with Clayton recipes too. The recipes on King Arthur's website are my go-to. Very reliable.
@Ringo, Every single other Clayton recipe I've tried has been a success. Even his other brioche recipes. This is the only clunker out of several cookbooks. It's a mystery.
Great save WilliamB! My mother, who was a fantastic baker and quite frugal in the kitchen, she often saved the water vegetables were cooked in to add the nutrients back into her homemade bread, would be impressed and proud of you too. Those loaves looked beautiful and look like they would've gone well with orange marmalade and a good cup of tea.
So cool. But now all other recipes in that giant book would be suspicious to me forever more . . .
@kristin @ going country, As I'll like say repeatedly, the mystery is that this one recipe was such a failure. I've used dozens, if not scores, of his recipes and they've all been good. I'm glad this wasn't the first recipe of his I've tried because so many are favorites. I particularly like his book "Small Breads."
I haven't made a loaf of bread in a while (sniff) because I have to be gluten-free, but I remember using fast-acting yeast directly in the flour but never regular yeast, which it seems is what is called for in this recipe. I agree, that's a lot of eggs and butter in this recipe, too.
That's a good save. I don't think I would have thought of that! I've been lucky in that I've never had yeasted wheat bread fail to rise, but I also have not used a recipe like that one for brioche, so that probably explains that.
Sourdough bread, on the other hand, has never risen for me. I did everything I was supposed to do, my starter grew as it was supposed to do , and I ended up with a brick of bread each time. I tried no less than five times with differing recipes, found out I had to drop gluten anyway, and that was that.
Cassava flour won't make yeasted bread, although I can make many forms of quick breads with it. Most cassava bread recipes are actually more of a "cloud" bread, based largely on eggs. I don't like egg "bread." I'm having success now with commercial gluten-free breads that use flours I had to avoid during the elimination stages of my diet, so I will probably try to start making it at home, if I can find a reliable recipe. There are GF bread mixes, but $6-$7 for the mix for a single loaf, and I still have to make it? No thanks!
@JD, GF bread is a challenge. I'm not an experienced bread maker but most gf recipes I've tried- in the oven or bread maker, are unimpressive at best. Many sink and/or turn to bricks quickly.
You two are serious foodies. 😀
Very informative! I didn't even think to make a smaller batch and incorporate it into the larger batch. Thanks!
That was some serious determination and a boatload of extra work. Given the price of eggs and butter, I commend you both!
When I was in college, I forgot it was in the oven and went to a movie with my roommate. It was called "Heartland", and when the main character was baking bread, I looked at my roomie and said, "OH NO!! OUR BREAD!!" When we got back home, we found a very very large crouton in the oven.
More recently I forgot salt, and the bread rose so high during baking that it touched the coils on the top side of the oven and burned.
Oh yes, a salt-free dough really goes crazy with the rising!
@WilliamB, I just read your Meet a Reader and quickly skimmed the comments. You have a lot of wisdom, including strongly shielding your privacy. It is a privilege to hear from you.
I was a journalism student at Indiana University in the 1970's and had the opportunity to do a telephone interview with Bernard Clayton. I don't remember much of the interview except that he was very willing to answer questions from a geeky student not only about his journalism career but about his bread making books too.
Oh, that's so cool that you got to talk to him!
@Barb, Wow! Do you remember why you were interviewing him? I didn't know he'd been a journalist. [WilliamB goes off to lose self in the intarwebs...]
Mr. Clayton was the Indiana University news bureau chief, so he was familiar to the journalism department. Can't remember the exact assignment other than it was an interview with a local resident. I also remember interviewing one of the campus bus drivers for the same assignment.
I have to admit that I have never owned one of Mr. Clayton's cookbooks.
Woah. Gold stars to you both!
I hope that one day I'll overcome my fear of baking bread and just go for it (and keep going even when it doesn't start out great).
@CrunchyCake, follow a recipe that uses very few ingredients so you don't feel wasteful if it fails. You will be relieved to see that it doesn't take very much hands-on time, and when you follow the instructions, it almost can't fail. There are times I wish that we all were neighbors because I'd invite you over and show you in person!
@CrunchyCake, You might start with Angel Biscuits, which use both yeast and baking powder. Another reason to like them is that you can keep the dough in the fridge for up to a week, making a few biscuits at a time.
Here's a recipe from a long-time poster from the late, lamented Gail's Recipe Swap:
Tim's Grandmother's Angel Biscuits
Richard in Cincy; these are a real treat and totally yum, the only biscuits I will eat. A basket of these on the table when company comes disappears in minutes since most people have never had yeast-raised biscuits. And, they are really easy. With the dough in the fridge you can have fresh baked biscuits in the time it takes to heat the oven and bake.
1 pkg. yeast (2½ t.)
5 c. flour
1 t. baking soda
1 t. salt
1 T. baking powder
3 T. sugar
¾ c. crisco
2 c. buttermilk
Feed yeastie-beasties.
Sift dry stuff.
Cut in crisco.
Add buttermilk and beasties.
Fridge in covered greased bowl overnight; this’ll keep up to a week.
Shape into ½” biscuits.
Bake at 400F for 12 min, or till golden.
@WilliamB, Thanks so much! Maybe we'll give these a try. Fresh biscuits with butter and maybe a little honey sounds SO GOOD right now.
@Central Calif. Artist, Good advice. I think I had tried Kristin's pop-overs and they were ok but I made a mess and then that put a damper on my bread baking goals. It's time to get back on that saddle cuz the payoff seems so worth it!
@CrunchyCake, I make this every 2-3 weeks, and freeze 2 loaves (or give one away).
1. Heat to 120º: 3 c. water (or whey from making yogurt or from a failed ricotta cheese experiment), 1/3 c. honey, 2 T. fat (coconut oil, butter, vegetable oil, whatever you have)
2. Pour it in a large mixing bowl, and add 2 T. yeast, 1 T. salt, and 1 c. whole wheat flour. Whisk it, and leave it for a minute or two to be sure it gets frothy (which means the yeast is good).
3. Stir in 3 more c. whole wheat flour, then start adding white flour 1 cup at a time, until you have added 4 or 5 more cups. If it isn't too sticky, stop at 4 cups and reserve the 5th.
4. Dump it on the counter on top of the reserved cup of flour (or use more flour if you need to) and start kneading (look it up on YouTube to see the method) for about 5-10 minutes, until you can poke it with a finger and see it bounce back.
5. Wash the big mixing bowl, spray it with Pam, put the dough back in the bowl, spray the top of the dough with Pam, and put it in a warm place for about an hour.
6. When it has doubled in size, take it to your husband to sock. (That's how we do it because it makes us laugh, but you can punch it down yourself).
7. Knead it again, divide it into 3 equal pieces, smoosh and shape and squish each piece into a general bread shape, and put each one in a loaf pan, sprayed first with Pam. (I weigh the lumps on my yarn scale, going for 16 oz. each, but you can guess because closies count.)
8. Let it rise for about 45 minutes to an hour (until it looks like a loaf of bread), then bake for 35 minutes at 375º. It will smell like heaven a few minutes before you pull it out of the oven. Dump the loaves out of the pans as soon as you pull them out, cool for a pair of minutes, and then grab a serrated knife and some butter. . . you will think you have died and gone to heaven.
9. Let us know how it turns out!
That was just fascinating and a great save of expensive ingredients. Thank you!
Kudos to both of you. That was a great save.
Nice job, both of you. Persistence is good.
Thank you, FG, for all the help and for sharing. The initial doughs were discouraging, then I had a lot of fun researching and learning, and am pleased to have a recipe for success for the next time the dough doesn't rise. The first loaf went quickly, the second is still in the freezer. I think it's time to get it out to celebrating sharing the process.
Everyone else, don't blame Kristen for the poor photos. She had to rely on what I sent her.
Very impressive, Kristen—and WilliamB, too.
Kristen, if you ever wanted to stay self-employed, you would be a major resource as a consultant on a host of fronts. Rehabbing furniture comes to mind first, frugality in many different forms, creative breakfasts, and now bread rescue.
The breads look delicious.
This was so fun, thank you both, I enjoyed reading this. I totally admire people who bake, especially bread. It is totally out of my realm, I would not even attempt this; I do not particularly enjoy baking, the best I can do is muffins and cookies and a simple cake if it is an easy recipe to follow. Otherwise I stick to cooking which I love, it is my happy place.
You get to live vicariously through WilliamB. 🙂
William B et al,
I use Mavis' Dutch Oven Bread over and over and over. (She writes at https://www.onehundreddollarsamonth.com/ )
2 cups flour (heaping if you live at higher altitude)
2 cups water
1 tsp yeast
a sprinkle of salt
That's it. Mix together (add a little more water, if needed) for a clumpy dough, then cover and let rise for 8-18 hours. (No kneading or any other effort needed. Takes about 5 min.)
Heat your oven to 450. Grease the bottom of a Dutch oven, and put in to heat about 15 min. Dump the dough in, cover, and bake for 30 min. Take the cover off and bake for 10 min. more. Dump the loaf out and let cool.
This round loaf makes the nicest 'crumb, ' excellent sandwiches and toast. Mavis has all sorts of variations, including raisin...but I just go back to the main recipe.
P.S. I've added oatmeal with a little extra water, with success. My bet: you could use your leftover breakfast oatmeal mixed in.
@CINDY BRICK, I tried this and it didn't work at all for me. Other recipes I've tried (and I think including the one in the link you provided) use 3 cups of flour to 1.5 cups warm water, so a 1:1 ratio yielded a runny, too wet dough. Does the 2 cups of flour work for you?
Good job rescuing the dough!
I make my own mayo with an immersion blender. Especially at first I had failures when it just wouldn't emulsify. I don't know why because I make it often now, and I never bother with all the tips like "eggs must be room temperature". I take the eggs straight out of the fridge, add the other ingredients, and works 99% of the time. But in the beginning . . .a whole cup of avocado oil--YIKES, not so frugal! There are ways to still turn this into a salad dressing to at least "rescue" it. I've also learned to add some whey from yogurt and let it sit out on the counter to ferment--that ways the homemade mayo doesn't go bad in 4-5 days, because it's hard to use up in a short period of time unless I'm making potato salad for a crowd!
Kristen: One of the only breads I buy rather than baking myself (these days) is a brioche that my husband craves. After reading this rescue bread post and learning A LOT, I was wondering if you had a brioche recipe that you would recommend (preferably a dough that rises! LOL) Cause I have never even tried to make brioche!
I have used the recipe from America's Test Kitchen before! https://www.kcet.org/food-discovery/food/weekend-recipe-no-knead-brioche
@Millicent, the key thing I learned for brioche is to make the butter-less batter first, then add _softened_ (not melted) butter afterward. There are a number of good YouTubes showing this. Most of them are in French but the videos are clear anyway.
This was such a delight to read - and thank you for the extra recipes in the comments!
Wow! I was just so impressed that WilliamB’s oven was so clean. Wish mine looked that good. I have a self-cleaning oven but the one time I used it, it blew the fuse when I turned the microwave on at the same time. We had to have the repairman out, so I’ve never run the self-clean option again! Good job on the bread save!