
Joshua's newly black bed
We got this bed back in 2001 as a hand-me-down from an extended family member (Mr. FG's uncle's wife's aunt, I think!).
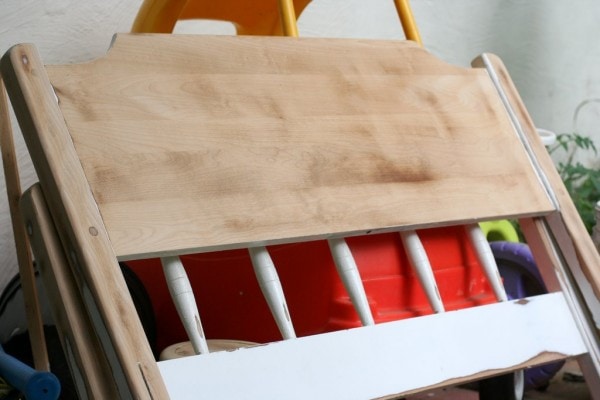
When it arrived at our house, it was stained with a somewhat dated-looking color, and it didn't go with the white dresser at all.
So, my younger brother and I scuffed it up and slapped a coat of white paint on it.

I really had no clue about painting furniture back then.
I think I might have used wall paint, actually.
And horror of horrors, I think we used a wall roller to apply the paint, so the finish was, shall we say, not too smooth.
After 9 years, the white paint was sort of off-white, and it was starting to chip off in places from wear and tear. Since all the other furniture in this room is black, I thought a black bed would be more appropriate, and he agreed.
So, we took the bed apart, and found it necessary to do a little bit of decluttering and vacuuming.
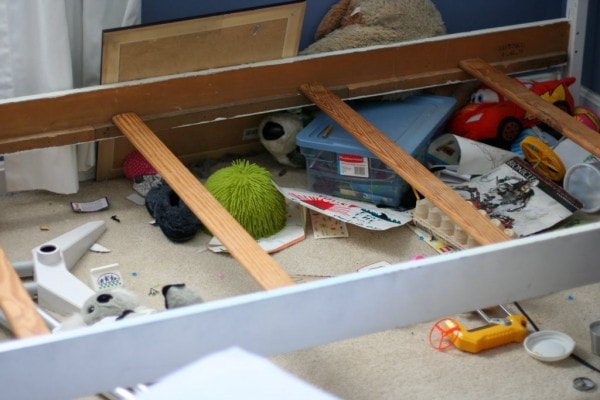
Because you can't exactly put a boxspring and mattress directly on top of all that.

(as you can see, a lack of underbed space does not deter my children from keeping things cluttered!)
This took me two afternoons and I could probably have gotten it done faster, except that I really wanted to sand down to the bare wood wherever possible, just because I love to have the wood grain show through the black paint.
Unfortunately, whatever paint I used on that first go-round was remarkably resistant to sanding.
Either that, or the problem was the gobs and gobs of paint I used.
Ahem.
Whatever the cause, my orbital sander and I had to spend a lot of time together to get rid of the paint (and I went through a small pile of 60-grit sand paper!).
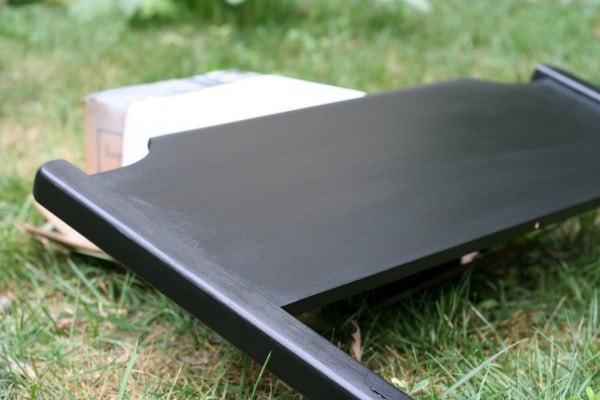
Once it was all sanded down, I used the painting method described in my How to Paint Wooden Furniture post to paint the bed black.
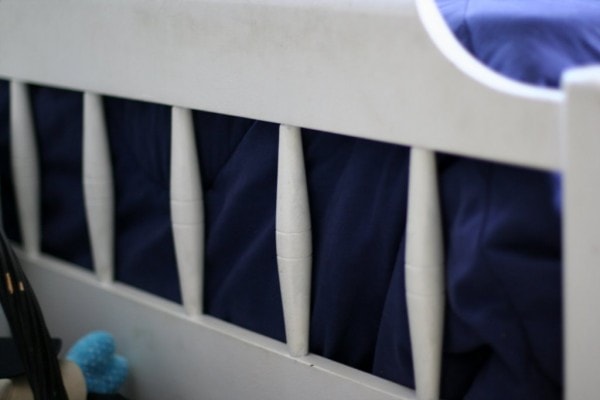
(excuse the dust on the left piece. And these really are black-black, not gray like they appear!)
You can see how the wood grain is showing through on the one side rail. Love that.
I don't actually paint in the grass, just so you know. I use sawhorses whenever possible.
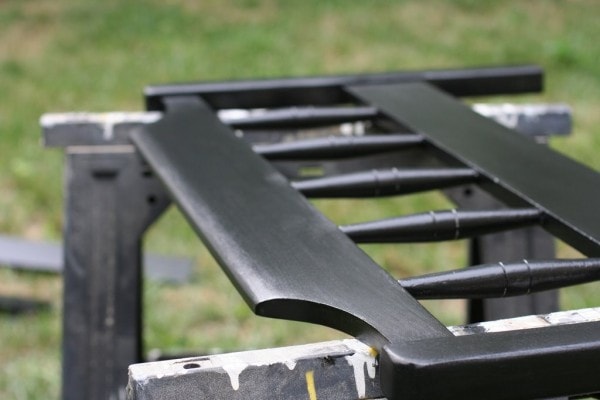
And sometimes I use cardboard boxes to prop things up. 😉
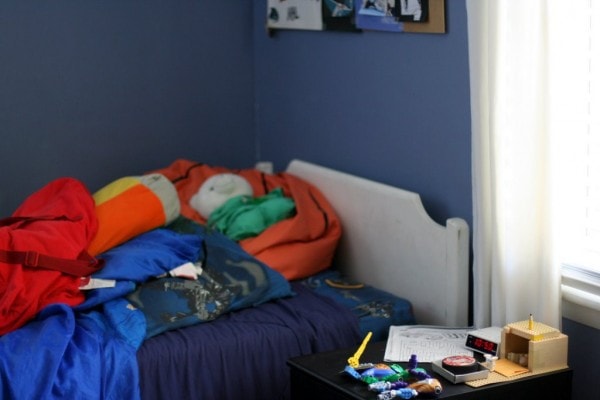
I was going to let the pieces sit overnight before putting them back together, but Joshua wasn't going to have any of that....he was very excited to get his new bed!
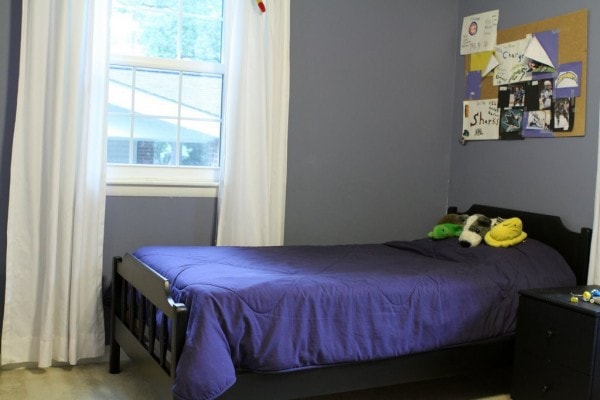
Unfortunately, the bed is in a dark corner of his room, and it's kind of a cloudy morning here, so I had trouble taking pictures. None of these really blow my hair back, but I'm too impatient to wait to share about his bed, so here you go!
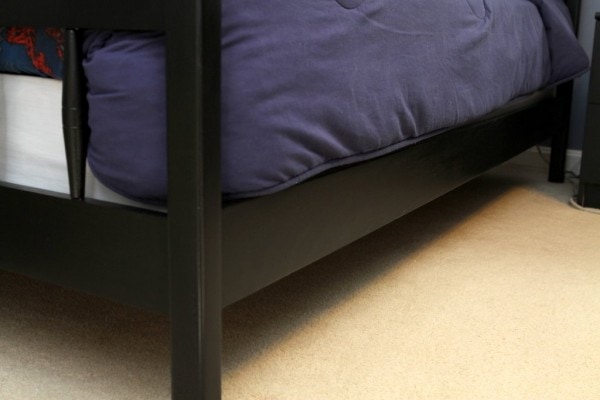
First, check out the underside of his bed...there's nothing there! At least, not for the moment.
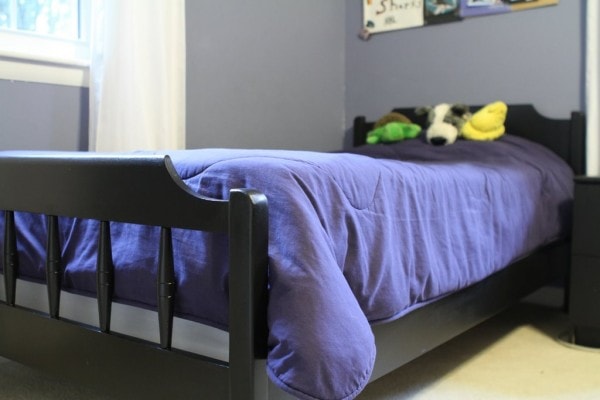
I'm not a big fan of the blue comforter/black bed combo, but we will get another comforter soon.
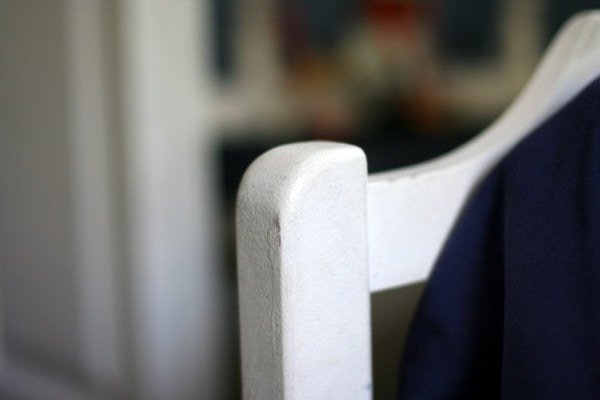
I'm so pleased with the look of this bed...it really does seem like a brand new piece of furniture! The pictures don't do it justice, so you'll just have to trust me on that. And Joshua's very pleased as well...I think he feels that his bed looks a little more manly now. 😉
Not only is the bed beautiful, I think it was a total bargain, especially for a bed made from 100% real wood.
A black twin bed from L.L. Bean, made from birch and, uh, manufactured wood comes with a $399 price tag.
Even Ikea's only twin black bed, which is made from "Fiberboard, Particleboard, Acrylic paint, & Foil" costs $129.
Pottery Barn carries a solid wood bed (not in black, though) but that would run me $599 (on sale!).
This bed, on the other hand, was free!
And a $3.50 can of primer, a pack of sanding pads (I already had those, so I don't remember what they cost! It's usually less than $5, though), and a $7 can of paint have made it look like those beds that cost hundreds of dollars.
Plus, that can of primer and can of paint are also going to rehab three picture frames and a mirror and possibly a few other items as well.
So, my out-of-pocket cost for redoing this bed is actually far less than $16.50.
Stuff like this just makes me all happy inside...yay for hand-me-downs, for high quality furniture, and for fabulous paint.
Wow, the bed looks fantastic! You did a great job and I'm sure Joshua is thrilled. I'm always so impressed by how people transform everyday furniture and take it beyond its original appearance. The folks over at Young House Love do that sort of stuff too and it's really inspiring.
How about getting Joshua some bins or even cardboard boxes to slide under the bed. That way things can't just fall under there and get lost?
I was a little boy too so I know how hard it is to keep things clean but a bin full of mess is better than just piles of mess, I guess.
He does have a bin for Knex that goes under there, but yeah, maybe he could use a miscellaneous bin too. =P
Nice job! It looks awesome! I wish I had your talent (and time!).
Oh, and I second the bin idea for under his bed. 🙂 Works for my kids!
Not sure if you will see this comment or not, but want you to know that I love your blog, all your ideas about most everthing, the links you tell about and everything that I have not mentioned. I like it all.
My husband and I talk of what I learn on your blog almost every day.
I had never heard of INGDIRECT until I found your blog. Now, we have five different savings accounts and it is a wonderful place to save my money. I have no problem with your getting a small amount for suggesting someone to their program.
The water for life is also one of my special challenges. I also want to start saving to help build water wells around the world. Why would anyone care if you are given a gift for telling your readers about it.
Keep up your ministry of helping others see a better way to live. I for one, am a happy visitor to your blogs.
Linda Walmer
Of course I read your comment, silly! I read every single solitary comment that's left on this blog except for the spam ones which get funneled to a spam folder.
Thanks for your encouraging words. 🙂
Wow! I love that bed!! It is amazing.
Good for you! It looks great. I'm often really saddened by how expensive all-wood furniture is...even the particleboard stuff costs hundreds!
Congrats! The bed looks faboo!
I did something similar to my bedroom furniture last year. Bed frame, bookshelves, and end tables. All it cost me was paint and time - and it's like I've got brand new furniture!
It came out beautiful!!!! I am searching for and end table , and nights stands to do. (i hate my hand me down night stands.... but they are some type of veneere...
It looks great! And this post was exactly what I needed. My 6 year old son has been sleeping on a mattress and box spring on top of just a metal bed frame for 4 years. I've been looking but haven't found anything affordable that I liked for his room. Now, I'll be more encouraged to try to find something used that can be 'updated' as needed. 🙂 Thanks!
I sure wish you lived closer to PA - I'd hire you to do this for some of our furniture! 🙂 (Yes, I could do it myself - but you do it SO well! lol)
I read this post and reread how to paint furniture and thought about those round posts. I wonder if using a dremel tool would help sand those non-flat surfaces.
Probably...I just scuffed them up manually with some sandpaper because I was losing sanding steam by that point in the game. lol
Is the purpose of sanding to get rid of the old paint or to rough up the surface so the new layer of primer&paint will stick? (Leaving aside a preference for woodgrain, that is.)
Me again - I have two questions and a thought.
Question: I need to touch up the walls of my place, painting dings and scratches, chips on corners, and ideally the gauges from learning how to install shelves (one dropped). Any advice to make it look nice?
Thought: A further cost for some of us would be an orbital sander. I expect you're not a fan of using a drill for that, given what it does to the appearance of the grain.
Question: what do you think of paint stripper?
If you've got a ding or a deep scratch, I would fill it with spackle first. And for gouges, I would DEFINITELY use spackle. Do multiple applications and sand thoroughly before priming and painting.
I've never used a drill for sanding, but I think it would be much less comfy than an orbital sander. Even an orbital sander gets uncomfortable after a while. Ours was not expensive, and we had already bought it before I started painting furniture (we bought it for home remodeling purposes), so I've never tried anything else!
When I was sanding this particular piece, I did think about paint stripper. Usually it's not that hard to sand a piece, but this one was a doozie. I've stripped stain with stripper before, and it was a messy, not-super-effective process, which has made me loathe to try it with paint. I suppose I could try it for those hard-to-reach places.
You should consider trying Citristrip (sp?) for stripping paint. It is very effective on paint. It makes the sanding process much more bearable. I have had really good results on wood that was treated prior to painting (which most qualitiy furniture is).
I should note, it also has a much more appealing smell than most paint strippers.
AWESOME upcycle!!!!! The bed looks brand new! That's the sort of project I LOVE and plan to feature on my barely going blogs (upcycledliving is even less developed than upcycled crafts.) Gotta make more time in my day for projects.
Wow! You did a fabulous job! I admire your talent in all areas of your house. I'm sure that Joshua was thrilled with his "like-new" bed.
Are you sure you weren't in my house taking a picture under my son's bed? It looked familiar. The redo looks great!
GREAT paint job as usual Kristin! I actually just bought a few end tables at GW that I'm going to paint black using your tips and tricks again. That paint is a DIY wonder!
Looks great.....we have two beds that could use painting...never even crossed my mind. Thanks for the inspiration!
Wow, that looks great. You did such a good job.
Bed and black nightstands both turned out amazing! I
purchased a lot of black furniture for a few rooms in my house right before economy bottomed out. I have stained end tables in storage that were my great grandmother's and are collecting dust. They are a similar syle to the night stands you painted. I would like to give it an "antique" look by trying to scuff up edges. Have you tried that before? Any tips? Thanks!
You are inspiration to me, I want to paint my old wood nightstand, dresser and headboard (maybe black!) all matching, a kitchen table top and some pic frames.
My dresser has that old embossing in all the drawers, do you have a suggestion as to how to fill them in or do I just leave it and paint and change the knobs?
I LOVE all of your posts, they have totally inspired me to stop wishing for new furniture and paint what I have to make it look new! Here's what I'm wondering...I've only really seen people painting old furniture black or white. Is it possible to paint it brown (like an expresso shade) and make it look as good?
Yes, as long as you use the paint I specify in my How to Paint Wooden Furniture post (Painter's Touch in the can), it will turn out like my furniture. 🙂 Don't be tempted to try another kind of paint because I can't guarantee the results!
Does this paint come in colors other than black or white??
Yep, but the colors are fairly basic. Check at Home Depot to see the options.
I love your blog and the whole "frugal girl" idea. Almost every piece of furniture in my house is something someone wanted to get rid of and I took for free or bought inexpensively. I love to repurpose! I have a specific question about painting furniture. I have a chest of drawers that belonged to my grandparents. It is all wood and has veneer on the drawer fronts. It is chipped in a couple of places on the drawer fronts. In your directions about painting wooden furniture you mention patching some chipping veneer. Can you please elaborate? I want the piece to look good when I am finished. Did you completely strip off the chipped veneer or patch it? The chest has about 6 - 7 drawers and only two of them are chipped - it seems like more work and a shame to peel the veneer from all drawer fronts. Please let me know what you have done with chipped veneer on pieces you have painted. Do I use wood filler and sand? Do I sand off the edges of the chip and paint over it? Your suggestions are appreciated. Thanks much!!
I've done both, actually, depending on how much is missing. If it's just a small bit, then I spackle over it, sand it, and the prime and paint as usual. If the damage is significant, then I've sometimes pulled off the whole piece of veneer on just the affected drawer.
You could also use wood filler instead of spackle if you like, although I think the wood filler is mainly important to choose if you'd be staining instead of painting.
(You'd need a whole different set of instructions if you were going to stain instead of paint. Painting is much simpler, in my opinion!)
The bed looks great. Good job!
Thank you! The piece you saw isn't quite done...that was just after one coat. It looks a lot less blotchy now. 🙂
What happens if I don't sand the bed down? Will it still work?
If you don't at least sand off the glossy finish that's currently on the furniture, your primer and paint will have a hard time sticking, and over time, it'll peel and chip off. If you want a durable finish, you've got to at LEAST sand off the hard gloss that's already on the piece.
Sanding to bare wood is quite optional, though.
I just came across this and your other post - how to paint furniture. I love the look and have an old bed frame and dresser that was mine as a little girl (literally decades ago) ;). My dad had refinished it then (stripped and re stained) but after years of abuse - getting handed around to other family members - and then stored in a basement for 10 yrs, it needs a lot of TLC. I believe the wood is maple and he stained it a light stain which is very yellowish in tone. We are updating my sons' room and decide to dust this off to give him a bigger bed plus it's solid wood.
I am glad to have found your blog and hope you can help me with this question - but how do you finish both sides of the headboard? I know it's a silly question, but I'm pretty new to the diy of painting wood. I imagine you work one side and let fully dry then work the other. But, it sounds like you worked pretty fast on your projects. Also, what would be a good cleaner for lots of dirt and grime?
Yep, I do one side at a time!
I used TSP 20 to clean my greasy kitchen cabinets before painting them...but you might not need something quite so strong for a bed frame!
What about a spray cleaner, like Fantastik?