
A DIY countertop redo and a kitchen cabinet painting project
Normally when I share DIY projects, they're my own...but today I have two reader projects to show you!
The first is from Sandra, who gave her counters a faux granite finish. Here's what she said:
Hi Kristen,
You might remember me from my floor tile grout painting pictures a couple of years ago. That had held up very well, I'm about to do some touch ups to the high traffic areas soon, but other than that, it's still looking great.
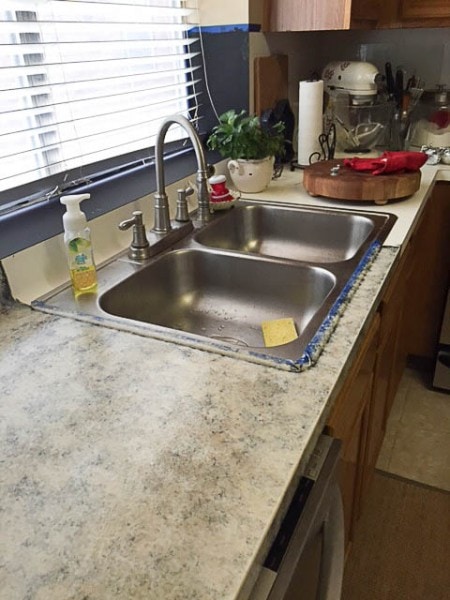
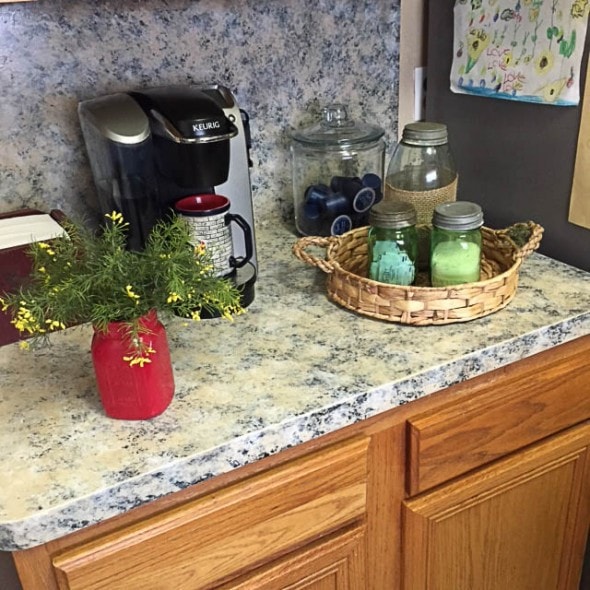
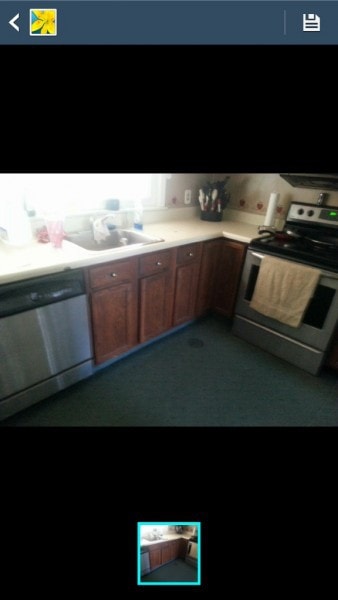
The reason I'm emailing you is to show you another comparatively frugal fix with paint! I have detested my plain white laminate countertops for years, but they are in perfect shape (wouldn't you know) and after pricing replacement counters, I just couldn't justify the expense. So after stewing about it for years, I did some research and found a product called Giani Granite Countertop paint.
So this past weekend I gave it a go. It involves a black primer coat, then three different colors of paint sponged on with the included sponge, then a clear topcoat after that dries.
Everything is included in this kit, which cost about $80 on Amazon. This covers 16 running feet of countertop.
I am not particularly an accomplished do-it-yourselfer, my only attribute is that I brashly jump in and try things, figuring hey, if others can do it, so can I!
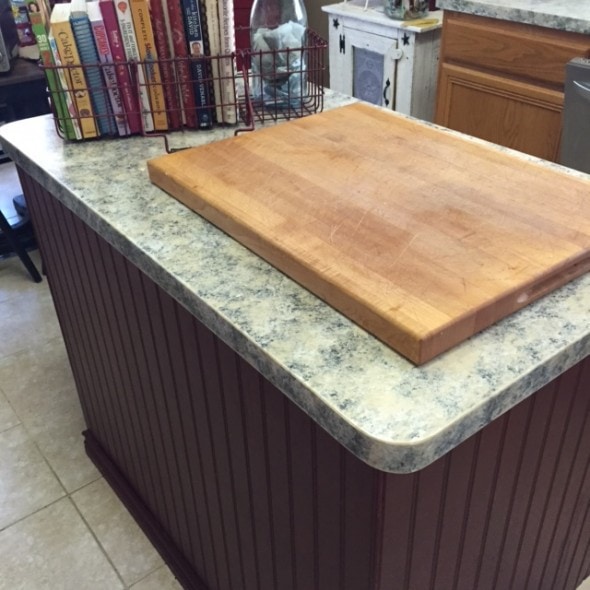
Sandra, way to go to just bravely jump into a project like this! Your island especially looks great.
Sandra chose the "Sicilian Sand" color, by the way, but the Giani paint also comes in some other colors.
_______________________________
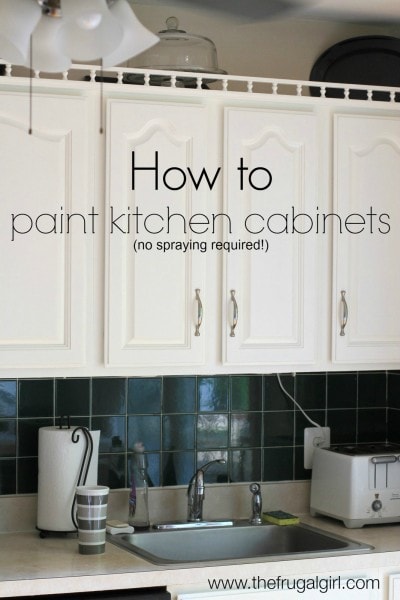
For our second DIY project, here's reader Lisa, who tackled the job of painting her kitchen cabinets.
Hi, Kristen! I'm sure you wonder sometimes who is out there reading your posts...well, I am!
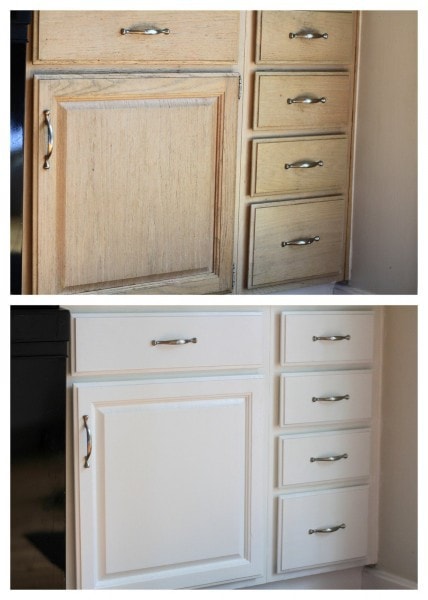
I read your posts from last summer(?) when you took on the job of repainting your kitchen cabinets and I was empowered!
(Frugal Girl cabinets)
Following are my before and after pictures--I didn't think of taking a good before picture, but you can get the idea while you enjoy my country apple stencil from 1996 and peruse my cookbook collection.
I printed out, studied and followed your posted directions and jumped right in.
I used 2 coats of Benjamin Moore Stix water-based primer (the absolutely best primer out there!) and 3 coats of Benjamin Moore Cabinet Coat in Simply White. I splurged a little on the cup drawer pulls, but everything else came from Home Depot.
We also replaced our 20-year-old refrigerator and ancient microwave--also from Home Depot and both for less than $1300! The counter top is walnut butcher block we bought at a wholesale design center and had installed by our contractor.
The next step is to get the hardwoods under the carpet repaired and refinished, but that envelope's not quite full yet!
Thank you so much for the advice, motivation and sharing your experience. I'm really proud of myself--I did 95% of the work myself, including installing new hardware and hanging the doors. DH bought me my own smaller-sized drill, held doors while I drilled holes, ran to the paint store and was my loudest cheerleader. He also ripped up the carpet, which is the worst job ever!
I hope you enjoyed this--I was SO excited to finally be able to show you!


_____________________
Lisa, your kitchen looks like an entirely different space now! You did such a great job...big fist bump to you because I KNOW just how much work a project like this is.
(Also, um, it looks like your kitchen had carpet in it before. Is that true? If so, just a big, "Oh dear." to that! I had carpet in my apartment kitchen and it was so difficult to keep clean. And once I spilled an entire pitcher of lemonade on it. Ahem.)
_____________________
If you're feeling motivated to give cabinet painting a try, click on the photo below to see my tutorial.
And if this post hasn't had enough before and after for you, here are the before and after photos of my kitchen cabinets.
______________________
Sandra and Lisa, thank you SO much for sharing your projects with us! It's always super inspiring to see other people's DIY projects.
Have any of you ever tried the faux granite treatment? Or painted your cabinets? I'd love to hear about your experiences in the comments.


I so want to try the Giani granite countertop piant! I have white laminate and you see every crumb which drives me crazy. For less than $80, that is remarkable! So grateful for this post and tip!
If you try it, send pics! We'd love to see how it turns out.
These look great! We are looking to buy a new house. I'm going to keep these ideas in mind in case we have to redo our kitchen!
I had researched painted countertops and saw the Giani countertop paint. I liked it, but I was interested in doing my bathroom counter in plain black. The counter was a makeup-stained light gray formica. I tried that paint that says it sticks to plastic countertops -- only it didn't, and hours of frustrated sanding followed. My next attempt, after more research, was to use acrylic "bonds to everything" primer, followed by rather expensive acrylic paint, then acrylic clear coat, two or three coats. It wasn't easy, but a year later, the countertop is still black. I don't think it would work for heavier use areas -- this is now a lesser used bathroom -- but it did the job and I think will hold until I can finally replace the top altogether.
These readers did great jobs!
Wow! Who would have thought paint could make such a difference.
So I've got the world's worst kitchen - built in the 1950's and kinda sorta updated in the '70's. The thing is... there are sooo many layers of old paint on the cabinets, that before I could really paint them, they would need to be stripped (they will barely close as it is, one more layer would push them over the top) and I'm quite sure there are several layers of lead paint on there.
The net result is that I just haven't been able to make myself tackle the job. I'm sure sanding is out, so maybe a heat gun, or a chemical stripper? But all those little crevices... oy! It sounds really daunting to me. Anybody have any experience in this department?
Oh man, I don't know anything about lead paint removal. I'd do a lot of reading about that before tackling anything that could be lead!
Thanks for the nice comments, everyone! I promise you, the Giani countertop paint is easy. I am no pro; it's not even much of a time commitment, EXCEPT for drying time, and the time you have to use the countertops "gently" ( no soap for 14 days). My kitchen was up and running after an overnight dry of the clear coat. But this was two different weekends, so I was already using the half of the counters I'd done the week before. It's also very forgiving. After it was all done, with clear top coat dried for 24 hours, I saw a couple of places I needed more of a certain color. So,I dabbed it on, let it dry, and top coated the area. Perfect! Cabinets next! Thanks for the inspiration!
The Giani countertop paint is popular in my family! My aunt used it first and she did a great job in her kitchen - she kept it really dark with muted greys and a little neutral sand color. After a couple of years she did get a couple of small (1/4" x 1/2") scratches from sliding her coffee maker back and forth. But she just patched the color w/ a small brush and put more top coat over. My MIL just did this in their rental - think harvest gold EVERYWHERE - kitchen and baths. And it looks great... you can customize the color just by using less or more of each accent.
*** I would recommend that you take out your sink and paint then reinstall the sink. It's difficult to get a really good seal up against a sink edge. If you don't get it smooth and perfect it will peel.
I did the Gianni Granite. Don't do it! It looks really great a first, shiny etc BUT...unfortunately IT DOES NOT LAST and I followed the directions very carefully. After 6 month a few dime sized pieces started chipping off. It looked awful. We had to buy brand new counters. You will be touching up ALL THE TIME unless of course you don't use your kitchen. I find a much better cheap alternative is to use butcher block. If you do want to try gianni on a pieve of something let me know I still have the cans.
Great information on a kitchen remodel! One question, should you paint the cabinets before or after the countertop replacement?
I'd paint them before! That way you don't have to worry about getting paint and primer on your new countertops.
I had painted my kitchen cabinets white from a dark wood a few years back and love the difference it made. I have been contemplating on painting the counter tops with a kit but have been very nervous about being able to pull it off, now I may look into the kits again. Thanks for sharing the DIYs!