Every Wednesday (ok, most Wednesdays!) I share a baking recipe. And lots of pictures of said baking recipe. I don’t call this Wednesday Baking because I bake solely on Wednesdays…no, my oven gets a workout much more frequently than once a week! Wednesday just happens to be the day I share baking recipes with you. All the past baking posts are archived in the Wednesday Baking category, which can also be found in a tab underneath my blog header.
In our current culture, baking any sort of yeast bread will earn you impressed looks from most people, simply because yeast baking is something of a lost art.
But if you really want to surprise people, tell them you make your own pita bread.
Because everyone thinks that it surely must be too hard to do this at home. But it’s totally not, and so you should add this recipe to your repertoire.
Besides being an impressive skill, pita-bread-baking will also allow you to eat pita bread that is far more tasty than the stuff you can buy at the grocery store. In their defense, pitas from the store probably were tasty when they were first baked, but they’re obviously not super fresh by the time you buy them. When you bake your own pitas, you can eat them hot from the oven, and that’ll beat anything you can buy at the store.
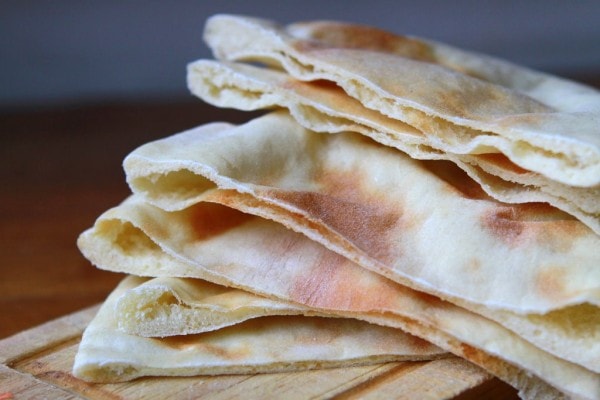
Though I’ve been making them for years, pitas always astound me. The dough is nothing special, and there’s no special shaping technique either. You just roll out rounds of dough, place them in a very hot oven, and somehow, they turn into hollow little loaves.
The dough-making process is nothing remarkable, so I’m just going to share step-by-step pictures of the shaping and baking part of things.
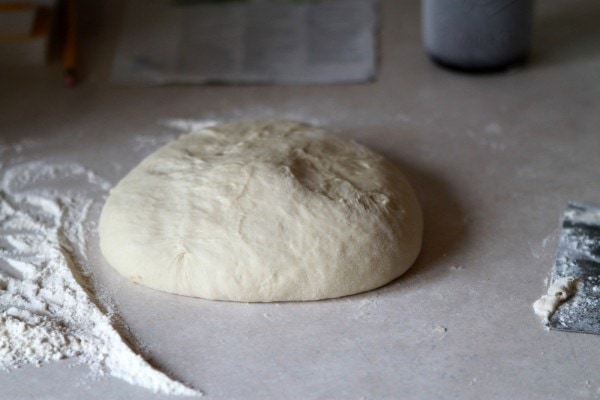
Here’s my lump of dough. After your dough has risen, you’ll want to punch it down and let it rest for 10 minutes. This makes the dough a little easier to shape. At this point, you need to turn your oven on to 400 ° F because you need a fully preheated oven to bake your pitas.
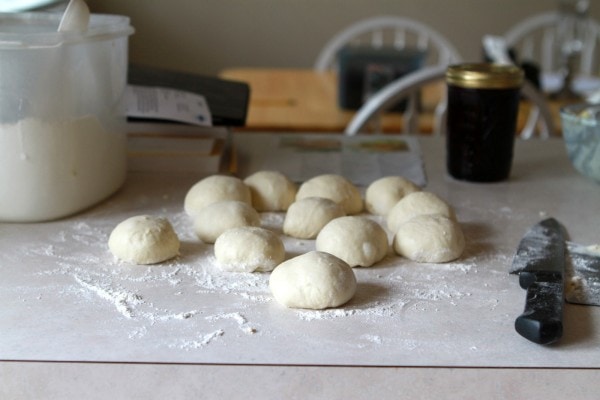
The original recipe (from my Better Homes and Gardens bread cookbook) calls for cutting the dough into 32 pieces. However, this makes very, very small pitas, and is too much work for my taste. So, I cut my dough into 16 pieces.
Obviously, not all 16 of my dough balls are pictured.
I like to let the dough balls rest for 5-10 minutes so that they’re easier to roll out (resting relaxes gluten, the stretchy protein in wheat flour).
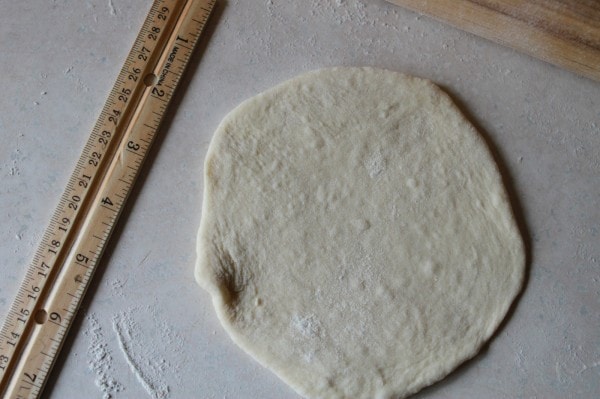
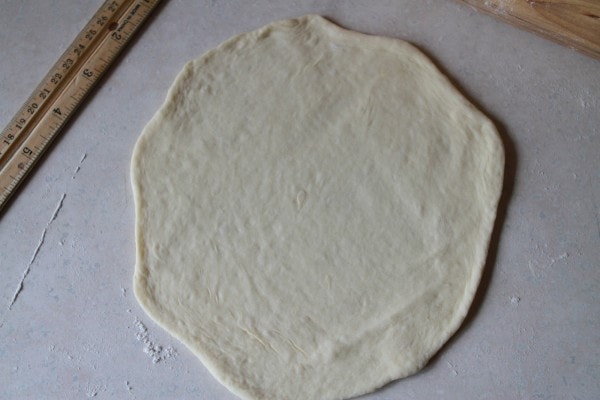
To make a pita, roll out a dough ball into a flat circle. At first, it’ll seem like you can only make it stretch to a few inches.
But it is possible to make it thinner and larger, which is what you want to do. A thinner pita is more likely to puff, in my experience.
To make this process easier, I often roll 8 balls into the smaller round, like in the first picture. Then by the time I’m finished rolling 8 balls out, the first round I rolled out has rested and is easier to roll into a larger round.
I hope that makes sense. Basically you’re rolling out several rounds of dough so that the smaller rounds have time to rest before you try to make them into larger rounds….sort of like an assembly line.
Some of my pitas are more round than others, but I don’t worry too much about the misshapen ones. They all taste good, and since I’m not competing for a beautiful pita prize, it’s just not worth stressing over.
Pitas don’t need to rise at all after you shape them, so it’s time for baking!
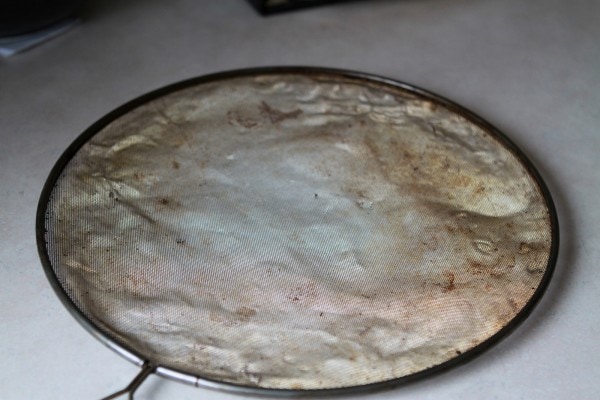
My original recipe calls for baking these on an ungreased baking sheet, but when I’ve done that, my pitas have mostly refused to puff. So, the solution I came up with back in my teen years was this:
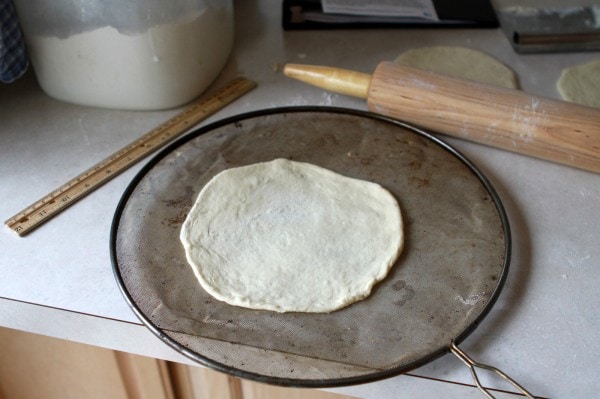
It’s a frying pan splatter screen with the plastic handle insert removed (the plastic wouldn’t survive a 400 degree oven!). Baking the pitas on this allows the heat from the oven to quickly hit the dough, and this blast of heat makes the pitas puff properly. I don’t think I’ve had a single puff failure using this method.
When I made these last week, it occurred to me that a preheated pizza stone might work just as well, but I haven’t tried that yet. Maybe I’ll do that this morning.
Anyhoo! I just place the dough round straight onto the screen (I can fit two on at a time), put it into the oven, and bake the pita for 7-9 minutes.
The dough will start out flat, of course, and then after a few minutes in the oven, it will slowly start to puff up. If you have children, they’ll probably be quite interested in watching this process. I rather enjoy it myself.
Unfortunately, my oven light bulb is currently burnt out, so we didn’t get to see any of these pitas puff. It was very sad.
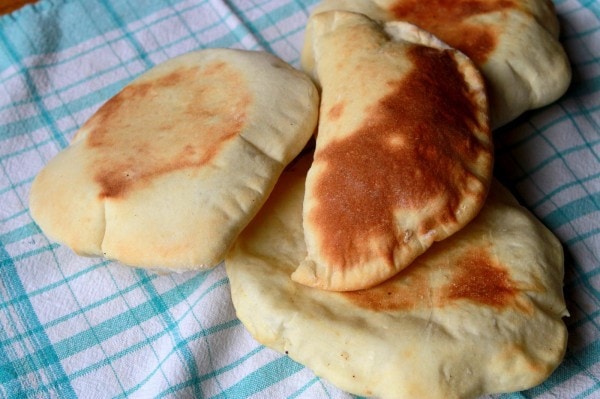
Put the puffed pitas on a kitchen towel to cool. Just so you know, the pita on the left there is ideally baked, whereas the one on the right there is a little over-baked. It’s not awful to get the pita that brown, but the heavily browned ones will dry out more quickly.
So you should eat them right away. Suffer for the cause, people!
You can split the pitas into rounds and top them with the usual bread toppings…peanut butter, butter, jelly, and so on. Or you can cut them in half and use them to hold more substantial fillings like chicken salad, cheese and vegetables, grilled meats, and so on.
And you might find, as I do, that eating a plain one one hot out of the oven is pretty darn delicious too.
Pita Bread (printable PDF coming later today!)
5 to 5 1/2 cups flour
2 pkg. (4 1/2 teaspoons) active dry yeast
2 cups milk
3 tablespoons sugar
2 teaspoons salt
3 tablespoons butter or oil
In a large mixer bowl, combine 2 cups of the flour and the yeast. Heat milk, sugar, salt, butter to 115-120 ° F. Add to dry mixture and beat 3 minutes. Stir in enough remaining flour to make a soft dough. Turn out onto a floured surface, and knead for 3-5 minutes.
Place dough in bowl, cover, and let rise 45 minutes. Punch dough down, cover, and let rest 10 minutes. Preheat oven to 400 ° F.
Divide dough into 16 pieces and form each into a ball. Let balls rest 5 minutes, then roll each into a 7-8 inch round (this is easier if you roll the balls into a 4-inch round, let them rest a few minutes, and then roll them to a 7-8 inch round).
Place pitas on a baking screen in the preheated 400 ° F oven, and bake for 7-9 minutes, or until puffed and lightly browned. Cool on cloth-covered surface.
Today’s 365 post: Speak softly…
Wendy says
Love your recipes. Was hoping to find the pita bread pdf version.
Michelle says
I just made these and they turned out wonderfully. They are the perfect accompaniment to the hummus I made earlier. Thank you so much for sharing the recipe as well as the splatter screen trick.
Jared says
This recipe looks amazing! I’m just wondering, have you ever tried making pita with a sourdough process? I understand that the fermentation process can help make pita bread healthier (http://creationbasedhealth.com/is-pita-bread-healthy/). Any thoughts?
Kristen says
I never have-I’m sorry!
Andrew says
nice! I made babaganoush today so I’ll be whipping up some of these tomorrow… happening upon your blog looking for kneading tips was perfect timing!
cheers
Alicia says
I just made these tonight and they are amazing! Fresh and hot out of the oven with homemade hummus. Thanks Kristen!
Stacy says
I made some on a stone baking sheet today and they puffed perfectly. I had one happy husband- he loves homemade humus and pita bread!
Yvonne Fawehinmi says
Hey Kristen,
met you at church today. Wow thanks for this Pita Bread How-To-Guide. I always wondered how they got them puffy! Will try making it this week.
Heather says
I was woundering… maybe its a stupid question… but do you have to proof the active dry yeast?
Kristen says
I never do. I think this step is more important if your yeast is old, but if it’s fresh, I’d just go right ahead and use it without proofing.
Natasha says
Thank you so much for telling us why you have to let the balls of dough rest. I’ve seen that in other recipes before and while I did it, I never knew why and often thought it seemed like a waste of time. So thanks for giving me an explanation for why the dough needs to rest! (I like to be told why to do things and not just ‘do this’.)
Bianca says
I noticed most of your recepies use a stand mixer to mix all ingredients, what do you suggest for someone who does not have one?
Deb says
Crazy question – we made these today using about a half-recipe. They puffed beautifully and were VERY fun to make and watch cook.
BUT
They are crunchy. I had thought they’d be soft. Did I do something wrong?
Sarah says
Wow thanks so much. I will make excellent sandwiches with mine.
Rachel says
I’ve had incredible results using a preheated pizza stone. As long as the dough is thin, they puff everytime.
Angela says
I *am* impressed! I’ve made chapati & naan in the past but never pita. I wonder if you’ve ever tried making these with whole wheat flour, and if so how you liked the results?
EngineerMom says
For anyone who doesn’t have a spatter screen or a pizza stone, I’ve had pretty good luck with the following method:
Put a heavy glass or ceramic baking dish upside down (so you have a large flat surface with no edges) in the oven before you preheat it (so it heats up with the oven). After rolling out the dough, place dough disks directly on the hot flat surface to bake, then remove with tongs when done.
Leanne says
Growing up we put our sloppy joes in pitas bread, that way the meat doesn’t fall out like it would in a hamburger bun.
hiptobeme says
Make these AND homemade hummus and people get really impressed!
adventuresindinner says
Throw-in some tabouleh and you have a really good party
The Happy Wife/Danielle says
I just wanted to second how easy these are to make and how much better they taste than homemade. My 8 year old made pitas for the first time (none of us have ever tried making them before) last week, with very little help from me. They turned out wonderful and delicious. She used a preheated pizza stone to cook them on and, while she did not roll them very thin, all of them puffed well.
Ada says
I totally appreciate that you use a ruler when baking. I do the same thing because I have poor estimation skills. My husband’s idea of using his shoe to measure 12 inches works when you’re measure floor tiles, but I don’t want a shoe on my counter!
Amie says
I know that from the tip of my middle finger to where palm meets wrist …is 7″…you’d be surprised how handy that can be at times …
frances says
Thank you!!! Thank you!!! Great recipe and instructions to share with us!!!
Dori says
Do you find that it makes a difference whether you split the pitas (for pocket sandwiches) when they are fresh vs. when they are cool? I have made pitas only once or twice, and I can never figure out if it would be better to go ahead and split them right away, or just wait until we are about to eat them. (NOTE: Because there are only two of us, we can never eat a full batch right away so we always wind up freezing some)
Isis says
I have made many, many pitas, and I agree that they’re deceptively simple. I use my regular dough (usually whole wheat or some bastardization of various flours I happen to have around), and slide the rolled-out circles of dough from a pizza peel onto a preheated pizza stone. They puff beautifully! You do have to lubricate the pizza peel with whole-wheat flour to get them to slide off, and it takes a little practice. Then I usually just grab the finished pita with a kitchen towel, and repeat. It’s a very effective method, though I find your splatter screen idea intriguing, particularly since it takes so bloody long to preheat a stone.
I’ve had reasonable luck freezing them, but unless you remember to open the bag (oops!) when defrosting, they get kind of soggy.
Jessica says
Kristen do you think if I wanted pocketless pita’s I should just roll them out thicker? When never fill ours, just cut them up to use for buffalo chicken dip, so I don’t want the pocket, but only one store near us sells pocketless ones and they are usually very outdated, but still “okay” and I’d prefer fresh.
Molly says
I’ve done this by accident – and yes, roll them out thicker (actual thickness might take some experimenting) and they won’t puff.
kh says
How funny! I was just this morning thinking about making pita this weekend. I haven’t made it in forever. I think I’ll try your spatter screen tip – I know I have an old one lying around somewhere!
Tina (Tightwad Mom) says
Hooray! I can hardly wait to try this recipe. I bet they would freeze well, too. It would be perfect this summer to pull pitas out of the freezer for dinner sandwiches, when it’s to hot to bake!
P.S. This tip is yeast related. My local grocery store sells the bulk bags of instant yeast. Every so often they go on sale. When they do I buy 4-5 place them in gallon freezer bags ( I stuff as many as will fit into one bag), and store them in the freezer. I have stored them up to a year that way, and the yeast still works great every time. Just make sure to take your bag of yeast out of the freezer, set it on the counter, and let it warm up to room temperature before you use it .
minders says
I store my yeast in the freezer also. But when I’m ready to make something, I just measure what I need, stick the bag right back in the freezer and the yeast right in my flour. I haven’t noticed any adverse side effects, I guess that small amount (2 1/4 tsp) doesn’t take long to warm up.
Tina (Tightwad Mom) says
That’s good to know!!! I’m going to try that next time!
Diane says
I store my yeast in the refrigerator. It works well stored in that location as well.
Sara says
I keep my yeast in the freezer as well and use it right away, and I have had no problem.
Molly says
Now I’m kind of inspired to make some pitas – haven’t made them since 2006.
Some tips I’ve found when making them, which I think you echoed:
– Roll out very thin. I thought they needed to be fat to puff; that didn’t work. Although still made yummy pitas.
– I’ve had fine luck with baking and cooling on an ungreased cookie sheet.
– Delicious puffed or unpuffed with homemade hummus. And quite impressive to your friends when you bring them to picnics.
Lindsey Cota says
Ohhh, you’re making me want some of my Abuelita’s tortillas right now! They are pretty much the same type of bread but Mexican instead of Middle Eastern.
kristin @ going country says
Huh. I just yesterday made hummus and was thinking I should make some pita bread to go with it. Except I also just yesterday made crackers, so I may be baked out for the moment (I have limited tolerance for baking, sadly). But I’ll keep this in mind for the future . . .
Jody says
How long do you usually store them?
Kristen says
Well, not long, since my kids eat them all up! I’d store them in a plastic bag for a couple of days and freeze them if you need to store them longer than that.
Jinger says
Home made falafel in pita bread….my favorite! Tonight, I think!
Mandy says
I can’t wait to try these. We just bought some hummus that will go great with them. Thanks for the fabulous recipe!
Danielle says
Homemade hummus is even easier than pita bread–give it a try!
Carla says
I would like to try this but have no splatter shield. How would they work directly on a cast iron griddle (flat side up) instead?
Alison says
I just use a baking rack for mine – like what you would cool your cookies on. Works great.
Ellen says
that is what I was going to suggest….
I wonder if just putting them on the racks in the oven would work?
Kristen says
I think that could work pretty well. The advantage with the screen is that the dough can’t sag through the openings the way it could sag through the cooling racks.
Elizabeth@ReadySetSimplify says
I think I might try my perforated pizza pan. We have a Polly Pocket cookbook that has lots of pita filling recipes, but the store-bought pitas are always so dry! My kids will love this!
Sara says
I just tried this and used a perforated pizza pan because I couldn’t get the plastic part out of my splatter screen. The pizza pan worked great.
Danielle says
The recipe I’ve used in the past says to use baking/cooling racks, but I’ve used preheated stoneware with good results.
WilliamB says
It *should* work well – pita is traditionally made in a cylindrical oven with the dough thrown against the sides. It bakes a bit, falls to the bottom, is fished out a minute later. It really is like magic.
Melissa says
I noticed that you use Active dry yeast and I wondered why you don’t use instant? I haven’t done much baking and when I did I always picked up the Active Dry 3 packet thing and proofed it. I was at BJs the other day and they only had instant yeast so I got it and then I learned that it doesn’t have to be proofed. That just removes 1 step for me which makes me more likely to do it. Since I don’t know much about it I thought you might have insight into why to choose 1 type over another when it comes to yeast.
Tamika says
I’m not sure Kristen’s reasoning on the yeast but mine is price. Totally price. I can buy a large brick of traditional yeast for about 1/4 of the price of the instant yeast in a jar – let alone the packets. I’m not sure how much is in it, but I bake bread every 2nd day (2 loaves) and right now I can’t remember the last time I had to buy yeast – definitely more than 3 months ago.
Kristen says
I actually think my bulk package from Costco is labeled instant yeast. But I use it exactly the same way as I used the packages of active dry yeast back in the day. I don’t think it matters which one you choose.
Tamika says
Its very possibly mine is too – Costco in Canada had never carried yeast, but our local grocer carries the brick – I should look at the label next week when I’m in for my veggies! LOL
Virginia Dare says
Kristen, do you use the butter or oil? I would be interested to try olive oil.
Kristen says
I use butter, but oil could definitely be used!
Karen@ Mom of Three Monkeys says
The splatter screen is a fantastic idea — and your expertise about rolling them out, letting them rest, and then rolling again, gives me courage to try naan again too!
I unfortunately couldn’t wait even one more day to make falafel and we had that last night — rubbery sad store-bought pita and all!