
One of my painting projects: Soffit painting
Amazon links are affiliate links.
I didn't actually add this to my bucket list, but I should have.
Maybe I'll go ahead and type it in so I can cross it off. 😉
SO SATISFYING.

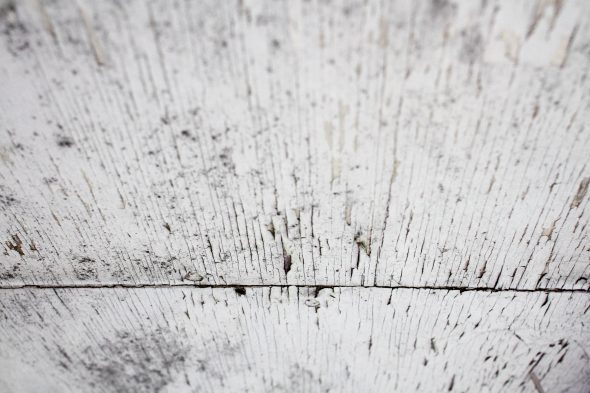
Anyway. The overhang of our house has plywood soffit underneath, and the paint on it has been in bad shape ever since we moved in.
We haven't done anything with it since we moved in, and 12 years of nothing-ness hasn't helped the situation.

The other day when we had some lovely weather, I took Lisey's bed apart so I could repaint part of it.
And while I was out there with my sander, I thought, ooh, maybe I should just see how hard it's going to be to remove this peeling paint.

So I did a little. And then some more. And some more.
And I sanded the whole thing.

Then I scrubbed it.
And then I thought, hmm, I wonder if I have some outdoor primer.
As it turned out, I had about a half bucket left from when I painted my kitchen cabinets, and that stuff is indoor/outdoor.
Woo!
It's oil-based, so it's mess to work with, but it got the job done, and I didn't have to buy primer.
So, I went from just kind of testing the waters with this project to sanding, scrubbing, and priming in one afternoon.

I told Mr. FG that apparently, I just need to get started on a project and then boom! It'll get done.
The next day, I found half a bucket of bright white exterior paint in my stash, so I put several coats of paint on.

I did tape the seam between the trim and the wall, but it's such a bumpy surface, it's nigh onto impossible to seal it off.

So, when I peeled the tape off, I had multiple spots where the white paint had leaked through.
Luckily, I still had some of the wall paint, so I used a small paintbrush to touch up all the leaky spots.
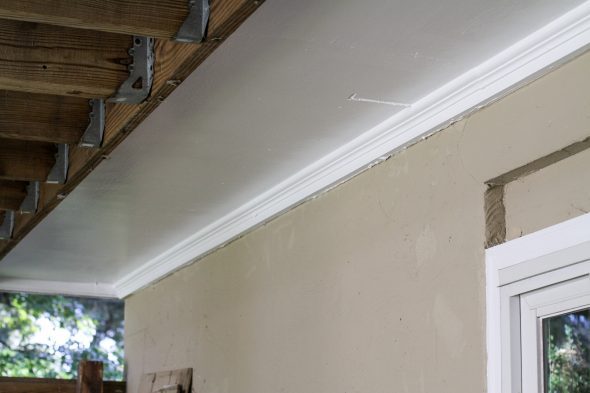
I'd actually kind of forgotten how horrible the paint was until I looked at the before pictures just now.
Definitely better now!

Happily, this project cost me nothing but time.
I used my favorite orbital sander, which I already owned and have used SO many times. Super super worthwhile $60 purchase for me!
I used leftover primer from my cabinet project, I used exterior paint from a previous project (I just had to thin it with water because it was a little thick from sitting unused), and I used brushes and paint trays that I wash and save after painting projects.
And to do the taping, I used up odds and ends from painting tape rolls that were in my painting box.
Oh, and I used my trusty paint roller cover and paintbrush cover too. They are so, so fabulous for keeping the roller and brush wet while you wait for coats of paint to dry.
(RSS and email readers, you'll have to click over to the post to get links for the supplies I used.)
I'm really happy that this is done because it was a messy project. I got so, so dirty from all the sanding and painting over my head.

(my painting outfit consists of a tank top from my teenage years, shorts from when Joshua was a baby, and a discarded Cubs hat that belonged to Mr. FG. I. Am. Fashion.)
The only bummer is...the soffit in the front of the house also needs to be sanded and painted.
Ha.
BUT! The upside is that because of the grade of our lot, I won't need a ladder to do that soffit at all. That'll make the project much, much quicker and easier to do.
Because when you have to use a ladder, every little section requires:
-set the ladder up
-climb up the ladder with paint/sander in hand
-do a little painting/sanding
-climb back down with paint/sander
-move ladder over
Rinse and repeat ad nauseum.

So, the front will be far better than the back. Yay for no ladder!
I think I'm going to take a little break from soffit painting, though. Maybe in a week or two, I'll be ready for more.
Awesome work! I recently discovered that I had almost a full can of off white which will be used for a room in our house.
That said, if you have no paint and aren't too particular about the color, check out your local ReStore or big box hardware store's oops shelf.
My theory is, that if I paint my soffits white, (currently gray) it will reflect more light into the house. Are you finding that to be true?
I'm not sure! There's only one window and one sliding glass door back there, so it's not a place where my house gets a lot of light anyway.
Now that you mention it, though, my upstairs soffits are white and I bet that does reflect better than gray.
I hope you don't mind if I jump in on this one, Kristen. Long before DH was my DH, he was the contractor I hired to paint my new (to me) townhouse. It was Spanish style, with cream stucco and dark brown trim. There were two long dark overhangs that really shadowed the rooms. He suggested painting them the lighter body color and wow, did it ever make an amazing difference!
Later, I joined the HOA Board. When it was time to paint*, I showed them my lighter overhangs. They all agreed it made an impressive difference. They had always painted them dark because they'd always been dark and no one ever gave it a second thought. When the units were next painted, the contractor was instructed to paint all of the underhangs with the light color, thus brightening everyone's homes. Did that ever make people happy and it cost nothing extra.
To carol g: Do it!!
Just for clarification, especially if you live in an HOA. My HOA painted the trim of every unit every X number of years, and the entire unit every X x 2 years. In between, homeowners were allowed to touch up their homes as needed at their own expense. Since the soffits were only visible to me, I took a gamble and painted them the lighter, but still approved shade. If you live in an HOA - make sure you get permission first!
What a difference! Looking at your "before" photos, I think I may need to follow suit and do the same at our house... we are in desperate need of a new coat of paint in more than a few places! Congrats on the progress, I love when projects have the "instant gratification" factor of a visible difference 🙂
Oh yay!!! That looks so much better! Isn't it funny how a new coat of paint can completely transform your home? We painted ours when we moved in and it's like a new house. 🙂 I definitely don't miss painting though (I got some all over my face and even in my EYE painting ceilings), so I sympathize!
That looks awesome! Love me some old-fashioned do-it-yourself house maintenance : ) Hope the front goes well!
Good job! What do you use to wash your paint equipment? I find that I am never able to fully get my brushes clean well enough to use again or the brushe bristles become very stiff.
So, I find that using a hose outside in the yard is helpful for the initial clean-off. Then, especially for rollers, I like to soak them overnight and then give them another rinse with the hose. That extra soak really helps to get the last bits of paint out, and makes the last rinse that much more effective.
If you use water based paint use fabric softener (the cheap stuff is fine) to wash the brushes. Put water in a bucket and add a splash of fabric softener and swirl the brush around until a bulk of the paint comes off. Dump the water and fill the bucket again (you only need enough water in the bucket to cover the bristles) and swirl some more. Keep dumping/filling/swirling until the water is clear in the bucket. If some of the paint has dried on the brush those wire brush cleaning brushes work wonders and I'll use one after the first swirl in the fabric softener water. After the water is clear squeeze water out of the bristles and hang or lay flat to dry. Works every.single.time. It's the only way I wash brushes now and my hubby isn't allowed to do it because he's not so great at it.
If you have some brushes that have paint stuck on or are in not great shape you can also buy brush cleaner. It's sold in a metal container like paint thinner and is in the same area of the hardware store. Get a metal bucket and poor in enough brush cleaner to cover the bristles and let the brushes sit in the cleaner. I think overnight is long enough, mine sat for much longer but were fine. Rinse them off and the brushes are back to new. Saved a couple of brushes I had.
The fabric softener trick is the only way that Wooster recommends cleaning their brushes (I have 2 of those) and they specifically say NOT to use soap (what I used to use). I do this with my Purdy brushes too and all of them still work wonderfully. The paint brush cleaner is stinky stuff but after years of not cleaning my brushes correctly it brought them back to tip top condition and I don't think I'll have to do it again for a long time, if ever.
Thank you very much!! I'll be sure to try the fabric softener.
Oh wow that looks so good!! I am with you. If I get started on a project, it takes me no time to get it done. And the best projects are the ones you already have all the things to complete.
I am feeling a painting project coming of my own, now that I see how good that looks!
We are re-painting the whole house, inside and out, and is seems like a daunting task. I had planned to spend the whole summer on it. That was not enough time, lol. We have actually only completed the hall and part of the living room. Turns out, real life has as way of altering the most well thought out plans. When we started, we told each other we were going to try to not let it completely stress us out and we have only partially held to that. I guess I just really desire to see the finished project. I get tired of looking at all the mess from only being partially done. Our ceilings are 12 feet tall so it's a big deal to paint. Anyway, we are going to continue to trudge along. I have fallen in love with my new paint color, which is the perfect gray for us. I know when it's done it will be just what I wanted so I am going to try to stay positive. I love how the color breathes new life into my old, quirky home. I'm so glad to hear from others that are painting. It somehow feels better to know we aren't alone!
We bought our house 3 years ago not realizing how bad the paint job was on the house (in and out were terrible, the outside we are leaving since the terribleness is really all of the over spray EVERYWHERE!) and started painting right after moving in. We still aren't done. 2 rooms left to paint! We've been doing 1 room at a time, most rooms the same tan color. We've had to paint all of the ceilings, trim and walls and it takes so much dang time! We do the ceilings first, then the trim and last the walls (3 different colors and paints, one for each area!). Luckily I'm pretty good at cutting in so we only tape the floors off when we do the trim but it is a pain to do! It was much easier to paint our last house since we just invited family over and they all helped paint before we moved in. My dad taped everything off the few days before the paining commenced and we just banged out almost the entire house in one swoop. Oh how that would be nice now!
That's some serious elbow grease put in over there. Very impressive! And it sure does brighten things up in that area. Those are definitely the kind of tasks that are so easy to put off. They are just no fun . . . but still important to do now and then to keep a home in good shape. Great job!!! And what a bonus that you didn't even need to spend extra money to do the work. Win-win!
I wanted to share a painting story with you and lo and behold, today's topic is about exterior painting! Our ten-year-old house needs to be painted, but we've been putting it off because the next-door neighbors are building their dream house, and the job is dirty!
DH noticed that his favorite paint supplier is having the best sale he's ever seen and it ends today (Monday, July 31). Last Friday, he brought home four color samples for us to try out over the weekend so he can buy the paint today. No pressure, lol!
Here's the clever thing he did: He took four clean quart paint cans to the store, bought a gallon of paint and asked them to divide the paint into the four cans. Then he had them mix up each of the four sample colors. He said it cost him less than half the price of ordering four quarts.
Just in case you decide to paint the whole darn house now that the soffit looks so marvy-fabulous!
I want to paint the outside of our house one day (it's brick). I never want to do paint samples because of the cost, but this is seriously one of the best tips I've heard!!
Oh, interesting! I'd never have thought of doing the samples that way. So smart.
LOL, DH wants me to clarify the paint he bought was tint base, so it can be made into any color. He also adds that if you don't have any empty quart cans, most paint stores sell them for about 69 cents, which adds a little to the cost, but still saves you money.
Hmmm, now I'm thinking about all the fun crafty things one could do with clean quart paint cans that only cost 69 cents.
Painting over my head or up in the air from a ladder are things I detest, for all the reasons you mentioned. Good for you for getting that done! How on earth did you hold a sander up there that much without having your arms break off?
I'm glad to see I'm not the only one who is wearing as much paint as the walls when I get done. I have a painting shirt that was a vendor giveaway about 20 years ago, and a pair of really ratty painting jeans. I wear the jeans even when it's hot, to keep from having to scrub paint off of my legs. Of course, if it's really hot weather, I don't paint, anyway.
The soffit looks a world better!
Well, I thought my arms would be screaming at me the next day, but they weren't. I guess my push-ups and Kung Fu have paid off.
I agree with JD--horrible job! You should get an award for doing this. Maybe ice cream. 😉 We painted our soffits when we moved in 15 years ago and I'm noticing a little flaking. Sigh.
I love your painting outfit!
I should probably start a fashion blog. 😉
Ugh, I feel so lazy. We have a lot of touch up painting that needs to be done, but with temps in the 100's...NO. However, yours does look nice (:
I felt the same way when the weather was hot! But it's cooled down a lot recently, so that's why I did a bunch of painting. Gotta take advantage of it!
You're the bomb!
The paint job looks great but what impresses me most is that you can still get into a top from high school and shorts from how many years ago? 17? 18? Now THAT'S impressive.
Ha, thank you. I'm still mostly the same size I was then, but with a little more wear and tear. 😉
And your nose looks great!!!! I know you had to have surgery because it wasn't functioning properly but I just thought I would tell you that.
Heh, thank you! It's almost completely back to being a normal nose now, except that it works 95% better than before.
Go you!!! I didn't know there were covers for rollers and brushes. I throw mine in plastic grocery bags and keep in fridge or freezer depending on when I
I'm going back to painting. These things look interesting but not sure if I want to invest since what I use is free though maybe not environmentally friendly.
Luckily, the covers are only about $5. Totally worth it in my mind!
Looks great! Your example shows people that DIY can be done! ✅
Did I miss seeing the bed project?
Wow I'm so impressed with your painting skills! It takes a lot of patience and talent to do such a great job. Mr. FG is a lucky man!