
How to make great homemade pizza
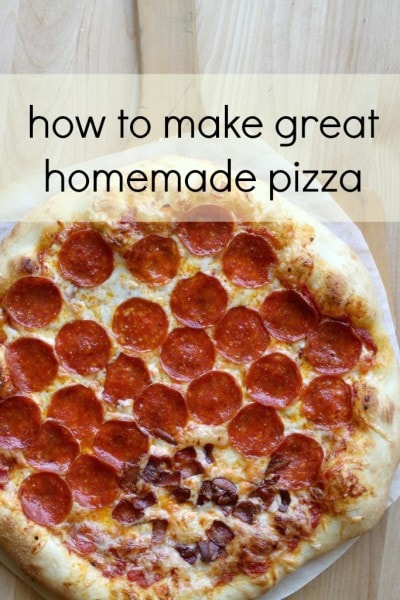
If you're like me, you've made your share of homemade pizzas that were just kind of...meh. Not horrible, but not great.
I followed recipes, and I bought a pizza stone, but my pizzas were still just not that awesome.
Then, as so often happens, Cook's Illustrated came to the rescue.
(And as I so often say, no, they didn't pay me to say that. I just think they're totally fantastic.)
It turns out, I was using my pizza stone all wrong. I wasn't preheating the stone in the oven, I wasn't turning my oven up high enough, and I wasn't sliding my pizza onto the hot stone, using a pizza peel.
Plus, I was using the wrong kind of flour in my pizza dough.
Things are much better when you do what Cook's Illustrated says.
I've been making my pizzas this way for years now, but for some reason, I never got around to posting the method here. We're going to rectify that today, though.
The essential tools:
Baking Stone/Pizza Peel
Ok.
So, to make good pizza, you are going to need a baking stone and a pizza peel (a pizza peel is a paddle-shaped piece of wood that you use to slide the pizza onto the hot stone).
A baking sheet or metal pizza pan will not produce the same results, so I highly recommend springing for a real pizza stone.
I got a stone and peel set at Bed, Bath, and Beyond (using one of their 20% off coupons, of course), but Cook's recommends this Bialetti 4-Piece Pizza Stone Set![]() , which comes with a stone, a peel, a pizza cutter, and a chrome serving rack, all for $30.
, which comes with a stone, a peel, a pizza cutter, and a chrome serving rack, all for $30.
Or if you want something bigger and want to buy a pizza peel separately, their favorite was this Old Stone Oven 14-Inch by 16-Inch Baking Stone![]() , which is awesomely large. I can see how the size of that would be quite an advantage, especially if you're using it to make something that's not round, like calzones.
, which is awesomely large. I can see how the size of that would be quite an advantage, especially if you're using it to make something that's not round, like calzones.
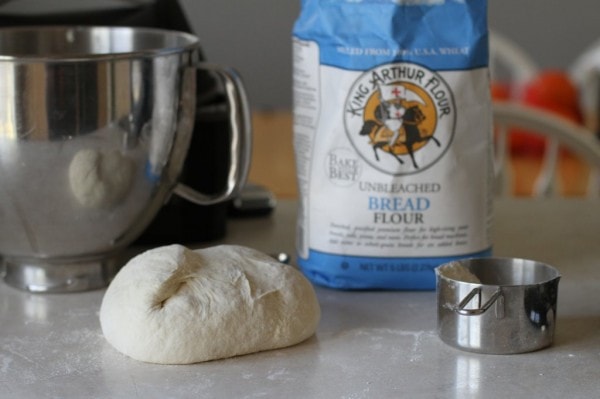
Bread Flour
Normally I swear by Gold Medal All-Purpose unbleached flour, but pizza dough is just not the same with that flour (it sends your pizza directly over to the "meh" end of things.)
So, when I'm making pizza, I pay for the King Arthur bread flour. It's totally worth it.
Parchment Paper
This will go underneath your pizza and will help it to slide neatly from the pizza peel to the hot baking stone.
You can just dust the pizza peel with cornmeal, but that's not very foolproof and can lead to amoeba-shaped pizzas.
A (very, very) Hot Oven
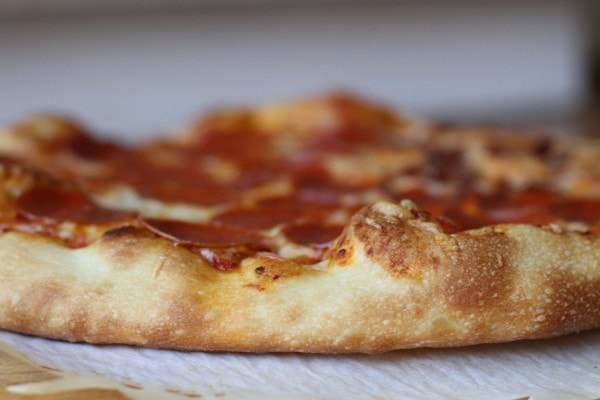
Pizza bakes up the best in a ridiculously hot oven, so it's no wonder that my 350° pizzas were sort of lackluster. You'll need to heat your pizza stone in a 500° F oven for at least 30 minutes before you slide the pizza onto the stone.
When you're used to baking things at 350°, 500° can seem a little scary, but it really does make your pizza better.
Alrighty. Here's how to make the dough and put together your awesome pizza.
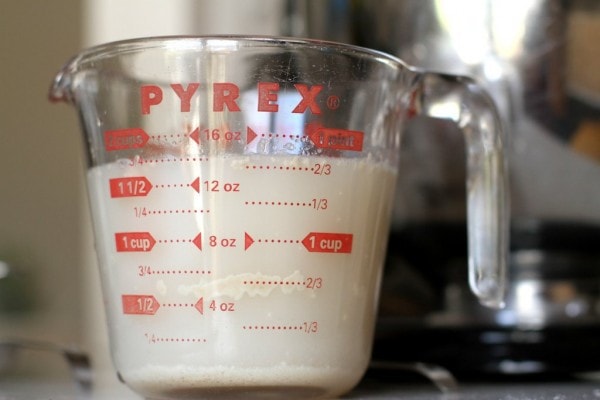
In a measuring cup, combine ½ cup of warm water and a package of yeast.
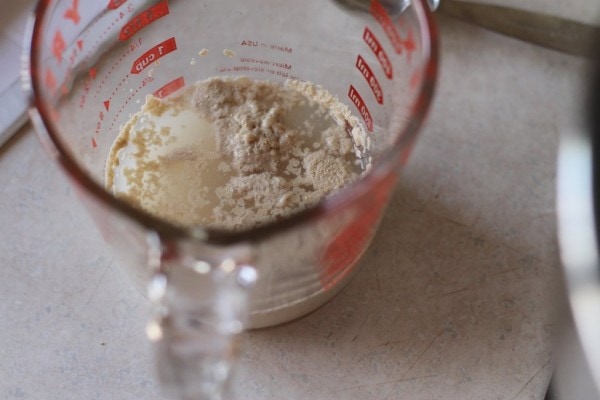
Meanwhile, in the bowl of a stand mixer, combine 2 cups of flour and 1 ½ teaspoons of salt.
Then add 1 ¼ cups of warm water to the yeast/water mixture.
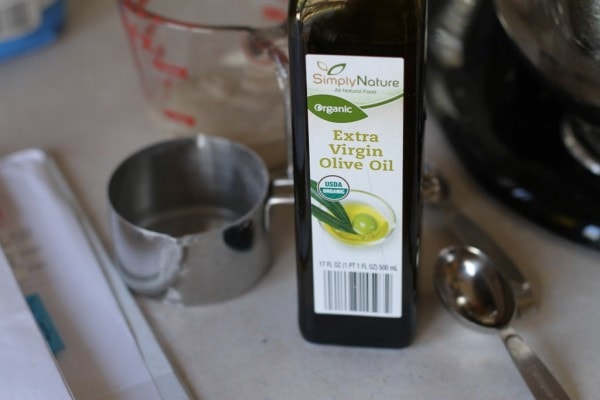
Pour this into the mixer bowl, add the olive oil, and let the mixer run for several minutes.
Then stir in the rest of the flour, and turn the dough out onto a floured counter to knead it for a minute or two.
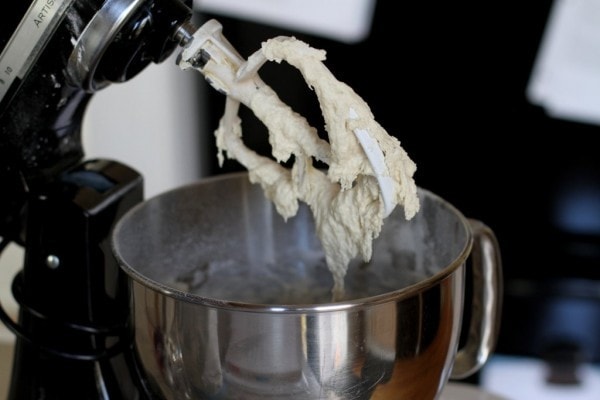
At which point it should look like this.
Put the dough back into the mixer bowl, cover it with a wet tea towel, and let it rise for an hour.
About 30 minutes before the dough is done rising, put your pizza stone in the oven and turn it to 500 °.
Once the dough is done rising, turn it out onto a floured surface and divide it in half. Or you can do like I do and make a big pizza with ⅔ of the dough, and a smaller pizza (or breadsticks) with the other third.
To make a nice round pizza, shape each portion into a neat ball, and let the ball sit on the counter for a few minutes. This will help the gluten relax and will make shaping the pizza a little easier.
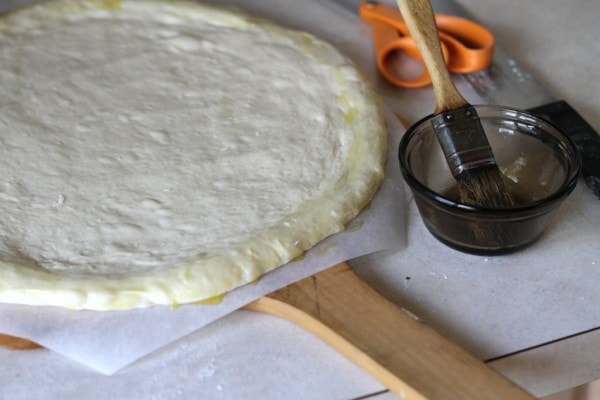
Roll the dough out into a round shape (I do a combination of rolling with a rolling pin and pressing with my fingers.) I like to keep the edges a little bit on the thicker end of things, but do as you like.
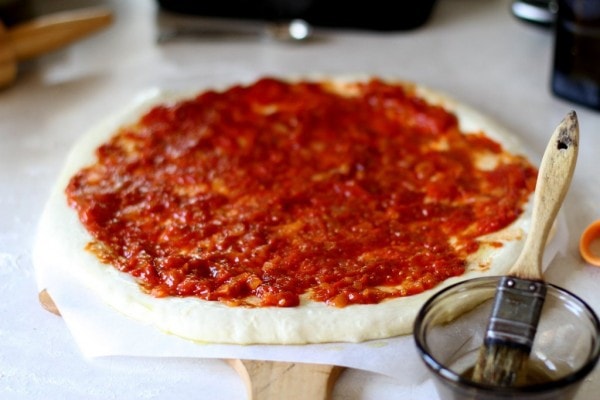
Place the dough on a piece of parchment paper on your pizza peel and brush the edges of the dough with olive oil.
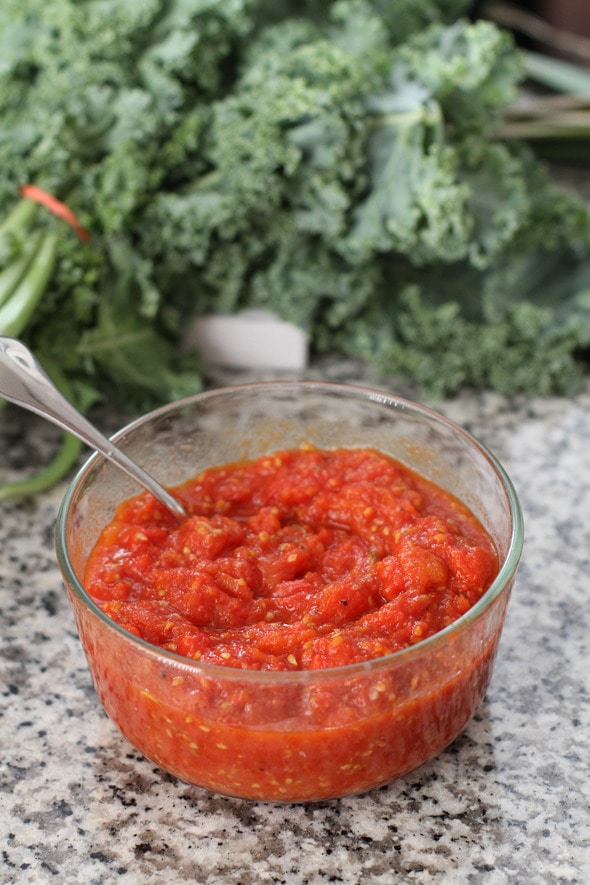
Spread tomato sauce over the dough. The amount is sort of up to you, but don't go crazy with the sauce or your pizza slices will be a little messy.
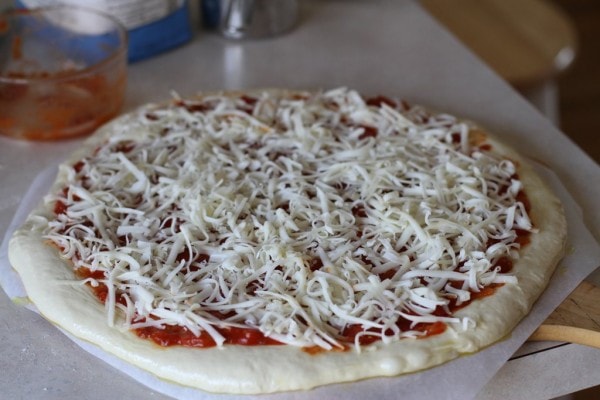
Sprinkle the pizza with cheese, and add any other toppings you so desire.
Open your oven door, and using a bit of a flicking motion, slide the pizza off of the pizza peel and onto the hot stone.
Bake for 8-12 minutes, or until the crust and cheese are nicely browned.

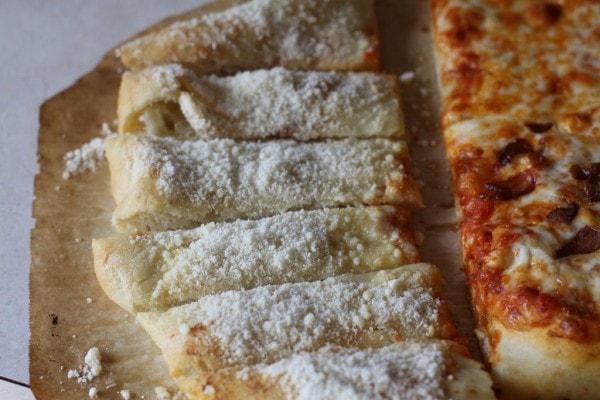
With the rest of the pizza dough, I often make breadsticks, or I make half into a pizza and half into breadsticks. For breadsticks, I just leave the dough plain, and after it's baked, I brush it with melted butter, and then sprinkle it with garlic salt and Parmesan cheese.
So, now there's nothing standing between you and awesome pizza. Go make some!
Basic Pizza
½ cup warm water (about 110 °)
1 envelope (2 ¼ tsp.) instant yeast
1 ¼ cups water, at room temperature
2 tbsp. extra-virgin olive oil
4 cups (22 oz.) bread flour, plus more for dusting
1 ½ tsp. salt
For pizza:
olive oil
tomato sauce
mozzarella cheese
desired toppings
Combine warm water and yeast in a 2 cup measuring cup. In the bowl of a stand mixer, combine 2 cups of bread flour and 1 ½ teaspoons salt.
Add 1 ¼ cups water to yeast/water mixture, and add to the flour mixture along with the olive oil. Beat on medium speed for 3 minutes, and then stir in a much of the remaining flour as you can. Turn dough out onto floured surface and knead for several minutes. Place dough back in bowl, cover with a wet tea towel, and let rise until doubled, about 1-1 ½ hours.
Place pizza stone in oven and heat at 500° for at least 30 minutes.
Punch dough down and divide in half. Shape each half into a neat ball, and let rest on the counter for 5 minutes. Roll each half into a pizza round and place on parchment paper. Brush edges of crust with olive oil. Spread tomato sauce over dough, sprinkle with cheese, and add toppings.
Slide pizza peel under parchment paper and transfer pizza to preheated stone, using a flicking motion. Bake for 8-12 minutes, or until crust and cheese are browned.

Looks ace...I always make a pizza base with one cup flour, one cup Greek yoghurt. Very quick and easy.
@Francesca, That's very interesting. I'm going to have to try that as well!
I love this tutorial! I learned all my pizza making skills from you in previous posts but this is very thorough and I've only been using 450 for my oven. For your cheese sticks I highly recommend doing those things you do before it bakes, and adding some shredded cheese also. Tastes just likes Pizza Hut cheese sticks
Does the parchment paper stay with the pizza in the oven, or is it just a sliding vehicle, so to speak?
Yep, it stays in the oven with the pizza.
I had the same question, but I love the "sliding vehicle" way of asking!!
Parchment paper is not to be put in the oven at 500 degrees. Read the label please. At least that is what mine has on the package.
I don't think the problem is that the paper will make the pizza unsafe to eat or anything...maybe more that the paper won't hold up as well at such high heats?
Any parchment sticking out from the pizza will turn brown, but mine has never had any issues apart from that. It's never come close to bursting into flames or anything, and from what I read on the internet, other people's experience mimics mine.
Cool, but what happens when you need more than one pizza? Use two stones on two oven racks? Any thoughts on this? Baking them one after the other would be kind of a drag. I suppose I should experiment with baking two at once.
One pizza doesn't cut it at my house. Even two round ones on the Pampered Chef pizza stones haven't been enough lately. Lectures on portion control have not worked...not when it comes to homemade pizza. 🙂
Well, because this one bakes in 8-12 minutes, we can make it work. I bake one, put the other one in right away, and I don't call everyone to come sit down and eat until the first pizza has cooled for a few minutes. So, then the second one is usually out of the oven before we've totally devoured the first one.
Pizza day is definitely a time where I wish I had two ovens, though. That would be SO handy.
Oh, that's do-able. Mine usually bake for 20 minutes or so, so 8-12 is a huge time savings.
Thanks!
Just thought I'd mention, if you have two racks in your oven, and you're willing to buy two stones, you can bake two at a time. I usually switch racks halfway through baking, in addition to rotating the pizzas 180 degrees so they bake more evenly, and they come out pretty perfectly!
@SarahD, We invested in one of those wood burning Oonie pizza ovens a few years back and it has been so worth the $. It only takes literally a few minutes to cook a pizza. My son and I do it assembly line. I make them, he cooks them on the porch. Then we set up several cutting boards for him to slide them on as they're done. Even when all 12 members of the extended family are over we're able to get pizzas made pretty quickly and some will hang out with him as he cooks and some with me as I assemble. It's not really sit down dinner friendly but it's a lot of fun. If you ever see a bargain on an Oonie (or maybe some other kind), I highly recommend them! We use ours at least 2-3 times a month. No one ever wants to order pizza anymore.
Looks great! I hand make pizza every Saturday...and now the family don't like shop bought pizza at all! I did forget yeast two weeks ago. That was interesting. But in true no waste style - we ate it!
Hey, unleavened pizza, just in time for passover. 😉
While this method DOES make truly fantastic pizza, please try your grill sometime. Straight on the grate. On high. For 3 minutes, the flip'n'top, then 3 minutes more. Have your toppings all ready in bowls. You are welcome. We eat pizza 1-2x/week in the summer because we love this method so much.
Huh! Pizza on the grill . . . my kids will be SO IMPRESSED! (Thanks for the tip!)
Yup, I do that in the summertime. When it's 98 degrees outside, I just can't round up any sort of enthusiasm for heating my oven to 500 degrees!
This was perfect - I've heard most of these tricks before about using a pizza peel and a hot pizza stone, but I've never seen them all put in order so it's so easy to use (and using parchment paper on the end looks sooooo much easier than cornmeal!)
Looks delicious! Have you ever tried putting your pizza stone 2/3 up in your oven, instead of towards the bottom? America's Test Kitchen recommended this, as it more closely replicates the salamander-style ovens of most mom and pop pizzerias.
I have my own method that doesn't require a pizza stone or peel that seems to work for our family. I begin with the pizza on a baking sheet, then a minute or two before it's completely done baking, I slide the whole thing off the baking sheet and directly onto an oven rack. My family enjoys these pizzas tremendously.
I'll have to try that. Mine is usually in the middle/lower middle part of the oven.
Would this feed 6 adults and 2 toddlers- or do I need to double?
Carole, the recipe is for one pizza. I'd definitely double (or even triple) for 6 adults and 2 toddlers depending on how ravenous you guys are. One pizza would probably work well for 3 people and a toddler 🙂
Actually, the recipe does make two pizzas. But still, I think that probably wouldn't be quite enough.
For six adults, that would seriously depend on how hungry they were! It would be close, and I'd probably double the recipe just to be safe.
You know what else is awesome? Pizza made in a cast iron skillet... I'm actually surprised I haven't seen you cook in cast iron 🙂 Here's my favorite... http://simplyinspiredbymegan.wordpress.com/2013/03/05/cast-iron-pizza/ This crust makes a great taco (or any thin crust) pizza on the baking stone using your method too.
Can I ask what you pay for the UB flour? and where do you get it? It seems way overpriced in the stores here. I just recently started using it, and can tell a difference, and would like to find it cheaper!
Have a great Friday!
In my experience in a variety of stores over the years, for any given brand bread flour is the same price as AP flour. King Arthur flour is more expensivethan Gold Medal or Pillsbury, but has by far the best reputation.
I wish bread flour were the same price as all purpose in our area. Gold Medal, King Arthur, etc.--they are all more expensive when it comes to their bread flour, and the price just continues to rise. I've been using unbleached white flour recently to see if it will work as well. So far I haven't noticed a big difference, but I have increased my kneading time a bit to try to compensate for the lesser amount of gluten.
I should have mentioned--I can get the unbleached flour for the same price as regular all purpose flour here. (That's brand name flour, the generic, store brand AP flour is cheaper, but I don't have as good luck with it.)
That's really too bad. One thing you can do is let the dough rise for longer amount of time, in a cooler place.
Another thought that occurs to me is more work but might do the trick: price compare gluten + AP flour to bread flour. Maybe that cost will be less. Gluten is available as fancy stores, sometimes supermarkets, and online.
Yum! I make homemade pizza or calzones weekly for my crew, but I tend to rush the dough and not let it rise (boo). I am going to give your recipe and techniques a shot . . . and ask for a pizza peel and stone for my next birthday.
Yum! I have a pizza stone but no peel. I guess I'll need to get one soon. I usually make French bread pizza. We love those :).
What is the difference between bread flour and regular flour?
I make pizza at home all the time, but I double the recipe and freeze half of the dough (before it rises) to use another time.
Short answer: gluten level. Bread flour has much more gluten than AP does.
Longer answer: gluten is the stuff that allows a flour product to get elastic, rise well, and hold the air bubbles that yeast produces. The more gluten, the more rise you can get from your product. Compare shortbread (very tender dough, no rise, made with very low gluten flour) with country bread (elastic dough, lots of rise, made with high gluten flour).
What defines how much gluten there is in a flour is the protein level. AP flour has roughly 8-9% protein. Bread flour has 11-12%, and King Arthur bread flour has another percentage point or so. (I'm doing this from memory so the numbers might not be exactly correct.) At the other end of the range is cake or pastry flour, which has around 5% protein.
What WilliamB said...beat me to it!
thank you, it looks fantastic! I'll be trying this method, my homemade pizza fall in the 'meh' category 😉 One question, do you make your pizza sauce too?
I'm gluten free, but a big fan of pizza, so have been experimenting with making my own gluten free bases over the past few months and have found two that have worked well. I haven't been able to replicate a chewy pizza base yet, but I like the thin and crispy ones better (more space for toppings!).
If anyone is interested, here are my two recipes. First a buckwheat pizza base: http://www.economiesofkale.net/gluten-free-buckwheat-pizza-doug/
And secondly, a socca (chickpea flour) pizza base, cooked in a frying pan: http://www.economiesofkale.net/gluten-free-socca-pizza-base/
The socca one was my preferred recipe, since it is so quick and easy, but currently my frying pan doesn't fit into my oven, so I've gone back to the buckwheat one, which is also good 🙂
Thanks, I will check those out!
Me, too. I have some buckwheat flour I bought on a whim (it was stone ground at an old-fashioned mill) that I'd like to use up.
I haven't had pizza in many, many years because I'm allergic to yeast. Do you think it would be possible to make a pizza dough using baking powder as the leavener? Anybody have any suggestions?
Cat, when my kids were small, one of their favorite things was biscuit dough pizzas. These are just mini pizzas. I'd use those canned biscuits for these. (I know I'm an awful mom for serving such a horrid food product to my children!)
But you can use homemade biscuit dough, too. Obviously not the chewy texture you get with a yeast dough.
Also, you can use flour tortillas for a thin crust. These cook up super fast. A favorite of my son, when he was in high school. He could come home and make himself one of these in 5 minutes.
Thanks Lili,
Maybe I'll try using my chewy gordita tortillas... or maybe just the dough, and see if it cooks up OK. Oh... the experiments never end!
You can make pizza with sourdough, too.
1) Question: I have tried this CI recipe several times and have the same problem each time - the dough springs back when I roll/pat/spread it out. Can you help me figure out why? I've tried the recipe with AP flour, bread flour, and a mix of both.
2) Question: again with this recipe, my crust comes out doughy rather than thin/crispish. I preheat the oven & pan a long time, using an upsidedown jelly roll pan since I don't have a pizza stone.
3) Observation: I like my crust crisp and this recipe doesn't come out crisp for me. In fact it's downright floppy on the middle corner. To address this problem I bake the crust by itself for a few minutes, then top it, then finish baking.
4) Observation: a half-baked crust like above, can be frozen for later use. This works well for me because it's the crust that's time consuming. If the crust is in the freezer, I can go from 0 to home-made pizza in less than 30 min, including making the sauce from scratch.
WilliamB,
America's Test Kitchen did a show on making pizzeria-style pizza a while back. They said the key to getting your dough to relax, and not spring back, is to allow it to rest in the fridge, overnight, if possible. A friend of mine now runs their family-owned pizzeria, and he tells me this is what they do. They start the day's pizza dough, the day before.
To get a crisp crust, without the pizza stone, this is what I do. I bake the pizza on a baking sheet until almost done. Then a couple of minutes before it's finished baking, I use a metal spatula to loosen the pizza from the baking sheet and slide it off onto the bare rack. It browns and crisps nicely on the bottom in about 3-5 minutes. When I take it out of the oven, I put it on a cooling rack for 5 minutes, so it doesn't get soggy in its "sweat".
I'm willing to bet that the lack of a pizza stone is holding you back. A jelly roll pan is not going to hold heat like a pizza stone will, just like a thin metal frying pan won't hold heat like a cast iron pan will, you know?
Pizza stones are not crazy expensive, and I think you'd notice an appreciable difference in the quality of your pizza if you invested in one. I know it's a bit of a unitasker, but if you make pizza regularly, I really think you should make space in your kitchen for one!
With the dough, have you tried shaping it into a ball and letting it rest before you try to stretch it out? I sometimes let it rest 5 minutes, stretch it partway out, let it rest for another few minutes, and then finish stretching it out.
I do let my dough rest overnight (or, ahem, longer) in the fridge, then rest a bit on the counter before stretching out.
What FG describes is sorta like what I do but you don't describe your dough as springing back to it's former, smaller size. Mine does. So I stretch it out, then have to weigh it down with something (rolling pin, water bottle, etc) to keep it from reverting to previous size. After a minute or two I repeat the process. I find it aggravating and a real barrier to making homemade pizza more often.
As for the stone, yes. I think it might be time to break down and get this unitasker. If I keep making pizza despite my troubles with shaping, I guess I'm going to continue to make pizza.
Thanks for the help.
Don't do any kneading of the dough before you roll it out. The gluten is too elastic to handle it. When I first started making pizzas, I benefited from adding a little extra water in the dough when mixing - the dough was a little more forgiving.
When I have had the springing back problem the only thing I have found that works is to "throw" the crust. Just like at the real pizza places. Roll out the dough into a circle and throw into the air, punch it with your fist when it is on its' way down, repeat as necessary. The kids love it!
I know I'm really late to the game with this comment. I had my dough spring back too. I let it rise in the fridge for about 5 hours then shaped it in to balls then let it rest for about 15 min. I think I man handled it too much. I think next time I'll shape them in to balls before I put them in the fridge then just punch them down and let them rest on the counter the whole time the stone is heating up (30 min).
What really, really saved my butt with the springy dough was putting another sheet of parchment paper on top (I was rolling it out on a bottom piece of parchment to begin with). The dough stuck to the parchment instead springing back and I just peeled off the top piece.
I will have to give this a try. I have attempted homemade pizza twice and both times the crust left something to be desired.
Do you have a pizza stone? A hot pizza stone is SO important.
Honestly, I have a metal pizza pan and a pizza stone and I can't tell any difference between the two. I don't like working with the heavy, cumbersome pizza stone. (I guess I'm the voice of dissention). I think a hot oven and a good pizza dough recipe (I haven't tried the one Kristen uses but Lili at creativesavv.blogspot.com has a recipe my family enjoys) are key. Here's the other thing--everyone likes their pizza a little different--it may take some experimentation to find what you like. Or you may find it's worth the splurge to by it from your favorite pizzeria. 🙂
That looks fantastic!
This is helpful! I have a pizza peel, but I mostly use it for bread because my pizza doesn't transfer well. The parchment paper is a great idea! I am going to switch my flour and give this a try!!!
I use cornmeal instead of parchment, less cost/waste. I've recently switched from bread flour to AP and can't tell a difference. As its much cheaper, I'll stick to it. And it doesn't require much extra rise time (20 min over 10). I add oregano, thyme, and basil to the crust and that gives it great flavor.
I have to second the commenter that said that everything they learned about making homemade pizza they learned from your blog. The only difference is I add 1 tsp each of granulated garlic and italian seasonings to my crust. Its worth it for the smell factor alone. I have to certainly agree that the pizza stone absolutely makes all the difference to great homemade pizza. I will definitely have to try the parchment paper since I've had several cheese ooze-overs and now have a smoke issue every time I use my oven. I grow weary of taking the batteries out of the two closest smoke detectors. I went out and bought some KA bread flour to try tonight so I will be interested to see if I notice a difference. I was shocked at how pricy it was ($5 on sale when I can get generic AP flour for about $1.80 here). Do you make your own sauce? If so, do you mind sharing the recipe?
Kim, we do something similar to our crust, but brush on melted butter first. KA bread flour is beyond my budget, but if you're willing to compromise and get enriched bleached bread flour, it's not so expensive. I bake my own bread, so I use a lot of bread flour. Some Costco stores have 25 lb. bags for about $10. I got a 25 lb. bag from Smart and Final (a restaurant supply/grocery store) for $9. Someday I hope to be able to buy the good stuff, but for now this is all I can afford. Bread flour makes the crust more bread-like and that's the way we like our homemade pizza.
I will have to see if our Costco has the bread flour. I know I used to buy their AP flour all the time but then we canceled our membership for awhile. I did like the way the pizza turned out with the KA bread flour so I think I will take your suggestion and compromise as $5 flour isn't really in my budget either. I bake my own bread too so it won't go to waste (I've just been using AP flour for that as well).
This looks SO delicious! I am not good with dough, I can't roll it out for some reason. But I think I'm going to try this!! Yum!
I pinned this by the way!
Since your previous post on pizza making, I've been thinking about how to do this method since Pampered Chef says you shouldn't preheat their stones. I contacted their customer service and they said it could crack from the temperature difference between the food and the stone. However, it seems that many people preheat their Pampered Chef stones and they do fine as long as you don't get cold water on a hot stone. I got rid of my pizza peel after I found it I wasn't supposed to preheat, but now I will be shopping for a new one.
I will definitely try this!! Back in the 1970's my young son was very allergic to dairy. I made all our own pizzas.He was 13 before he realized pizza came with cheese everywhere else, I think! I made it with sauce, barbecue chicken shreds, or (sue me), hot dog slices--we ate hot dogs then,sorry.. of course pepperoni, sausage crumbles, just no cheese.
Now we can all eat a little cheese, and this recipe looks awesome.!!
Madeline - That is why I started making my own pizzas too. My son can't have dairy or soy so cheese of any kind is out. I make his with sauce and frozen chicken nuggets (so don't feel bad about your hot dogs 🙂 ) This is his favorite meal so its worth it to me to make it.
I buy bread flour in 50 lb sacks at Costco, by far the best price and the yeast is SUPER cheap there as well, along with olive oil, cheese, pepperoni, hmmm, I sound like a Costco commercial, but it IS cheaper for those items. 😉
Hi Kristen, Thanks for sharing the recipe! I've been worry about baking up to 500 degree F because the direction in my parchment paper {Pergamino brand from Costco} says only safe for oven up to 425 degree F. I wonder if this is only for this particular parchment paper hmmm....
You know, my parchment paper box says 450, I think, but I have never had a problem with using it at 500. I have no idea why it says not to use it at a higher temperature.
A remote chance it'll flame - flame point of paper is, famously, 451F.
But really it won't do much if it does burn. There's not much to burn, since the stuff *under* the crust doesn't have enough oxygen; burning paper will just make the crust a tad crisper; and an oven makes an excellent firebox - the flames can't escape.
Kristen, can you freeze half of the dough? For just me and my hubby, we would only need one pizza!
Yes, that should work fine. Freeze one half of it before you let the dough rise, and when you're ready to use it, just let it come to room temperature, shape it, and bake it.
oooh, always on the lookout for new pizzacrust recipes, and this looks so incredibly yummy, that I might just have to try it someday!
Have you tried their other NY style pizza recipe? Delish. I LOVE the calzones too. You can freeze and then reheat.
I'm making an entire Cooks meal tonight. Baked Ziti( the bomb), focaccia( bomb again) and german choc. cake( extra bombalishis). Have you tried any of those?
This is great information! Thanks for posting the recipe. I'm going to try it this week.
We've been making pizzas for years now, and our favorite frugal tip is to hit up the salad bar at the local supermarket for a variety of toppings choices. Everyone can pick out what they want, and you only get what you need - no food waste! You can get cheese there, too, but it's often not cheaper.
Ah ha!! So THAT's the secret. Thank you. I'll be trying this out soon.
Well Done - I have tried a few pizza dough recipes and this was by far the best one. I had gotten a stone for Christmas and had used a few times but like you didn't really get much success from it. I did exactly as you suggested and it worked great.
My kids favorite(one of their favorite) dishes is my homemade stuffed pizza. I used to use pizza dough I bought from the pizza place. Now I make my own dough with my own sauce. I only need to get arround to making my own mozzarella and then I'll be all set 🙂 .... Great site and thanks for the tips
SO pleased to hear it. Yay!!!!
I made this on Friday and it was awesome. Thanks for the comment about doing on a baking sheet and then doing the last few minutes directly on the rack. My father-in-law had never had homemade pizza and LOVED it. I am sure it is also amazing on a pizza stone, but I recently gave mine to good will (oops!)
I made this too, the other night , and it was excellant. I've been making pizza for years and this was. Very good crust. I'm in between pizza stones right now, any suggestions. I use a cookie sheet and the crust does get nice and brown, but I'd like to go back to a pizza stone.
I've never had a pizza stone, and never really known anyone who has used one. For years I just sprayed my baker's half sheets with oil, sprinkled them with cornmeal, and put the crust in. But my family kept begging me to try to make crust like the Pizza Hut pan pizzas they love. I read online that the key to the "pan pizza" crust is extra oil in the baking pan. I started pouring 2 to 3 tablespoons of oil into them, spreading it all around and then putting the crust in the pan, omitting the cornmeal all together. (If you use 4 to 5 tablespoons, you will get a crust even more like the pan pizzas, but I try to keep the health aspect in mind at least a little bit...) Everyone really likes it this way, but I was just given a pizza stone and can't wait to try it out after reading this article. We'll see what the verdict is. Public opinion is very important at my house. All changes in recipes have to pass with a majority vote--(not really, but it does make life easier.)
I just made this over the weekend. Used a pizza pan instead of a stone. And baked at 450 instead of 500. Came out great!
I've perused all of the 75 comments above (lol), and I haven't seen anything on freezing the dough. Have you ever tried freezing it? I homeschool and work full-time, and it would be great to have several batches of frozen dough that I just have to thaw out during the week.
There are some directions in this post for freezing, over at Annie's Eats: http://www.annies-eats.com/2010/04/29/perfect-homemade-pizza-crust-tips-and-tricks/
Got them. Printed them. Thanks! 🙂
Kristen,
Do you leave the parchment paper in the oven when it is baking?
nevermind, saw the same comment above! :)!
Do you just use plain tomato sauce for the pizza sauce? And do you used pre shredded mozzarella, or do you buy it fresh?
Really like your site! I also used Americas Test Kitchen. Which I think is affiliated with Cooks? Either way I use to use both. Cooks has a great recipe for pan seared chicken. On the pizza topic, ATK has a deep dish that is amazing! The trick is a semi boiled grated potato in the dough. Also cooking the dough a bit before topping. Also a tip they give you, that if you don't actually have a pizza stone, you can use a cookie sheet turned upside down! And they are right. Anyway thanks for the roasted carrot recipe, going to try tonight.
Yep, I've made that deep dish pizza a bunch of times-very delicious!
I know this is an old post but I just wanted to say I always use this recipe and follow the directions for cooking it on a stone on high heat. It makes the BEST pizza we have ever had. Last time we made cinnamon bread sticks with half the dough..yum!!
Great recipe, although another example of why I need a pizza stone 🙂 I did use a baking sheet and placed straight on baking rack for an extra 5 minutes. Seemed to work pretty well. Thanks for the great pizza recipe.
I have been eyeing this for months now. Finally got the pizza stone you recommended for Christmas. Followed your instructions and it turned out perfect. Thanks again!! I love your blog!!
Yay!!! Isn't it so great to turn out a crispy-crusted pizza at home?
Suggestions for freezing?
This is a great tutorial and I am pinning it. In the past, I'd made one large pizza on a T-fal air-bake pan, but I'm ready to get more "real" about our pizzas now 🙂 Our family just did a bake your own night last night, and because I didn't have the right tools, I used an inverted metal sheet pan to preheat, then used foil to make our pizzas on. The pizzas were good... I used my James Beard crust recipe I'd used in the past, but the foil stuck badly on the bottom. I had to turn each pizza completely over to peel it off! Obviously not what I wanted.
So, I'd already read several reviews about the Old Stone Oven stone and that is what I am ordering on Amazon. My question is, were you able to leave your parchment paper in the oven, at 500 degrees for the entire baking time? I've read several other sources that say to remove the parchment after 5 minutes, but that seems like a pain... especially for a family pizza night. If you could answer, that'd be great 🙂 Thanks so much!
Yeah, I've left the paper in and it seems to be fine. I mean, it's pretty brown when all is said and done, but it works fine for me!
Made pizza over the weekend on my new pizza stone. This is now my go-to recipe for crust. It was SO much better than what I'd been making in the past. And thank you for the feedback. I actually cranked the temp to 550, and I still think the paper would have been fine the whole time, but I wanted to try sliding it out after 5 minutes and it worked beautifully. Slid right out from under the pizza. Thanks for sharing this post!
So glad it turned out well!
What do you do if you don't have a stand mixer? Can you mix it with a wooden spoon? Thanks!
You can, but you'll want to knead it a little longer than you would if you made the dough in a stand mixer.
Hi,
I just made your pizza dough this afternoon and to say it was a HIT is an understatement! 🙂 Thanks so much for putting out such a wonderful blog!
Question- do you use table salt or kosher salt in this recipe? The only change I made was to add 1/2 tsp of sugar to the dough.
I just use table salt. So glad yours turned out well!
Bread flour is not recommended because it makes a chewier dough--most pizzerias use AP. Extra-virgin olive oil is overwhelming a taste for pizza--very many pizzerias use corn oil. You really don't need a pizza stone (lots of wasted energy to heat it up)--use an inverted sheet pan, so what I do is to roll out and shape the dough onto a pizza pan lined with parchment paper, then I par-bake the crust to set the dough, then I cook the dressed pizza on the parchment paper (without the pan) directly on the rack.
Seriously, why do people come to pick apart and criticize other's recipes or methods? To each their own. If you don't like it done it a certain way or with particular ingredients, don't do it. Start your own recipe blog and stop interjecting your rudeness on everyone else's.
I buy my dry yeast at Sam's Club. Two 1# vaccum sealed blocks for less than $5. I open one and put the other in the freezer. After a year, I throw away what was left and open the second.
Try using cold water instead of warm. Refrigerate for 24 hrs. This slows down the fermentation process and makes the dough easier to work with and allows for a thinner pie. I agree, Cook's Illustrated is the best.
Kristen, Thank you so much for the recipe and directions. The crust looks completely delicious. I agree that Cooks Illustrated is amazing. I have America's Test Kitchen's (same people) I Can't Believe it's Gluten Free and a few other recipe books by them & they are so helpful.
I just made pizza with this recipe. The crust came out great. Every body in the house including my 2 year old daughter loved it. Best pizza crust ever!! THANKS
I'm so glad your pizza was awesome. Yay!
I have just started to try out your yeast bread recipes and I used your pizza recipe last night for the first time. It turned out beautifully! I don't have a pizza stone, so I baked the pizza directly on the parchment paper (and slid it into the oven using a rimless baking sheet). There used to be a bake-your-own pizza place in my area called Homemade Pizza Co. that instructed you to bake directly on parchment paper so I figured it was worth a shot. The crust was so perfect I don't even feel like I need a pizza stone! I have three little ones so I can see this becoming a Friday night tradition! Thank you!
So I've been searching for a crust like my local pizza place make sure it, and I googled "browned pizza crust." Yours came up and honestly it's the olive oil brushing that gives it that perfect flakey crust. Thank you. Look amazing btw.
I absolutely love this crust recipe. Also, all your tips for cooking on a stone are spot on. We make the best pizza now, and everyone in the family has fun helping.
Also, wanted to let you know that my nonstick cookware bottoms started peeling, so I decided to invest in All-Clad due in part to seeing how much you enjoy cooking with it. I got a wonderful deal on QVC! Can't wait for it to arrive, so I can start using it. I decided it was better to pay more upfront and have for a lifetime than have to replace every ten years or so. I may have taken this idea from you, so thanks for that!!!
I just wanted to tell you that I really enjoy reading your blog.
If you're on a budget, unglazed quarry tiles are an excellent alternative to a pizza stone. I bought mine at the local home store for less than a dollar a piece. Six of them were enough for me to cook on. They've worked beautifully for me. Best part about them is that they're modular. If one breaks, you can just individually replace it.
https://slice.seriouseats.com/2011/04/the-best-surface-for-baking-pizza-part-3-quarry-tiles-test.html
Also, if you don't own a good mixer, this no knead dough recipe is excellent. 400 g all purpose flour with 100 g bread flour seems to give me the best pizza.. I've made over a hundred pies with this recipe. No one has ever complained and I very rarely have leftovers.
https://www.seriouseats.com/recipes/2012/03/jim-laheys-no-knead-pizza-dough-recipe.html
I had a pizza stone once. It got really ugly looking and I couldn't get it to look clean again. Since you can't wash them with soap, I didn't know how to keep it nice and clean. How do you clean yours?
Mine looks ugly and dark! I just scrape it with a plastic scraper to get any bits off, rinse it, dry it, and call it good. It does not have to be beautiful, and as it gets more and more seasoned, it will get darker and smoother.
Two cups or four cups of flour? Not clear
So, you start with 2 cups of flour in the mixing bowl, and then a little later in the recipe, you mix in the remaining flour.
Hope that helps!
Are there instructions for using instant yeast?
The Red Star yeast I use, from Costco, is labeled as instant yeast, and it works just fine in this recipe.
I have 3 well used, aged bar pizza pans that came into my possession 45ish years ago that I like to use. I do have a pizza stone but I don't use that very often.
For dough recipe, I have one that I have used for years and years and then I also like the America's Test Kitchen recipe that came to my attention maybe 8-10 yrs. ago. Last week I made a sourdough pizza crust recipe that I found satisfactory alternative because my supply of yeast is low. And I use all different flours. Maybe I'll get some bread flour when things open up and do a pizza bake off trial.
Does the parchment paper go with the pizza onto the pizza stone?
How do you take it out if you are making multiple pizza. again with the peel?
I can't figure out how to slide the pizza in and out of the oven.
Thanks,
Want better flavored dough? Make your dough, then stick it in a covered bowl for 3-5 days in the back of your fridge to ferment slowly. Day of making pizza, portion into dough balls and let rise on the counter till your ready.
Fermented dough jas way better flavor. I personally use a sourdough starter.
I suggest:
Get steel instead of stone/tiles. Retains and distributes heat much better than stone.
Quarry tiles can have hidden faults within and cause them to literally explode.
Add a pinch of garlic powder to the flour.
Hand mix versus mixer causes the bubbles to be irregular bread like, mixer is a consistent finer bubbles... that decision is the dealer's choice
Hand spread versus roller. Hand spread does not crush the bubbles, rolling does. Rolling usually can provide a much thinner crust.
Pre-bake the crust with only cheese on it. Rest the crust till cheese firms up, then apply the toppings. (A Geno's East technique)
Use sliced cheese rather than shredded. Sliced cheese remains on the crust as you shake the it off the peel and provides consistent coverage.
Use a barbecue fork to poke the pizza (and spin it) as it allows the water from the toppings to escape to the steel, making the pizza less watery.
I've been making your dough for a long time and love it! Have you ever frozen the dough to use it for later? If so, how did it work out? Thank you!!
Yep, I've done that. I'd say the frozen dough is not QUITE as good as fresh, but it does still get the job done.
Just don't leave it in the freezer for more than a month or two; I left mine too long one time and it did not rise at all when I got it out!
Looks good. Though not used yet.
I’m really late to the party, but I just tried your pizza dough and sauce and we love them! Talk about cheap and cheerful! Thanks for sharing these!
Yay! I am so happy to hear this!
So I sprung for steel and a peel but I need to find some KA, in the meantime, I have a question: when I roll out the dough, is there a secret to keep it from springing back? Mine always seem to shrink back before I can get the sauce and toppings on. What am I doing wrong?
I make this recipe almost every Sunday for my family. The dough and pizza turns out consistently delicious. Using bread flour makes a difference. Start the dough late in the afternoon, and it's beautifully risen for dinner time. Thanks for sharing this keeper recipe!
Yay! I'm delighted to hear this.
I'm going to try your crust recipe. We've tried a bunch of good ones but we're still looking for the perfect one for our us. 🙂 I used to make pizza sauce as well but lately I just add some garlic, basil and olive oil to canned crushed tomatoes and use that and we're really liking it.
Italian 00 flour also makes great pizza! I order it from Amazon. It's also pricey but a bag makes a lot of pizzas. Added bonus, all three wheat sensitive/avoiding members of my extended family can eat it with zero after affects! I also use it to make pumpkin and banana bread in the breadmaker and it's nice to be able to have these things again. Note, that if you're celiac it does still have gluten. None of us are celiac and apparently it's not the gluten in wheat that bothers us. It sure makes the price of the flour worth it to us.
'Currently unavailable.
We don't know when or if this item will be back in stock. '
I guess everyone went with your suggestion