
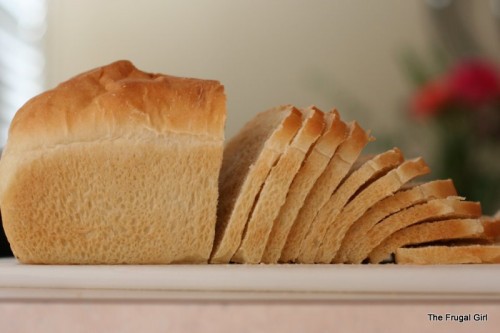
How to Make Homemade White Sandwich Bread
In case you're here just to do a quick recipe print: Printable White Sandwich Bread Recipe
When I posted about my baking day back in June, I mentioned that sandwich bread was one of the items on my baking list, and a number of you asked for the recipe. So, here it is!
If you prefer to make whole wheat bread, you might want to use my Whole Wheat Bread recipe, or you can substitute whole wheat flour for part of all of the white flour in this recipe. If you're not an experienced bread baker, I would probably not try for 100% whole wheat, though, as it's harder to get your bread to turn out nicely with nothing but whole wheat flour.
However, if you're looking for a white bread, this recipe will work well for you. I mostly make this when I need bread for panini sandwiches or for other dinner sandwiches. The recipe is from my old (it was published in the 70s!) Better Homes and Garden Homemade Bread Cookbook
In pictures, here's how to make the bread, and the actual recipe will follow.
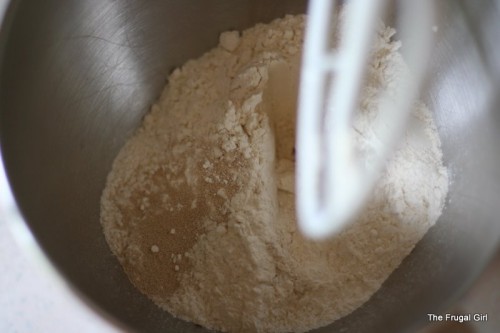
Combine yeast and flour in the bowl of a standing mixer.
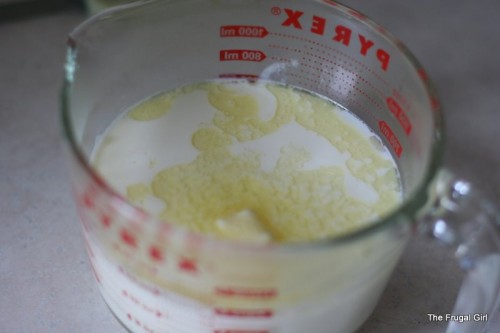
Heat milk, butter, sugar, and salt in the microwave or on the stovetop until it reaches 120-125 degrees.
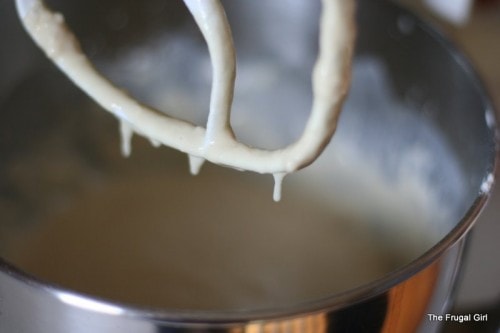
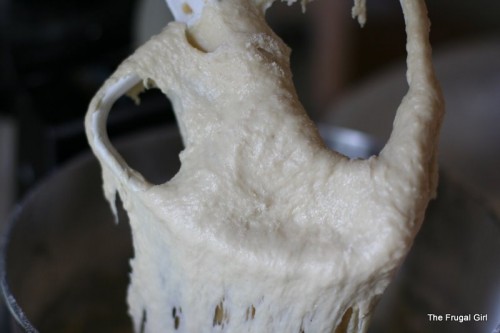
Pour the milk mixture into the dry ingredients and beat for three minutes.
Add enough additional flour to make a soft, but kneadable dough. See how the dough is stretchy? That's the gluten at work.
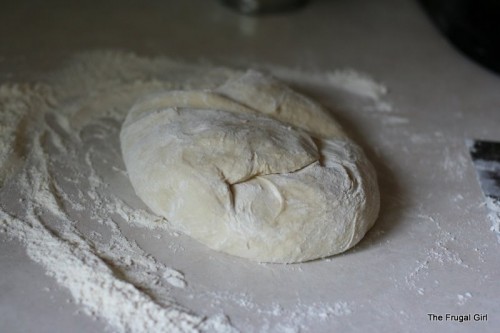
Turn the dough out onto a floured counter and knead for 5 minutes, or until dough bounces back when poked with a finger.
I think I took this picture partway into the kneading process, because my dough NEVER looks that neat when I first dump it onto the counter.
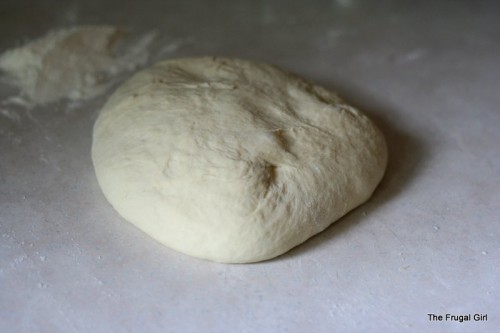
After you're done kneading, your dough should look like this.
Put it back into the mixing bowl, cover it with a wet towel, and let it rise for an hour. Once it's risen, punch it down, divide it into two pieces, and roll each piece into a rectangular shape.
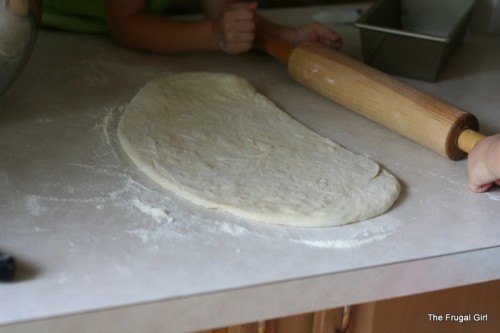
Starting from the short end, roll the dough up and place into a8x4 inch bread pan. The Williams Sonoma Gold Touch pans are my favorite.
Cover with a wet towel, and let rise for 30 minutes, or until doubled.

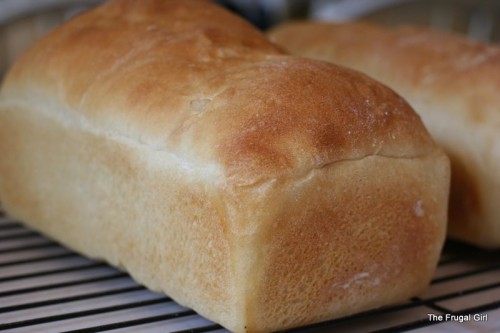
Bake in a preheated 350 degree oven for 20-25 minutes, or until lightly browned. Turn out onto a wire rack to cool.
And here's the real recipe:
White Sandwich Bread
Printable White Sandwich Bread Recipe
5 ¾-6 ¼ cups all-purpose flour
1 pkg (2 ¼ teaspoons) active dry yeast
2 ¼ cups milk (you can use water if you don't do dairy)
2 tablespoons sugar
1 tablespoon butter or vegetable oil
2 teaspoons salt
1. In a large mixer bowl, combine 2 ½ cups of flour and yeast.
2. In a saucepan or in the microwave, heat milk, sugar, butter, and salt to 115-120 degrees.
3. Add hot liquids to flour and yeast. Beat at low speed until combined, then beat at high speed for 3 minutes.
4. Add enough additional flour to make a soft, but kneadable dough, and turn out onto a floured surface. Knead for 5-10 minutes or until smooth and elastic.
5. Put dough back into mixing bowl, cover with wet tea towel, and let rise 1 hour.
6. Punch dough down, divide into two pieces, and roll into a rectangle, about 6"x18". Starting from the short end, roll up jelly-roll style and place into two greased 4x8 inch loaf pans. Cover with wet tea towel and let rise 30-40 minutes, or until doubled.
7. Bake in a preheated 350 degree oven for 25-30 minutes. Turn out onto a wire rack to cool before slicing.
I notice you were kneading your bread with the paddle attatchment? I always use the dough hook, but do you find the paddle works better? I made a blueberry cobbler today that I'm going to post on my blog!:P
Thanks for the newest installment! I was just searching your site for the sandwich bread recipe, I was sure you had already put it up! I will give this a go in the next couple of days but I will admit to using the bread machine for the mixing, I can handle the rising and baking now!
My counter is a dingy, small, tile counter with horrible grout lines and I just can't see kneading dough on it. One day I will try all of your recipes as you intend them. And maybe I'll have a flour drawer with my new counters in this dream house I've imagined! I've always wanted a flour drawer.
I have a large chopping board that I use to knead, for exactly this reason! Go to a catering/commerical kitchenware store and buy the biggest you can find.. mine was only about AU$15.
I'm so glad you post recipes. Just had to say that 🙂
I was going to make more bread tomorrow using your other recipe but I think I'll try this. I have some lunch meat I've been needing to use up.
Your pictures are really awesome. I think that's why I love your blog so much. I love seeing how things are supposed to look throughout the process.
Liz-yup, I only ever use the paddle attachment. I don't think I've ever used my dough hook! lol
Calimama-use your bread machine without guilt. 😉 I think bread machines do a fine job of mixing and kneading...they mostly fall short on the baking end of things, so if you use them just to make the dough and then bake it yourself, your bread should be very similar to mine.
Ariana, thanks for the encouragement! I always like seeing how things are supposed to look too...it reassures me that I'm doing it right.
I love making bread. I'll have to try this recipe.
I have two small children, so I divide my bread dough into quarters, roll each quarter into a loaf and put 2 loaves side-by-side in a square pan. When the bread comes out of the oven, the 2 loaves in one pan are easily separated. This makes for smaller slices and less waste for us.
Mouth watering! Wish it were not 90 degrees outside and I could turn my oven on. How about a bread recipe for a toaster oven, Kristen? LOL - just kidding. I love your posts and your photos!
@Sarah , what a great idea!
@Calimama@compactbydesign , you can knead dough on a floured cloth. You can buy a special kneading cloth kit (comes with a sleeve for your rolling pin) or make one yourself from heavy muslin or - maybe? - cotton.
You know what? I am actually going to try this...finally. I'll let you know how it goes!
hi kristen,
thank you so much for this recipe. my husband is going to be very happy. but i was wondering: how do you cut such even slices of bread for your sandwiches? do you use one of those bread slicers?
I love to make bread and can't wait to try your recipe. I can never get it to cut well though. Do you just use a regular bread knife to cut your bread? Inquiring minds want to know 🙂
I actually used your bread recipe last night. I like that it uses less yeast than all my other receipes (2 packets). The bread was great, so thanks! The only change I made was that I needed slightly more flour (7 cups plus some dusted on my surface).
I use a bread machine to mix my bread into dough then do the baking in the oven (today I am making some rye bread for turkey sandwhiches) - I guess it works alright, but I would love to make some bigger batches as well.
I have tried in the past with pour results, but I think I was just not letting it rise properly, I think I am ready to try again- well, maybe in the fall, I seem to be spending more time laying in the sun reading then in my kitchen :), but hey, summer is short lived here in Alberta and I don't want to miss it by being in the house!
Have a great weekend!
I made this bread tonight! It was very easy, and the girls were kind of fascinated by it. It turned out really well and smelled FANTASTIC while cooking. Thanks for posting the recipe! I'll definitely make it again, and I really like the idea of making the smaller loaves, thanks, Sarah.
First, I have to say that I love my WS Goldtone loaf pans also. Nothing sticks to them. They are fantastic and very much worth the money.
I'm going to make this bread tomorrow. I can't wait to try it. I've had so much luck with your recipes (the deep dish pizza is still a weekly menu staple). Thanks for sharing. You've made backing so much easier.
FYI - the instructions with the pictures say 9x5 pan but the recipe below state an 8x4 pan. The pans look like the 9x5 but I just want to be sure. Thanks!
Kristin, thanks for letting me know...I fixed it! It should actually be a 4x8 inch pan. When I made those loaves, I tripled the recipe and put the dough into three 9x5 inch pans. So you're right...that's what you see in the picture! lol
I hope your bread turns out great.
Christine, you should NOT feel bad about using your bread machine. Those things do a great job of making the dough and mostly just fall short on the baking end of things.
@Kristen
so if you tripled the recipe to make three 9x5 pans, can I assume that the standard recipe would make one 9x5 pan?
Gah! What a disaster I am! lol I meant to say that I doubled it, not tripled it. I guess had three in my brain because I was thinking about how I was making three loaves.
Duh.
The standard recipe would make a really large 9x5 loaf...you might have some problems with overflow.
I made a single recipe and divided it into two 9x5 pans and it turned out well. Might not have been as tall as yours but for sandwiches it works. Thanks!
Love the baking posts! I just wanted to add a few tips that have worked for me to reduce cost and waste. Please forgive if they have already been mentioned in previous posts, I am a recent fan of this blog.
I buy my yeast in bulk vacum packs at BJs wholesale club. According to my trusty Red StarCentennial Bread sampler, 2 and 1/4 tsp of bulk yeast equals one package of yeast. The extra yeast can be stored in an airtight jar in the refrigerator. According to Red Star, refrigerated open jar yeast should be used within two months, but I have gone much longer with no detrimental results.
Anyone hesitant to knead on countertops directly might want to consider silicone baking sheets. Got 2 at Christmas Tree Shops and it was the best $6 I ever spent. I knead everything on them, they are great for bread and piecrust. When dusted with flour nothing sticks to them. No more tearing and throwing away wax paper. Yah!
Hope these help!
Ummmm I like your bread. Thank you to share your experienced.
I am Thai, and I would like to thank you, Kristen, for your recipe and the pictures to show us step by step. I have a couple of recipes to make Butter Bread or a kind of Sandwich Bread. I finally settled at your recipe. My loaf turn out excatly like your pictures. My kids love it. I feel really thankful about that.
Laddavan.
I also had bad counters in my apartment. At home depot or lowes you can sometimes get
sink cut outs from pre made counters. They are great things to have they have many uses
I always use pillsbury bread flour, which I think is bleached (must switch!). Every time I make bread I use bread flour, I never thought about using all purpose. Is there a difference? I know bread flour is supposed to make the bread more chewy, but have you compared the two and actually noticed the difference?
Once again you have stated the facts about making your own bread at home, or buying it in the store. You did your homework on the figures and I appreciate it very much.
I agree with you in all points. Home make is best and if a person likes to bake bread, it is as though it is a gift to the family.
Thanks for all your helps. I love your recipes.
I am a brand new member and am enjoying gleaning new ideas and recipes. I haven't tried the Sandwich Bread yet, but I liked Linda's comment about the gift to the family. I know my family feels that way every time I bake breads. My own bread recipe makes 4 loaves of bread, so it is a rule in our house that the 1st hot loaf goes to another home....as a surprise. It is amazing how people react when you're at the door with a hot loaf of bread in your hands.
love it! but I forgot to roll it out with the rolling each one out and simply stretched it with my hands... and the bread tastes great! but they are still in the swirly shape (slightly larger because they did rise). Tomorrow i hope to remember to roll them out!
also, my didnt look as smooth as yours when i was kneading... it didnt affect the rising nor taste though. I do know I used the lower end of your flour portions (even at that a little was even left over).
How do you store this bread and how long does it keep? I made some sandwich bread from the back of the King Arthur bag and it is awesome but with only 3 family members I don't want it to go to waste by sitting out too long.
Great recipe, Kristen! I've made this one several times now and it's always turned out so great. We love to eat the slices toasted with butter and cinnamon-sugar. Delicious!
One thing I did have a question about - I was looking at the pictures and the instructions that go along with them and then was matching them up with the "recipe". The pictures say to let the formed loaf rise for 30 minutes and then bake - but the recipe says 30-40 minutes. What time is best? Do you normally just eyeball it to see if it's doubled anytime within that time frame? Also, the cooking times vary from the picture descriptions to the recipe. One says to cook for 20-25 minutes and the other 25-30 minutes. I may just be splitting hairs here but I just wanted to double check for the best results possible.
Thank you for putting your recipes and your frugality out there for all of us. It's been VERY inspiring for me and has actually pushed me into more cooking at home, baking, and sewing! I bought a sewing machine this summer and have been using it non-stop since. So, thanks for the inspiration!!!
The rising time is definitely loose...that can vary so much depending on the temperature of your kitchen.
The baking time...I have no idea why I put two different times down there! Whoops. That too can vary, depending on how light your bread is (bread that hasn't risen as well takes longer to bake), but I'd say 25 minutes is probably optimal.
I love your website and recipes! I stumble upon your site 2 days ago and have been intrigued ever since! I am definitely gonna try this recipe tonite and I have plans this week of making yogurt! I am tossing the idea around of starting my own blog. I love to cook, bake, craft, woodwork, and various other things that keep me occupied!
If you still get comments on these old posts, I must know... I've tried a few bread recipes before and while I love my homemade bread it always comes out slightly too crumbly and with a very hard crust, which makes it not so great for sandwiches... what's the texture and crust like on this one? I know that it's hard to get that charmin-soft texture on a home-baked crust, but I'd like something that doesn't break my teeth. 🙁 I've heard brushing various things over the crust during baking helps, but thus far I haven't had any success with that, either!
Sorry, guys! I sometimes have a hard time keeping up with comments and questions on older posts.
Crumbly bread is usually a result of poor gluten development or a dough that's too stiff. My homemade bread crusts aren't usually very hard...nothing like the crust that comes from a bread machine. They're not as soft as the store-bought bread, though.
If you try this and it doesn't come out the way you want, you could consider adding some vital wheat gluten to the dough. Commercial breads usually have dough conditioners and such added to them to make the texture extra soft, so don't feel like you're cheating by adding the gluten.
Aha! I knew there had to be a science-y reason for my crumbly bread! Thank you! I'll hunt down some gluten and try it next time 🙂
Hey Fae, I had the same question but unfortunately it doesn't look like this page is getting checked for new messages. 🙁
In the description, it states to heat the liquids to 120-125 but in the recipe it states 115-120. Would five degrees make a huge difference in this recipe? What temp do you usually aim for?
Ack! Sorry about that...the 5 degrees won't make a big difference. I usually shoot for somewhere around 120.
love homemade bread, just starting to learn how to make. Have a Sourdough starter I made 9 years ago, would like to use it in my Dinner rolls or whole wheat dinner rolls
Any ideas
I'm sorry, I have no experience with sourdough starter!
This is a great recipe, I have the same cookbook & it really is the best!
I mix mine in the bread machine; I don't like it to bake the bread but it mixes it wonderfully. 🙂
thank u for this recipe ,it`s a very,very good and delicious bread
I'm letting this dough rise now. I used about 1 cup less flour, as I was adding it bit by bit until the consistency of your pictures, and the dough you knead in that video. I also used a combo of breat flour and 1 cup whole wheat, so that might have made a difference. I'm looking forward to the results!
Me again. It turned out great! I didn't remember to roll it with a pin, I just hand pressed them into rectangles and rolled them, so the loaves were a bit short when they first went into the pans. I'll remember to use the rolling pin next time. I'll be sharing this recipe and using it often myself! Thank you!
I made this today and it was awesome! I did it by hand using a wisk until switching to spatula to mix in the remaining flour. I knead bread only till it feels right which is not long at all. 2-3 min! This is true for most bread now. I used to do the kitchen aide and the full knead and ended up with heavy lackluster loaves. Happy to report most bread is on par with Pañera now if I do say so myself. The family has turned into a bunch of bread snobs now though. My 5 & 1 year old hover the kitchen waiting for it.
Was just wanting to ask a question (sorry if its been asked before I read through some of them) how much does it affect the taste to use milk vs water? We can use dairy but if I can make it cheaper I will. But I don't want to sacrifice taste. Thanks. And live your site!
That was supposed to say love not live..
Water will work just fine, but the bread won't be as soft, and it won't keep quite as long. You could experiment and see what you think.
I have used this recipe twice a week for the past 4 weeks, and haven't had to buy store-bought bread at all during that time. Thank you so much for a fantastic bread recipe! The only thing I would add to what you've got here is that while it rises, it works well for me to place the bowl/bread pan on the middle rack of a cold oven with a 13x9 pan shallowly filled with very hot water placed on the bottom rack (turn the tap water to hottest setting and let it heat up, then fill the pan about 1/2 inch). This warms the oven enough to let the yeast do its thing, and keeps the bread from forming a dryer crust over the dough that might keep it from rising as much.
One thing I LOVE to do with this bread: roast a head of garlic in the oven for an hour or so until the garlic is dark and soft, then spread it on a slice of this bread and toast it. DELICIOUS!
Kristen,
I love your blog and enjoy reading it every morning !
I wish to make Jalapeno bread.
Can I use this recipe and add the jalapenos before shaping the bread (rolling)?
Advance New Year Wishes to you and your family !
Thanks,
Anusha
I think you could. I've never made jalapeno bread before, though.
How do you store your bread? I have mine in paper bags right now, but wasn't sure if there was another way to keep it softer or if I should do a ziplock instead.
I've tried various methods, but a good plastic bag really does seem to work the best. I just shake the crumbs out of mine when I'm done, and reuse it for the next loaf, so the bag can last for a really long time.
Thanks for sharing.
I have my first 2 breads in the oven and they look good.
I have been following you for a while with all types of savings and it is absolutely great
Kind regards
Philippina
Hi there,
Do you have a printable version of this recipe?
I added one just now for you!
I just tried making this and not only did I forget the salt, but the sugar got left out because it all sat on the bottom of the pan when and I didn't notice until later. The recipe didn't say to stir when I was heating. I am going to try again, should I stir the milk mixture to mix in the sugar?
I just use a spatula to scrape the liquid container out...that helps to make sure any undissolved sugar and salt make it into the bowl. 🙂
This recipe is very popular in our house! I am about to make my second batch this week! Keep up the good work! Your recipes are wonderful!! Thank you!!
Just leaving a comment to add my continual thanks for this recipe. I make 4 loaves at a time, and freeze the extra. I think I have it memorized by now, but I love having it here to pull up.
Isn't it great when you memorize a recipe? It makes the baking process so much faster!
I'm confused. The ingredients say 5.75 - 6.25 cups of flour, and then step 1 says 2.5 cups of flour. Does the remaining flour get added during step 4?
Yep, I'm sorry that I didn't make that clear. You start with just part of the flour, and then before kneading, you add in most of the remaining flour; enough to make a soft, kneadable dough.