
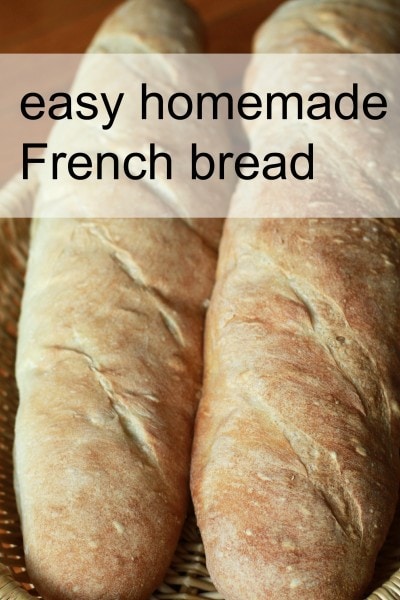
Homemade French Bread (aka possibly the cheapest bread ever)
This is probably the most inexpensive bread I make because of its simple, short ingredient list...water, salt, sugar, yeast, and flour.
Water and salt are practically free, a tablespoon of sugar costs pennies, and flour isn't very pricey either.
This recipe is not going to turn out artisanal loaves that rival what you'd get in a French bakery...this bread is more like a heartier version of what you'd buy in your local supermarket.
If you'd like to make your loaves more nutritious, you can substitute whole wheat flour for part of the white flour (I wouldn't sub more than 50% of it, personally).
I use this bread recipe quite often...we eat the loaves when they're fresh and hot, I use the dough to make bread bowls, and I make panini sandwiches, French Bread pizzas, and garlic bread with extra loaves.

Because of this, I rarely make one loaf! It's just as easy to make two, and then you can freeze one to use later.
Since the dough has very little sweetening and no added fat (both of which act as preservatives), you'll want to use or freeze your bread within a few days to prevent mold.
Here's a step-by-step process with photos, and a printable recipe is at the bottom for you!
First, combine the yeast, sugar, salt, and flour in a mixer bowl.

Add water and beat for 3 minutes.

Beat in enough additional flour to make a soft but kneadable dough.

Turn dough out onto floured surface...

and knead for 3-5 minutes, or until smooth and elastic.

Place in bowl, cover with tea towel, and let rise 45 minutes (an hour if your house is cold).
Punch dough down and roll into a long rectangular shape.
Starting from the long end, roll up jelly-roll style.

Place seam-side down on a greased baking sheet, cover with a wet tea towel, and let rise 30-45 minutes, or until doubled. How long this takes will depend on the climate of your house.
(The loaves below are obviously not risen yet).

Preheat oven to 400 degrees.
A hot, fully-preheated oven is key for a brown crust, so don't be tempted to default to 350 °F and do wait patiently for your oven to get to temperature.
This next stop is optional...it just makes for a shinier crust:
Whisk one egg white with one tablespoon of water until slightly foamy. Using a pastry brush, gently brush beaten egg white onto loaves.
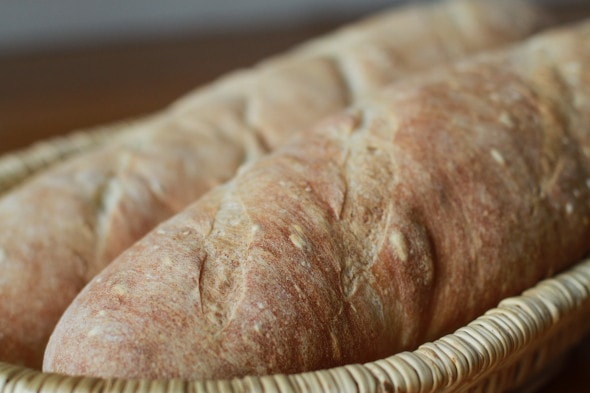
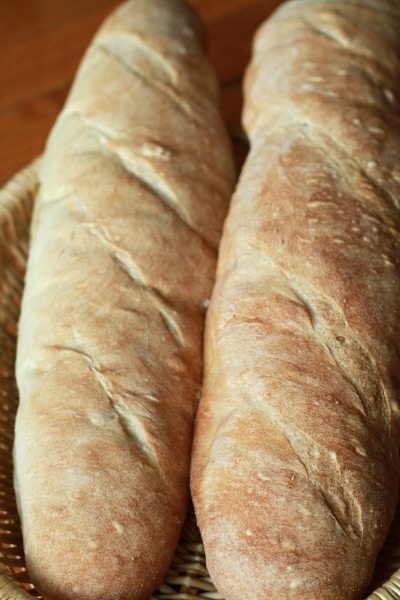
Using a sharp knife, make 3-4 diagonal slashes on top of the loaf.
These loaves are a bit over-risen...I got busy doing something else and forgot about them. Oops.

Bake for 15-20 minutes, or until nicely browned. Cool on a wire rack.

Easy Homemade French Bread
This bread is ridiculously delicious despite being made of very simple ingredients. Double the recipe and freeze the extra loaf.
Ingredients
- 2 ¼-2 ¾ cups flour
- 1 teaspoon salt
- 1 tablespoon sugar
- 1 pkg. (2 ¼ teaspoons) active dry yeast
- 1 cup warm water (120° F)
Instructions
- In the bowl of a standing mixer, combine 1.5 cups flour with the salt, sugar, and yeast. Add water and beat for 3 minutes. Beat in enough additional flour to make a soft but kneadable dough.
- Turn dough out onto floured surface and knead 3-5 minutes, or until smooth and elastic. Place in a bowl, cover with a wet tea towel, and let rise 45 minutes to an hour, or until doubled.
- Punch dough down, turn out onto counter, and roll into a long rectangular shape. Starting from the long end, roll up jellyroll style. Place seam side down on a grease baking sheet, cover with a damp tea towel, and let rise 30-45 minutes, or until doubled.
- Before bread is done rising, preheat oven to 400° F so that it will be hot when bread is finished rising.
- (optional: whisk one egg white with one tablespoon water until slightly foamy. Using a pastry brush, brush egg white mixture onto loaf.)
- Make 3-4 diagonal slashes on top of loaf, using a sharp knife.
- Bake for 15 minutes, or until nicely browned. Cool on a wire rack.
Notes
The high oven temperature is essential. Use 425° F for an even browner crust. Make sure the oven is fully heated before you bake your bread.
This bread has very little fat/sugar, so it doesn't keep long. Freeze what you won't use in a day or two.


Yeah and if you snatch a few packets of sugar from work or the next time you're at a restaurant it's even cheaper. 😉 (just kidding of course.)
I've been thinking of trying French Bread for a while. Part of the reason is that I love getting a sub at either Subway or the local place but I can't justify the price. French bread like this is ... well moderately priced (I can get two 18 inch loaves at BJs for $3) but I can see this being a heck of a lot cheaper.
I do want to try using more whole wheat for my bread. Of course I'm also trying to find something to match the quality of those multi-grain breads at Subway (yes I know that honey oat is really just wheat bread rolled in a honey/oat topping but it's still delicious!)
This is probably a silly question, but do you ever cover the bread with plastic? I used a towel once to cover the dough and the dough got stuck to the towel.
Hi! I bake quite a bit, and I use Cling Wrap. It works just as well. Hope that helps. ^~^
@Cheryl,
When I make this, I use moist paper towels and have no issues.
When I make french bread, I substitute whole grain spelt flour for half of the bread flour. I also use spelt flour in pita bread, naan and bagels.
I love French bread! There's a picture of me at the age of 4 helping my dad make a few loaves - easiest recipe in the book. I never tried brushing the crust with egg white, though.
@Cheryl - Make sure you're using a towel with a very low pile, like a flour sack style. If you still have a problem with the dough sticking, use a little oil to brush the surface of the dough instead of the egg white. I do that with my french loaves on days when it's really humid (which is when the towel will be most likely to stick!).
Thanks so much for this! I've been wanting to get a decent french bread recipe to start making and keeping fb pizzas and garlic bread in the freezer for a while now. I can't make this before Sunday - but I have a feeling I know what my afternoon then will look like now.
Rather flour covered and smelling yeasty.
I frequently make baguettes (I found a baguette pan for a quarter at a thrift store!), but how do you make bread bowls? For instance, how many bowls would this batch of dough make? How do you get it to stay spherical, rathern than sagging into a flat circle? How long do you bake them? Inquiring minds want to know!!!
Love your blog--I look forward to it every day. Some day I'm going to get brave enough to sand & paint my own furniture findings. 🙂
Thank you for this simple repcie. I made this tonight and it was delicious. I used 1 cup each of the sugar and it was sweet enough. This is coming from someone who loves sweets.
I'm going to make this right now! I love fresh made bread. Thanks, Kristen!
Kristen, I just noticed you use a standing mixer. I don't have one- can I use this recipe and mix it by hand?
Angela-yep, you sure can. Just mix up the dough as thoroughly as you can before adding the last bit of flour, and then you might want to knead it a bit longer by hand. It should be nice and elastic when you're done. Poke it quickly with your finger, and if the indentation fills in quickly, then you can be done kneading.
Kristen do I have to let my yeast bloom frost I am new to baking
Generally, you don't with the current types of yeast out there. That was more common 30-40 years ago than it is now.
Thanks Kristen, and for post on the question. I bake a lot of "quick breads" like pumpkin, banana, gingerbread, etc. and those obviously don't need the stand mixer. And I know you don't actually NEED the stand mixer, because like you said, people have been baking bread for centuries. I always have to remind friends of that when they're incredulous that I don't own a food processer, because I bake so much, and do it all by hand. But I wondered what the difference would be with your recipes if you wanted to do it by hand, and you've answered that very thoroughly in the post. Thanks so much!
I made the bread last night. It was awesome. Thanks for the recipe.
I made this Sunday night, and it was delicious!
Can I double this, or am I better off making two loaves separately?
Des, you can make as many loaves as you want at one time. I made four yesterday, in fact!
Kristen,
I am loving this super handy recipe, and was wondering if I could run it as a guest post on The Non-Consumer Advocate?
Thanks,
Katy Wolk-Stanley
"Use it up, wear it out, make it do or do without"
Found this recipe at Katy's blog, and made it for the first time on Sunday morning. By Sunday afternoon it was all gone! And I couldn't believe how easy it was. Thanks soooooo much for sharing it.
I'm going to try it. I made the grilled pizzas last night, and my crust didn't rise while cooking. I discovered, after researching posts here, that I had too much flour. We still had the pizzas, though. They were just thin crust. Very thin crust!
Can you roll other things into the loaves like herbs and spices? Maybe butter? Will that affect the rising while cooking? Just wondering.
I'm going to try it. its much more cheaper than our bread that we sell here in our bakery!
I love making this bread because it doesn't require a loaf pan. I only have one loaf pan, I think I need more with all of these great bread recipes. Thanks.
Thank you so much for sharing this recipe. It was delicious and easy enough to motivate me to make my own bread more often! I think I'm going to try your garlic bread next.
Yay Kristen! I did it! I made my first yeast bread and broke my kneading virginity 😉 I'm so happy and thanks to you and your blog, I did it. I followed your slideshow of photos dutifully and my french bread came out brillantly. I made two loaves and plan to use one tonight w/ a yummy vegetable soup and use the second tomorrow for your french bread pizza recipe. You rock, Kristen. Keep up the great work and especially, Wednesday baking 🙂
My 8 year old son and I made this today. It was very easy, super fun, and so delicious. Thanks for sharing the recipe.
I would loke to know how to make the bread bowls.
I will never buy French bread again! Thank you so much for a god recipe. I went on a baking frenzy last night. It turned out so good, I'll think I will use it for steak sandwhiches next time.
I haven't been reading your blog for very long, so I'm so glad you linked to this in your "Beef au Jus" post. Making bread products from scratch and quickly making my short list of things to add to my kitchen repertoire, and this one sounds like a great place to start!
This bread can even get cheaper yet. Instead of buying those small pkgs of active dry yeast, try buying a bulk pkg of yeast and freezing the extra for future use. I have done so for about the last ten years. My last yeast purchase was about three years ago with no poor performances to date.
Another great recipe-and again thanks for sharing! Made it yesterday and it is delicious!! A little bit left over to go with tonights meal! (just two of us or it woulda been GONE) 🙂
I've made this a few times recently, and it's so yummy. Kristen, if you double the recipe, do you also double all the ingredients (yeast and all?). Also, have you tried this in a bread machine?
This recipe is great! My roll ended up longer and skinner than yours though. I should have cooked for about 10 minutes only. It ended up so tasty! Thanks!
Kristen, thank you so much for this great recipe, i am making this bread every week now.So easy, tasty and cheap!!!! THANKS a bunch!!!
BTW:love your website and admire you too !!!
Thank you for sharing this recipe! I had all but given up hope that I would ever be able to make a loaf of french bread where the crust wasn't as hard as a rock! The very first time I made this recipe the bread came out golden brown, and I was so fearful that once it cooled the crust would be hard as always. But it was sooo soft and delicious! Thank you for this recipe!!
I made a few loaves of this recipe last weekend - it's been my most successful bread yet! The first loaf came out a bit dry (probably because I don't use the fancy flour) so we used it for French Toast on Saturday morning. The next go-round, I added more warm water and cut back on the mixing time, and the second loaf was perfect. Thanks for posting your recipe!!
So what's the trick on how to make this into bread bowls?
Have you ever tried a starter instead of yeast? I've been using one I started last year for my weekly bread making.
Also if bread is still left over at the end of the week, I make croutons. Cut bread into cubes, fry with a little butter and seasonings of your choice, bake at 300 F for 10-20 minutes.
I have made this twice and making it again tonight for french bread pizzas. My whole family loves it. I used to buy 4 loaves of french bread a week at 2.80 a loaf, so this will save us a lot of money. Thanks for the great, easy recipe.
Hi! Is it 1 cup of flour to start in the mixer or 2? The full-picture version says start with 1, but the printable version says start with 2. Thanks for clarifying. Can't wait to try this!
Sorry about that! It doesn't really matter a whole lot, but I usually start with somewhere around 2 cups.
I made a double batch of this last night and it came out awesome! This was the first time I have made a successful and edible loaf of homemade bread. Thank you so much for the recipe and I love reading your blog, it is an inspiration to me as I try to live even more frugally than I have been.
Thanks for the great recipe! We love it. I have made it twice. Doubled the second batch and used half whole wheat flour. My hubby actually prefers it that way. 🙂
This is excellent! Thanks so much!!
I made your bread! It was so so so so good! My new favorite bread!
http://happywifey.net/2013/02/french-bread/
Thanks <3
So glad to hear that!
I'm amazed that it turned out so well. Thank you very much!
Hi Kristen! Thanks for a great recipe! Do you think this would work with bread flour?
Yup! I've done that before and it works fine.
I have traditionally bought take and bake loaves of French bread for our Sunday morning breakfast, because all I have to do is bake it for 15 minutes and I have fresh, hot from the oven bread. Is it possible to refrigerate the dough at any point in the process to cut down on the time of preparing in on a Sunday morning?
To replicate that kind of thing at home, you'd just want to underbake your loaves a bit. Use a 350 oven instead of 425, and take the loaves out when they're still a bit on the blonde end of things rather than the dark brown end of things. Let them cool, wrap them in a plastic bag, and then take them out of the bag and bake them in the oven on Sunday morning until they're hot and darker brown.
Im curious why you didnt let your stand mixer do the kneeding in addition to the mixing.
I prefer to have a little more control over my kneading, and honestly, once the dough has been mixed for a few minutes in the mixer, not a whole lot of kneading is necessary!
You can certainly let the mixer knead the dough if you prefer, though.
Thanks for the reply.. I was just curious.. I've been making bread by hand (no machine) for at least 30 years and I think the machines are great after getting one a couple years ago. 😉
Thanks! This is a delicious, simple, inexpensive recipe. I love it!
Thanks so much for a great recipe! I have tried several french bread recipes that have been total flops! We tried this last night and it was awesome!
Can this be done in a bread machine?
I just made this and it is so good. I can't wait to try it with French
Bread pizzas! Thanks for the recipe!
I made the French Bread and served it with my homemade spaghetti sauce. It was so EASY to make and delicious!! Thanks so much for the detailed instructions...they were easy to follow and my family loved the bread.
I was wondering if you could use cling wrap to cover the dough instead of the towel? Also what is the best way to reheat this in the oven? Thanks for the recipe!
Yes, you can use cling wrap-I just prefer a towel because it's waste-free.
I haven't reheated mine in the oven, but I imagine if you wrapped it in foil and baked it for 10 minutes or so, that would do the trick.
I am assuming to make the bread bowls, you simply shape into a round loaf? Would it make one big bowl and/or two smaller bowls? My son loves soup in bread bowls and would love to try this for him!
It all depends how big you want your bowls to be...I'd think maybe three would be good from one loaf's worth of dough, but you can play around and see what works best for you.
Looks like a great recipe and I can't wait to make it to go along with soup this weekend. Just curious though ... can this be made in a bread machine?
Thanks, will try this it looks quite doable.
I made your Easy French Bread last night, and it turned out wonderfully! As a novice bread baker, I appreciated the easiness of the recipe and the detailed instructions. Thanks for a great recipe! I want to try whole wheat bread next.
I agree! I'm not very experienced with baking, and she made this recipe so easy to follow! Makes me feel like a pro!
THIS IS AWESOME!!! My picky husband said it was the best bread he has ever had. Thanks for the recipe!!!!!!!
Woohoo!
I just wanted to thank you again for this great recipe! I have some loaves in the oven right now. This is such a simple recipe, and makes such delicious bread! I love the short list of ingredients, and the use of the hand mixer. And, my family lives the fresh-from-the-oven taste! I'm going to underbake a few small loves, freeze them and heat them up when we're ready for them. Thanks!
I love this simple and delicious French bread recipe. I have made them often, since my family loves it so much.
I did have a question, can I use equal amounts of oat flour to make this bread? Thank you!
Oat flour has very little gluten, so using only oat flour wouldn't work, sadly. You could substitute maybe a half cup to a cup of flour for oat flour, but beyond that, your bread will have a lot of difficulty rising.
Does anyone know how long these stay good without freezing? I was going to use this to make french rolls that I need for 2 separate meals during the week but would like to make them ahead.
Made two loaves this afternoon and they are just gorgeous! I'm having to resist the temptation to cut into one before dinner is ready!!! I had a little trouble telling when it was ready to be kneaded, I had to put it back in the mixing bowl and add some more flour one time, but other than that this is a great and easy recipe to follow! Thanks for posting!
I've made the recipe several times in my bread machine. I take it out after the 2nd rise cycle then form my bread, cover with a towel and let it rise! It is amazing and a keeper recipe. I also add some garlic powder and grated Parmesan Cheese... Yummy.. Thank you for sharing...
The loaf looked perfect until I brushed the egg whites on and then it fell flat. What did I do wrong?
Hmm...did you use a light hand when brushing on the egg white? You do have to be gentle with risen bread.
Maybe try it again without the egg wash (I don't do the egg wash very often myself!) and see if that works better for you.
This looks so good. My family is gluten -free, though. Has anyone ever tried this in a gf version? If I can get this to work gluten-free my daughter and husband would be so excited!
Have you had the chance to try this with gluten free flour? I was wondering the same thing.
I made this bread today and not only was it easy to make but it came out delicious! I've been pulling pieces off the loaf all day and gobbling it up. Thank you for sharing.
This recipe was delectably simple and went perfectly with some homemade French onion soup. My children and husband were wowed by how delicious the bread turned out, especially as a dessert with butter and honey. I enjoyed the soft, slight chewy crumb texture. I chose to let my stand mixer do the kneading for approximately 5 minutes before the initial rise. I also placed a shallow pan with water on the oven rack below while baking for a slightly crustier crust. I found your recipe linked on Money Saving Mom and now I have another fantastic blog to follow. Thank you, TFG!
Yay! So glad it turned out well for you, and also glad to have a new reader on board. Welcome!
I've been wanting to try this recipe for some time. Made it this afternoon and it was awesome and so easy! Thanks, Kristen
It's ridiculously tasty for how few ingredients it has, isn't it? I'm always amazed.
My family loved this bread! I don't make much bread due to time and effort not this was easy. In fact, it is a great recipe for kids that are interested in baking. Both my kids helped out making loaves. With it being so simple, they made it with very little assistance.
This was so easy to make and so delicious. I made one loaf to have with our Sunday dinner and now I am excited to try making bread bowls from the dough. Thanks for sharing this!
https://www.thefrugalgirl.com/2009/03/wednesday-baking-cheap-cheap-breadfrench-bread/#comments
This was the bomb posted on your facebook page - thanks again and God bless you for teaching me a great bread recipe i did not screw up
I'm so happy it turned out well!
This may be a silly question but do you use all purpose flour or bread flour?
Not silly at all! For this recipe, I find that all-purpose flour works just fine. Bread flour would also be great, but since it's generally a little more expensive, I like to use all-purpose when possible.
Love your recipes, but I realy want to know why can we not put them on pinterest, I would love that much easier to keep them,
Oh, you should be able to! Lots of people put my recipes on pinterest.
I've been using this recipe for almost a year and my family loves it. I was wondering though if I can use whole wheat flour instead of all-purpose flour? Thanks!
You can, but it'll definitely change the texture of the bread. I'd maybe try using a 50/50 combo of white and wheat at first and then you can adjust from there as you wish.
I've made this for me and my fiancée twice now since finding the recipe a week and a half ago. It's just that easy and nothing beats the smell of baking bread.
Do you use bread flour or all purpose?
I was a little nervous about bread baking as the process seems complicated to me, plus I'm just getting used to a new oven but I gave this recipe a go and WOW. I'd like to give up my job so I can stay at home and bake this bread all day. Thank you Kristen from my little family in New Zealand.
Made this french bread today to go with soup. This is wonderful bread and I like the soft crust.
Yay! So glad it was good.
I made this bread yesterday and it came out so well. Had it with a cup of hot vege soup and love it....thank you and it's healthy too without fat.
I have made many loaves of bread and this one ranks up there at the top. When you pop a slice in the micro a few seconds its just like fresh again. The only thing I can say about the bread that is wrong , is that I can't stop eating it. Made 1st loaf day before yesterday and 2 more loaves yesterday 🙂 Thanks for such a great bread recipe. Your instructions were very easy to follow. I link to the hint you gave of how you can tell if the bread is kneaded enough. Didn't know that! Very helpful hint.
Yay! I'm so delighted your bread turned out so well.
Love your bread and your blog! You taught me how to bake bread a few years ago whether you know it or not; life has been awesome since!
Question on this one (and I've had it happen once before making tortillas): I find that I end up adding what seems like too much flour (because it isn't knead able because it's so sticky) that it loses elasticity and ends up a little lumpy (or dry might be the better term).
Thoughts or advice?
You definitely don't want to add lots of flour...that'll make it hard for the dough to rise.
Have you tried using a dough scraper to help you knead? That can help make sticky dough more manageable.
This is so good! I was looking for a bread to go with soup for dinner and since you linked to this recipe today I decided to try it. Win! I made a double batch and just want to eat it all.
I needed a nice round bread loaf to make muffuletta, so used this recipe to make a 10 inch round and a little sub sandwich-sized loaf. It came out perfect!
Bread making is my new obsession... gonna make this tomorrow... right now I have 3 different breads on the counter....may have to give one away....
Hi Kristen!! I was just thinking how I've been making this bread for about 6 months now but have never commented to say thank you. I'm a bread baking-obsessed crazy woman, but even with all the "fancy" stuff I try, this is my go to. I can do it from start to finish in under 2 hours and have it memorized since I don't measure the flour - I just add slowly until it pulls away from the bowl. I do let the stand mixer do the kneading for me because I'm lazy, but hey. To each their own right? The main reason I'm commenting though, is to give you an idea. Recently I was reading about how fat and sugar as preservatives change bread. I have another bread recipe that uses an egg yolk. So because all of the ingredients are cheap, I decided to add an egg yolk to your recipe. I can't tell you how the flour measurements changed since I don't measure anymore, but it can't be by much since it's only one egg yolk. But oh my goodness, it transformed into a totally different bread!!! It makes more of a challah/brioche type texture to your bread. Now, when I know I'm going to make your bread for dinner, I simply have to decide "to yolk, or not to yolk". If I'm making italian food, no yolk. If something like meat and potatoes, I yolk. ANYWAY, just wanted you to know that it might be a fun experiment to try on one loaf the next time you make bread. As a side note, I add this half way through the flour additions so that I don't accidentally cook the egg with the hot water. Thanks so much!!!!
I'm so glad this is working well for you! And so great that you've been able to modify it with an egg yolk.
This rolling tip is the best! But now all the flours have barley in them and I can't have barley. This used to taste so good and I make even better than baguettes at whole foods. Do you know where to buy real only wheat flour? I'm dying to make this again.
Have you checked into King Arthur flour? I wonder if their flour has no barley in it.
Also, I read that the Whole Foods 365 brand of flour does not have barley in it, so check into that!
Thank you so much! I wound up with 365 and it did not taste like king arthurs bread flour, that and all purpose have barley. The flour seems to be key in flavor but I'm ready to do their (ka) bread flour just to see if the flavor is the same. Thank you again, this is the best French bread I've ever tasted outside France.
It's not the same. King Arthur used to be so good but without barley isn't even available any more. You're so right: the flour drove the taste.
Hi can you tell me what type of fooor you use please, I live in England, many thanks x
I use an American brand of flour...Gold Medal unbleached. King Arthur is another good brand here in the U.S. I'm not sure what's available in England!
Hi just read fooor instead of floor sorry about that, I was going to try strong white floor which is what I usually use when making bread, I'm hoping this will work if not I'm going to try self raising floor so fingers crossed x
What a great idea. As I get older I don't like to grocery shop. This is perfect. Also....you can find great mixers at thrift stores lately. Mine us,an old 1950s white model
After five years and lots of phones I'm still searching for this recipe. Adding the word French helped. Boy you've got a lot of copycats! Definitely have a great site! Has anyone noticed that most of the flour vendors are adding barley and still calling it wheat flour? Even King Arthur! "Wheat flour with added barley" is what it should be, it seems to me. A lot of people are allergic to barley. And despite all of the lactose intolerant people, they're adding milk to the butter and cream and not titling it accurately! How unfrugal is that to get home and find out you can't use what you just paid for-- plus your time isn't free. Thank you again! Delicious!
Lactose is present almost exclusively in dairy products: milks, cheeses, yogurts, butters, creams. Butter is made from cow's milk and therefore contains lactose: one portion of butter (10 g) indeed contains 0.06 g of lactose.
Can this be made in two loaf pans
I have never tried that; you could, but then it would be more like a chewy loaf of white sandwich bread than French bread. 🙂
Hi MS. Judy, I have turned this loaf into bread bowls, and rolls. It's very forgiving. If you read further down by adding and egg yolk it changes the texture and the taste, is wonderful. I'm making it again today into rolls. Hope this helps I just usually make a double batch for whatever I am making. Have a Blessed day
The bread is rising for the final time now! I can't wait to see how it turns out. A ripe avocado on my counter is just waiting to be spread on this in the morning 🙂
I love this recipe. I make it 2 loaves at a time and freeze the extra. Thank you!
Disappointed with first attempt, will try again!
I'm sorry to hear that! If you want any trouble shooting help, just let me know what went wrong and I can try to assist.
My gosh some of the best French Bread ever! Cheaper than dirt.
Thanks for this great recipe.
I have made this bread so many times in the last few weeks. I was initially skeptical but it was very easy and delicious. I used KAF bread flour (because I already had it on hand). My daughter loves a slice straight from the oven - with butter of course! Thanks for a keeper of a recipe!
Oh yes, I especially love the crusty end piece, hot from the oven, with butter. So heavenly!
I'm really glad you are enjoying the recipe.
I just did a double batch with only 2 t of yeast (I was trying to do a longer rise for flavor). It took probably an hour to rise. Next time I'm going to try with only 1 t for the double batch. I'm trying to get to 4-5 hours on the first rise.
I live in Boulder, CO so I know elevation may have some sort of effect on the baking, but I have had mine in the oven for 25 minutes now at 400 and the outside is still browning nicely (doesn't appear burnt) but I have a layer of dough that still looks wet in the very center. Any suggestions? I'd love to make this again in the future.
Do I have to knead by hand or can I use the bread dough hook with my KitchenAide?
You can definitely use the dough hook!
If I used rye flour, would it still work?
Or half rye, half gluten free flour?
Using gluten-free or low-gluten flours is definitely not gonna work without modifications. You'd be much better served by using a recipe that's designed for those flours because they behave SO differently in yeast bread than regular flour does!
First time trying this recipe and I was following the step by step with pictures. Beware! Sugar is not listed. I noticed it too let and had my bread on it's first rise. Hopefully it will turn out okay.
Oh, goodness, I don't know how I missed that for so many years!
It's fixed now. Thank you for letting me know.